Wednesday, February 12, 2014

Work with TF.exe from Visual Studio Package Manager Console

I work with Team Foundation Server and I have found sometimes it takes lots of mousing [I mean mouse movements] to accomplish a certain task.  While if you don’t know then all the commands that are available to us from Visual Studio are also available from the command line.  Oh! wait it is the Visual Studio command prompt. So there is just one thing you will have to do in order to make TF.exe available from almost everywhere.  Add the following path to your system environment variable and TF.exe will be now accessible from the command prompt. 

C:\Program Files (x86)\Microsoft Visual Studio 12.0\Common7\IDE

[This is the path for Visual Studio 2013 installed on my machine. If you are using VS2012 then change 12.0 to 11.0 version]

After this you can just do like this Win + R + cmd and Enter.  Then just type TF /?

image

Since this is available from normal command prompt what would prevent us from opening PowerShell and try there. 

image

Oh! It works there.  Btw this was my favorite approach to work with Team Foundation Server until I thought what if this would work from Visual Studio Package Manager Console which is using PowerShell. 

image

Awesome. So why I like this approach? If I am working on something in regular PowerShell and to find pending changes I have to navigate to my working directory to do tf status.  But with Package Manager Console I can just do tf status and it gives me pending changes for just that project and that particular branch that I am in.  Try doing pwd it will give the current location of your project.  And since docking in VS is supported for all the windows I just dock Package Manager Console to another monitor.

I use regular PowerShell and Package Manager Console for committing changes to TFS interchangeably. 

Sunday, February 9, 2014

PSBuild makes working with MSBuild.exe easier from PowerShell

PSBuild is a project started by Sayed Hashimi to simplify working with MSBuild.exe from PowerShell. It is hosted on gitHub.  I really like this project because I love PowerShell and if I can do things in PowerShell then I am more inclined to use PowerShell first. 

PSBuild installs into your Modules folder and is available once you install it by the following very simple command. I love projects that go one extra mile to make setup as easier as possible.  Open PowerShell and copy the following command and paste into console by just right clicking your mouse.

(new-object Net.WebClient).DownloadString("https://raw.github.com/ligershark/psbuild/master/src/GetPSBuild.ps1") | iex

Once you have installed it, you can list all the commands available by this command.

Get-Command –Module PSBuild

image


The most important command we are interested here is Invoke-MSBuild cmdlet.

Get-Help Invoke-MSBuild

There are lots of examples on how to use Invoke-MSBuild

Get-Help Invoke-MSBuild -Examples

image


MSbuild is very powerful and rightly so as it is used to build visual studio projects.  With Visual Studio 2013 MSbuild is being shipped with Visual Studio and is now referred to as MSBuild 2013. Previously it was shipped with .Net framework and versioning was also different now the version is bumped up to 12.0 from 4.0 to match with VS2013 (it is 12.0). It also comes as separate package known as Build Tools Package. This allows you to install the Build Tools Package as standalone and create a light weight build server. Path to MSBuild has also been changed and Invoke-MSBuild makes it easier for us to not know these different versions and hunt around for paths.  If you want to get MSBuild.exe then you can use one of the cmdlets as


Get-MSbuild


image


Another one to check the versions


& (Get-MSBuild) /version


image


If you want to get the MSBuild.exe help then


& (Get-MSBuild) /help


As you have noticed,  you can invoke MSbuild like this if you want but Invoke-PowerShell is better because you don’t have to second guess the syntax of properties and target that you will specify.  You pass properties as hash table. Let’s do something interesting here.


I am going to create an empty asp.net mvc website and try to build it and then publish to IIS website using a publish profile.


image


Simple call to build the project.
PS C:\BadSourceCodes\demoWebApp\demoWebApp> Invoke-MSBuild .\demoWebApp.csproj


image


You can get the latest log file


PS C:\Get-PSbuildLog


And if you want to open the log file then


PS C:\Open-PSBuildLog


Since this is a web project you can setup web publishing inside visual studio.  You can see these series of article on how to do web publishing here. I have created a website in IIS7 and setup Web Deploy publishing for that website.  Thanks to Sayed for his blog post - I was able to publish my website to the IIS website I by passing these parameters.


>Invoke-MSbuild .\demoWebApp.csproj –DefaultProperties (@{'Configuration'='Release';'DeployOnBuild'='true';'PublishProfile'='Default Settings';'username'='myusername';'password'=’password';'AllowUntrustedCertificate'='true'})


image


With PSBuild you can create a script that you can schedule to auto run on your build server that will automatically build the project and deploy the web project to IIS website.


Go check out the project on github and happy automating.

Thursday, January 16, 2014

Making TypeScript compile on TFS2010 Server

Issue:

So the thing is TypeScript is not included with VS2013 out of the box.  I thought it was included but it not I had to download “TypeScript for VS2012 and VS2013” and install locally. When you try to build your web project locally with VS2012/13 then it will produce .js file.  So that’s well and good.  But when you try to build on build server it will not work. As expected because it doesn’t have the Targets to compile .ts file. 

Resolution:

1.  Like most build environments if you have VS2012/13 already installed on your build server then download the “TypeScript for Visual Studio 2012 and 2013” and install on the build server.  This will build the .ts file into .js file on the build server.  However, keep in mind that when you build your solution locally this file (.js) is also created locally and this file should not be included in your source control folder just like normal practice we don’t include .dll files from the bin folder or .exe files from obj folder.  Exclude that file or convert that file into .ts file and delete the duplicate file.

2. Another way to compile TypeScript files on the Build Server is detailed by Tom DuPont – And that is to create separate folder on Source Control and reference the targets from there.

I am sure there are other ways but I found method 1 to be easiest as I already have VS2012 and VS2013 installed on the build server.

Wednesday, December 4, 2013

Fixing TF215097 error while using Nugetter on TFS Build 2010

I got the following the error while trying to run a build on TFS Build 2010 that was supposed to create a nuget package using Nugetter of a simple class library project.

TF215097: An error occurred while initializing a build for build definition \Project\BuildDefinitionName: Cannot set unknown member 'Microsoft.TeamFoundation.Build.Workflow.Activities.SyncWorkspace.RequestsFailed'.

My environment:

TFS 2010 Build Server

Nugetter 2.1

Cause: Nugetter version 2.1 is good for TFS2012 and not for TFS2010. 

Solution: For TFS 2010 version you have download 1.2 version. Another catch you have to keep in mind is that if you are using VS2012 or VS2013 then you will get error while creating a new Build Definition inside the process section.  This is because the process templates you downloaded with 1.2 version has certain assemblies related to VS2010 hard coded into it.  And for that reason you will have to clean the xaml process templates as demonstrated by  Jason Prickett in this blog post.

Friday, November 22, 2013

Show selected item details from Autocomplete dropdownlist of jQuery using PartialView

This is a continuation of a series around Autocomplete using jQuery in Asp.net MVC4.

1. Implement Autocomplete using jQuery UI inside Asp.Net MVC4 Application

2. Show selected item details from Autocomplete dropdownlist of jQuery UI – (using Knockout)

3. Show selected item details from Autocomplete dropdownlist of jQuery UI – (using PartialView)

In the last post we looked at how to display details about a selected person from the dropdownlist of jQuery UI Autocomplete using Knockout.js. Knockout.js allowed us to databind our ViewModel with our view.  In this post we are going to look at how to do show details of a person but using a PartialView. 

1. Right click on the Home folder>Add>View.

image

2. Type the name of the view as _Person

image

3. Create another method named GetPerson just like the following but this one returns a PartialViewResult instead of JsonResult.  And in our select statement of LINQ query we are return a custom class with all the properties.  We had to do otherwise we won’t be able to strongly type our view.  For demo purposes I have created the class in the same class as the controller but in real world application I create separate ViewModel folder and create classes there.

[HttpGet]
public PartialViewResult GetPerson(int id)
{
var user = (from p in db.People
join e in db.Employees
on p.BusinessEntityID equals e.BusinessEntityID
join be in db.BusinessEntityAddresses on p.BusinessEntityID equals be.BusinessEntityID
join ad in db.Addresses on be.AddressID equals ad.AddressID
join st in db.StateProvinces on ad.StateProvinceID equals st.StateProvinceID
where p.BusinessEntityID == id
select new PersonDetail
{
Id = p.BusinessEntityID,
FullName = p.LastName + ", " + p.FirstName,
LastName = p.LastName,
FirstName = p.FirstName,
JobTitle = e.JobTitle,
HireDate = e.HireDate,
AddressLine1 = ad.AddressLine1,
City = ad.City,
PostalCode = ad.PostalCode,
State = st.Name
}).ToList().First();
if (user == null)
{
HttpNotFound();
}
return PartialView("_Person", user);
}

Add the following class for PersonDetail below the controller class in your HomeController.

public class PersonDetail
{
public int Id { get; set; }
public string FullName { get; set; }
public string LastName { get; set; }
public string FirstName { get; set; }
public string JobTitle { get; set; }
public DateTime HireDate { get; set; }
public string AddressLine1 { get; set; }
public string City { get; set; }
public string PostalCode { get; set; }
public string State { get; set; }
}

Let's make sure our PartialView _Person.cshtml accepts our model of type PersonDetail.

@model AspNetDemo06.Controllers.PersonDetail
<p>@Model.Id </p>
<p>@Model.FullName </p>
<p>@Model.LastName </p>
<p>@Model.FirstName </p>
<p>@Model.JobTitle </p>
<p>@Model.HireDate </p>
<p>@Model.AddressLine1 </p>
<p>@Model.City = ad.City </p>
<p>@Model.PostalCode </p>
<p>@Model.State </p>

Finally fix few things to fix in our Index.cshtml page. First create a div with id selectedPerson.

<div id="selectedPerson">

</div>

Then in our javascript code, first instead of FindPerson change it to GetPerson. Then in the success method of ajax call just replace the div with the returned partial view.

 $(document).ready(function () {
$("#SearchString").autocomplete({
source: function (request, response) {
$.ajax({
url: "/Home/Find",
data: "{ 'prefixText': '" + request.term + "' }",
dataType: "json",
type: "POST",
contentType: "application/json; charset=utf-8",
dataFilter: function (data) { return data; },
success: function (data) {
response($.map(data, function (item) {
return {
label: item.value,
value: item.value,
id: item.id,
firstname: item.firstname,
lastname: item.lastname
}
}))
},
error: function (XMLHttpRequest, textStatus, errorThrown) {
alert(textStatus);
}
});
},
minLength: 2,
select: function (even, ui) {
var businessEntityId = ui.item.id;
$.ajax({
url: "/Home/GetPerson",
type: "GET",
data: { "id": businessEntityId}
}).done(function () {
}).success(function (person) {
$("#selectedPerson").html(person);
});
}
});
});

In the above code line 36 the person object is our partial view that we inserting in the div of id selectedPerson.


image

Monday, November 18, 2013

Show selected item details after selecting an item from autocomplete dropdownlist using Knockout.js

This is a continuation of previous post where we looked at how to implement autocomplete functionality into Asp.net MVC 4 application using jQuery UI and Ajax.  In the previous post when you selected a particular user it redirected you to a different page.  What if we want to show information about that user on the same page without any page refresh.  In this post we are going to do exactly the same thing.  Well there are many ways to do this but I want to show you the one using Knockout.js. To use Knockout.js first include it in our BundleConfig.cs  

bundles.Add(new ScriptBundle("~/bundles/knockout").Include("~/Scripts/knockout-*"));

Second lets tell our _layout.cshtml page to load knockout.

<body>
@RenderBody()
@Scripts.Render("~/bundles/jquery")
@Scripts.Render("~/bundles/jqueryui")
@Scripts.Render("~/bundles/knockout")
@RenderSection("scripts", required: false)
</body>

Add the following javascript below the autocomplete method in Index.cshtml page. This is a PersonViewModel which has properties like LastName, FirstName and BusinessEntityID.

 
//ViewModels Knockout
function PersonViewModel(data) {
this.LastName = ko.observable(data.lastname);
this.FirstName = ko.observable(data.firstname);
this.BusinessEntityId = ko.observable(data.id);
}

We created a ViewModel for the Person Object called PersonViewModel. And ko.observable(data.lastname) means that lastname is an observable property. Next add the following div section where we are going to display selected person’s information.  Inside the span tag see the data-bind=”text: LastName” it will be replaced by the LastName returned from our select function inside autocomplete.

<div style="display: none;" data-bind="visible: true">
<span data-bind="text: LastName"></span>
<span data-bind="text: FirstName"></span>
</div>

In this post I want to just focus on people who are employees. So lets make sure we allow users to search just for Employees. Make appropriate changes suggested below

[HttpPost]
public JsonResult Find(string prefixText)
{
var suggestedUsers = from x in db.People
where x.LastName.StartsWith(prefixText) && x.PersonType == "EM"
select new {
id = x.BusinessEntityID,
value = x.LastName + ", " + x.FirstName,
firstname = x.FirstName,
lastname = x.LastName};
var result = Json(suggestedUsers.Take(5).ToList());
return result;
}

One last thing before we run our application. Replace the window.location.href line with  ko.applyBindings(new PersonViewModel(ui.item));  This will databind our selected person to the datatemplate shown above.

@section scripts{
<script type="text/javascript">
//Javascript function to provide AutoComplete and Intellisense feature for finding Users.
$(document).ready(function () {
$("#SearchString").autocomplete({
source: function (request, response) {
$.ajax({
url: "/Home/Find",
data: "{ 'prefixText': '" + request.term + "' }",
dataType: "json",
type: "POST",
contentType: "application/json; charset=utf-8",
dataFilter: function (data) { return data; },
success: function (data) {
response($.map(data, function (item) {
return {
label: item.value,
value: item.value,
id: item.id,
firstname: item.firstname,
lastname: item.lastname
}
}))
},
error: function (XMLHttpRequest, textStatus, errorThrown) {
alert(textStatus);
}
});
},
minLength: 2,
select: function (even, ui) {
ko.applyBindings(new PersonViewModel(ui.item));
}
});
});
//ViewModels Knockout
function PersonViewModel(data) {
this.LastName = ko.observable(data.lastname);
this.FirstName = ko.observable(data.firstname);
this.BusinessEntityId = ko.observable(data.id);
}
</script>
}
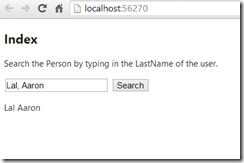
image


I just wanted to show that it could be done with Knockout. At this point our search button is non-functional. We will make it functional later. One thing to notice here is that the information about the selected user is grabbed from the initial query we did to find suggested users.  To bring in more information we would have to adjust our LINQ query.  And I know what you are thinking right now, “But Mitul, that would bring in all the unnecessary information about other users in which we are not interested.” So we are going to write another method in our HomeController to bring in information just about that selected person. Before doing that let’s update our model to bring in additional information about our selected person.


Open the ADworks.edmx file inside our Models folder and then click anywhere next to the entity and select “Update Model from Database”
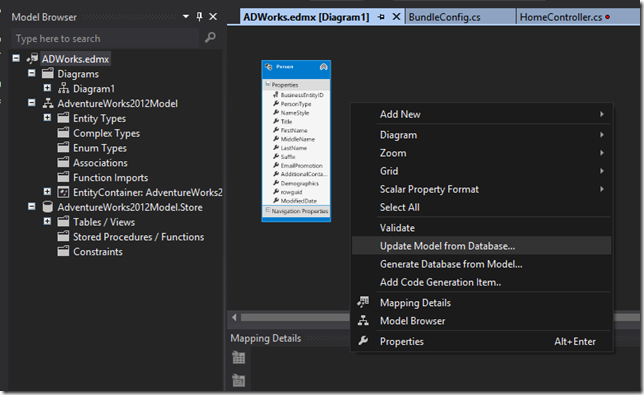

image


And then check on these entities Employee, Address, BusinessEntityAddress, StateProvince. 
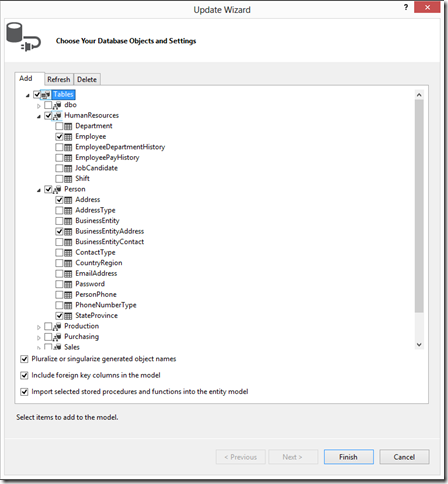

image

Now FindPerson method will return detailed information about the selected person.
        [HttpGet]
public JsonResult FindPerson(int id)
{
var user = (from p in db.People
join e in db.Employees
on p.BusinessEntityID equals e.BusinessEntityID
join be in db.BusinessEntityAddresses on p.BusinessEntityID equals be.BusinessEntityID
join ad in db.Addresses on be.AddressID equals ad.AddressID
join st in db.StateProvinces on ad.StateProvinceID equals st.StateProvinceID
where p.BusinessEntityID == id
select new
{
Id = p.BusinessEntityID,
FullName = p.LastName + ", " + p.FirstName,
LastName = p.LastName,
FirstName = p.FirstName,
JobTitle = e.JobTitle,
HireDate = e.HireDate,
AddressLine1 = ad.AddressLine1,
City = ad.City,
PostalCode = ad.PostalCode,
State = st.Name
}).ToList().First();
if (user == null)
{
HttpNotFound();
}
return Json(user, JsonRequestBehavior.AllowGet);
}

Inside our select function of AutoComplete we are going to make an ajax call [line 31] to this method passing in the BusinessEntityID [line 35] for the Person to FindPerson method [line 33]. Also I have made changes to the PersonViewModel to reflect all the properites returned from the FindPerson method.

@section scripts{
<script type="text/javascript">
$(document).ready(function () {
$("#SearchString").autocomplete({
source: function (request, response) {
$.ajax({
url: "/Home/Find",
data: "{ 'prefixText': '" + request.term + "' }",
dataType: "json",
type: "POST",
contentType: "application/json; charset=utf-8",
dataFilter: function (data) { return data; },
success: function (data) {
response($.map(data, function (item) {
return {
label: item.value,
value: item.value,
id: item.id,
firstname: item.firstname,
lastname: item.lastname
}
}))
},
error: function (XMLHttpRequest, textStatus, errorThrown) {
alert(textStatus);
}
});
},
minLength: 2,
select: function (even, ui) {
var businessEntityId = ui.item.id;
$.ajax({
url: "/Home/FindPerson",
type: "GET",
data: { "id": businessEntityId}
}).done(function () {
}).success(function (person) {
ko.applyBindings(new PersonViewModel(person));
});
}
});
});
//Person Detailed View Model
function PersonViewModel(p) {
this.Id = ko.observable(p.Id);
this.FullName = ko.observable(p.FullName);
this.LastName = ko.observable(p.LastName);
this.FirstName = ko.observable(p.FirstName);
this.JobTitle = ko.observable(p.JobTitle);
this.HireDate = ko.observable(p.HireDate);
this.AddressLine1 = ko.observable(p.AddressLine1);
this.City = ko.observable(p.City);
this.PostalCode = ko.observable(p.PostalCode);
this.State = ko.observable(p.State);
}
</script>
}

Finally lets update our div to reflect all the udpated user properties.

<div style="display: none;" data-bind="visible: true">
FullName:<span data-bind="text: FullName"></span>
<br/> LastName:<span data-bind="text: LastName"></span>
<br/> FirstName:<span data-bind="text: FirstName"></span>
<br/> HireDate:<span data-bind="text: HireDate"></span>
<br/> Job Title:<span data-bind="text: JobTitle"></span>
<br/> AddressLine1: <span data-bind="text: AddressLine1"></span>
<br/> City: <span data-bind="text: City"></span>
<br/> PostalCode: <span data-bind="text: PostalCode"></span>
<br/> State: <span data-bind="text: State"></span>
</div>

Run the application and search a particular user.
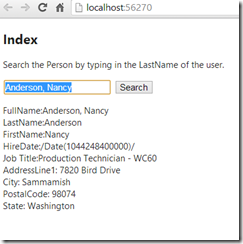

image


In this post, we looked at how to show selected user’s information after search for a user using jQuery UI’s autocomplete method.  Initially to display the selected user we simply data binded the object returned by the select object, we didn’t went to server to find more information.  In the final attempt we did another ajax call to the server to find more information about the user.  In the next post we will look into how to show detailed information about a person using a PartialView. 

Friday, November 15, 2013

Implement Autocomplete using Jquery UI inside Asp.NET MVC4 application

I think the title explains what I am going to accomplish in this blogpost.  I assume you have AdventureWorks2012 database, visual studio 2012 installed. So let’s get started.
1. Open Visual Studio 2012/2013. I am using VS2012 for this demo.
2. Create an Asp.Net MVC 4 Application and Click on basic application for this demo.
3. Add a new controller to your project. I am naming it as HomeController and using Empty MVC Controller as template.
image
4. Right Click on Models Folder and Add new Item. From the Data section add a new ADO.NET Entity Data Model.  I named it as ADWorks.edmx
image
5. Choose the AdventureWorks2012 database when prompted during new connection.   Choose Person.Person table when “Choose Your Database Objects and Settings” dialog appears in the Entity Data Model Wizard as shown in the figure.  After adding the model build the project once [Ctrl+Shift+B].
image
6. Open HomeController.cs file and Add Reference to your Models. Then create a new method to find the person.
private AdventureWorks2012Entities db = new AdventureWorks2012Entities();

        [HttpPost]
        public JsonResult Find(string prefixText)
        {
            var suggestedUsers = from x in db.People
                                 where x.LastName.StartsWith(prefixText)
                                 select new { id = x.BusinessEntityID, 
                                     value = x.LastName + “, ”+ x.FirstName, 
                                     firstname = x.FirstName, 
                                     lastname = x.LastName };
            var result = Json(suggestedUsers.Take(5).ToList());
            return result;
        }

In the above code we find all the users that match the text that is entered by the user and only return 5. One thing to note here is that the Value field is the one that is going to be displayed when the dropdown for all the possible values shows up. I pass in a anonymous object with all the possible properties that I want for additional stuff. Usually id is a unique identifier and value is something you want to display. Another thing is notice the HttpPost attribute somehow I tried with HttpGet and it doesn’t like because you have to set JsonRequestBehavior to allow GET.

7. Next Add Index.cshtml page to your View Folder and then add the Html.TextBox where we will enter Person’s LastName, inside Html.BeginForm() as shown in the code. 
    </p>
        Search the Person by typing in the LastName of the user.
    </p>
    <div>
        @using (Html.BeginForm())
        {  
            <p>
                @Html.TextBox("SearchString")
                <input type="submit" value="Search">
            </p>
        }
  </div>

8. Add @scripts.Render("~/bundles/jqueryui") to the _Layout.cshtml page as shown below.
image
9. Open Index.cshtml page and now we will add the Javascript code that will query our Find method of Step6 using ajax method of jQuery and autocomplete method of jQuery UI.  We will add the following script inside section called scripts that will place all this javascript code in place of @RenderSection(“scripts”,required: false) in our _layout.cshtml page. 
@section scripts{
    <script type="text/javascript">
        //Javascript function to provide AutoComplete and Intellisense feature for finding Users.
        $(document).ready(function () {
            $("#SearchString").autocomplete({
                source: function (request, response) {
                    $.ajax({
                        url: "/Home/Find",
                        data: "{ 'prefixText': '" + request.term + "' }",
                        dataType: "json",
                        type: "POST",
                        contentType: "application/json; charset=utf-8",
                        dataFilter: function (data) { return data; },
                        success: function (data) {
                            response($.map(data, function (item) {
                                 return {
                                    label: item.value,
                                    value: item.value,
                                    id: item.id,
                                    firstname: item.firstname,
                                    lastname: item.lastname
                                }
                            }))
                        },
                        error: function (XMLHttpRequest, textStatus, errorThrown) {
                            alert(textStatus);
                        }
                    });
                },
                minLength: 2,
                select: function (even, ui) {
                    window.location.href = '/Home/details/' + ui.item.id;
                    }
            });
        });
    </script>
}

In this step, we use autocomplete method of jQuery UI.  The nested function inside autocomplete takes two object request and response.  We take the response object and pass the text that was entered to the Find method of our controller using jQuery Ajax method. In the case of a success event we take the response object and grab the data and for each item return value, id, firstname and lastname.  On the user interface side we are only going to see the value property in the form of a dropdown list.  Once you select a particular object the select function or callback is triggered with even, ui parameters.  The ui parameter has all the properties that we returned from the success event of the ajax method.  In our select event, I want to redirect the user to a different page where you can see the details of the person.  I have included this in the sample code available on my github account.  Redirection is done by setting window.location.href to the url you wish.

Its time to spin this project in the browser so lets run and see what happens when we type a person’s lastname. 

image

10. Fix CSS. Notice the dropdown style is messed up.  Your marketing department and users would be frustrated.  Let’s fix that. Oh ! But you might say that there is CSS file already included for the autocomplete I see in the Content folder under themes/base right. Actually we forgot to include that in our _Layout.cshtml file. If you use any of the jQuery UI things then replace the existing Styles.Render line with the following. Because in the Bundles.Config file we already have created jQuery UI CSS Style Bundle. We just need to include it if we use it.
    @Styles.Render("/Content/themes/base/css", "~/Content/css")

Test it out if the CSS has changed or not. F5.

image

The full source code for this sample is available on github. In the next post we will check out some fun stuff with the help of Knockout.