Saturday, September 22, 2012

How to create an ASP.NET MVC 4 Application with Entity Framework

Open Visual Studio and create a new “ASP.NET MVC 4 Web Application” either in C# or VB.net but I am using VB.NET and Visual Studio 2012 Professional.  You can build this using Visual Studio 2012 Express for Web too.

 
Select “Internet Application” as the Project Template, Razor as View engine, and if you like to create test you can have “create a unit test project” option checked.  Click ok.


After you hit ok, you can see ASP.NET has created several folders for us.  It has also brought several scripts that are used in modern web application development. I always wanted to switch over to ASP.NET MVC from Web Forms as to do some things it was really hard to do in Web Forms as your application go big.  ASP.NET MVC 4 does most of the work for you like Bundling Javascript, little things like adding scripts at the bottom of the page and more.

For data I am using Adventure Works 2008 database which can be easily downloaded from Codeplex website (link).  We have to create a data model for our web application and we are going to use ADO.NET Entity Framework Model.  So let’s add an ADO.NET Entity Data Model to our Models Folder by right clicking on it.

Specify “myModel” as Name for the item which will create myModel.edmx file in our Models Folder.


On Entity Data Model Wizard, Select “Generate Model from database” and click on Next.


On Choose your Data connection and then Click on New Connection


I used the (.) symbol to specify localhost instead of my machine name however either approaches should work.


It will create Entity Connection String, leave it as it is and Click on Next.

On Choose Your Database Objects and Settings expand the Tables object and expand Production and select everything but the “Document” table otherwise it will give you the following error after you click Finish.

Unable to generate the model because of the following exception: ‘The table ‘AdventureWorks2008.Production.Document’ was referenced by a relationship, but was not found

Click on Finish and you will see myModel.edmx file opened and a diagram will show you our relational tables.

Notice in the Error List though, there are several errors which at first would scare away a newbie. There is nothing to worry about just build the project and those errors should go away.

We want to add Controller which will act as a bridge between our Model and View.  So add a New controller class by right clicking on the Controllers folder.

Type ProductsController as Controller name and Click on Add.


Add the following code where we create a new Context object named as db.  Notice AdventureWorks2008Entities is the name of my connection string.

Modify the default Index function with the following linq query.  The linq query gets list of only 10 products whose list price is greater than zero.

Right click anwhere inside the index function and Add a View as shown in the figure below:


Create a View with just all these parametes as shown above.

Build the project and browse in the Internet Explorer at the following location.

You will see a list of 10 products on this page.  In the next post we will see how to select an individual product item with keyboard and hit enter to see the details of this product on a details page.


Monday, July 30, 2012

Launching Visual Studio solutions made easy with PowerShell


In my previous post on “Launching Apps with PowerShell Functions”, I showed you how to launch a visual studio solution.  That was very easy I guess because we used the start command and provided full file path with a .sln extension. It started visual studio to open this file.

I am going to extend this solution to solve one of my pain points with Visual Studio Start Page.  On VS start page there is a section for “Recent Projects” which lists recently opened visual studio solutions.  In that section you can pin a solution which you like VS2010 to remember.  It is a great feature to open your most used visual studio solutions.  However, when you get into creating a lot of visual studio projects for development, testing some random code and production.  Over a time this list gets unmanageable and it won’t remember too many projects.  You don’t want to pin all these test projects and bad projects you have created because they will conflict with your frequently pinned production solutions.  Those test solutions might be good for future testing purposes.  Again you don’t want them to go away either.  So I wanted to list all the solutions that I have created in my two or three directories over time and use start command to open it.  There could be more solutions elsewhere but I am not interested in those.  So here is my solution:

I have create a script which will search two or three interested directories like C:\BadSourceCode, C:\ProductionSourceCode, C:\Testing etc for .sln file and list them.  Then I will provide a number to launch a particular visual studio solution I am interested in.  This way I don’t have to wait in the morning to wake up my visual studio from sleep and search and find the solution I want to open.  Ouch!! That is too much of work for me when I am half asleep.  Instead I just want to fire up PowerShell and supply visual studio solution number that I want to open and bang it just works while I sit back and relax.

So here is the script.  You can put the entire script in your profile or store it in a location and create powershell function to run that script.

Write-Host " " 
Write-Host "Listing all visual studio solutions" -ForegroundColor yellow
Write-Host " " 
Add-Type @'
public class solution
{
public int id;
public string name;
public string fullname;
}
'@
$tempSolutions = Get-ChildItem C:\Testing,C:\Production,C:\BadSourceCodes -Recurse -Include *.sln | select Name, FullName 
$si = New-Object solution
$st = [Type] $si.GetType()
$base = [System.Collections.Generic.List``1]
$qt = $base.MakeGenericType(@($st))
$so = [Activator]::CreateInstance($qt)
for($i = 0; $i -lt $tempSolutions.Count; $i++)
{
$obj = New-Object solution
$obj.id = $i
$obj.name = $tempSolutions[$i].Name
$obj.fullname = $tempSolutions[$i].FullName
$so.Add($obj)
}
$so | Format-Table -AutoSize
$choice = Read-Host "Enter a number to open a vs solution or letter x to exit: " 
if($choice -eq "x"){
Write-Host -ForegroundColor red "exited selection" -BackgroundColor black
}
else
{
Write-Host -ForegroundColor Yellow "Opening VS solution:" $so[$choice].name
Start-Process $so[$choice].fullname
}

The above script will recursively list all .sln files and then create a custom object for each file and then add it to a list object.  To launch a particular solution, we provide a number to get that object from a list and use the fullname property of the object to the start command to open that solution inside visual studio 2010.

I have created this little function and inside this function I provide the path to the script file for launching solutions.


function get-vssolutions {
C:\scripts\OpenVSsolutions.ps1 
}


PS C:\> get-vssolutions 


Enter a number to open a vs solution or type letter x to exit: 

Friday, July 20, 2012

Launching Apps with PowerShell Functions


Launching of apps is much easier with windows 7 taskbar.  The "pin to taskbar" option when you right click any open software will pin the item to the taskbar.  I have lots of remote desktop sessions pinned on remote desktop connection. However, there are some situations where launching some softwares it is quicker through your keyboard than through the mouse.  AutoHotkey is very popular when you want to assign shortcut keys for launching apps and trigger some custom actions.  However, I have fallen in love with the PowerShell way of launching some of my favorite and most used apps on windows.   I have found it very useful and so I would like to share them with you.

Launch Remote Desktop Connections with PowerShell 
Put this PS function in your PS profile and replace server10 with your server name in the following command and see remote desktop connection open up on its own.  For the first time, you will have to enter the password.  I love this very much.  


function rmd {
param([string]$computername)
& "C:\windows\system32\mstsc.exe" /v:$computername /fullscreen
}

PS> C:\>rmd server10

Search about a PowerShell error on Google from PowerShell
Suppose you had an error when you were working inside powershell and you had no idea what that error was and you thought that a Google search might result an answer.  At this point you don’t want to copy the error object or text and then open or switch to Google and type.  This function takes care of searching on Google for you.  It will search for the last error [$error[0]] encountered .  

Check this function out and if you like it then put it in your powershell profile.  Replace the chrome.exe path with your path or it might be just replacing Goofy with your name.


function Get-ErrorInfo
{ 
& "C:\Users\Goofy\AppData\Local\Google\Chrome\Application\chrome.exe"  https://www.google.com/search?q=$error[0].Exception
}

Let’s do some dumb mistake and try to search it on Google.

PS C:\> get-comand19


The term 'get-comand19' is not recognized as the name of a cmdlet, function, script file, or operable program. Check th
e spelling of the name, or if a path was included, verify that the path is correct and try again.
At line:1 char:13
+ get-comand19 <<<<
    + CategoryInfo          : ObjectNotFound: (get-comand19:String) [], CommandNotFoundException
    + FullyQualifiedErrorId : CommandNotFoundException

PS C:\> get-errorinfo

Just search on Google with PowerShell
If you observed the command carefully then you know how to search on Google through powershell.  Here is my simple function to search on Google.


function g { 
param([string]$searchstring)
& "C:\Users\Goofy\AppData\Local\Google\Chrome\Application\chrome.exe" https://www.google.com/search?q=$searchstring
}

Launch volume control pop-up with PowerShell
I have a bad habit of experimenting something in powershell (more on that later).  However, I found this link on superuser.com about open the volume control with a command.  Try this command “sndvol.exe –f” in run command window (open it by typing win+r) and you can see volume control but again when working in PowerShell I want to do it from PowerShell. Sweet little no brainer PS function. 

function vol { & "C:\windows\system32\sndvol.exe" -f}

Hit vol and see volume control pop-up.  Use up and down arrow key to control vol (obviously).
Launch a Visual Studio solution with PowerShell
Start a visual studio solution from PowerShell.  Yes, I know that you can pin your most frequented items to task bar but I wanted to do it in powershell. I have created a small PowerShell function to start my daily project that I am working on. I don’t if people would find it useful or not but I do find it useful in my work life.  


function vs {
param([string]$document)
switch($document){
"pm"{
start "C:\sourcecode\dailyprojectIworkOn.sln"
}
}
}

Launch a word document with PowerShell
Ah! So easy once you know how the start cmd works right. Just put it in front of any document and it will open in relevant software for you. One of the things I have opened while working on a project is having a word document opened up.  It is like my live journal of that project.  Over a time my word document get very large and I have to do two things: 1) Open word doc 2) Scroll to the last page 3) Save it before exiting.  For two and and three I have created a word macro which will scroll the doc to the last page and save it for me before I exit.  Finally for launching that word document I do this.

function show{
param([string]$document)
switch($document){
"pm" {
start "C:\project\projdoc.docm"
}
}
}
So you see I don't panic if the start menu is gone from windows 8.  I only have to remember the PowerShell way of launching apps.  If you have some other PowerShell functions that you put in your PowerShell profile then share with me in the comments sections.

Sunday, July 8, 2012

Using Powershell Function to Quickly Test Regular Expressions

I have found the easiest way to learn and experiment with regular expressions using Powershell.  In this function below, I have converted .Net code to test regular expressions into PowerShell Function test-regex.  It accepts two parameters $inputString and $regex.  In $regex you provide the regular expression you want to test.  Put this little snippet into your PowerShell profile so that you don’t have to run this function everytime.  PowerShell Profile will run this function everytime you open a new PowerShell session.  This MSDN article explains on how to put functions into a PowerShell profile.


function test-regex {
param(
[string]$inputString,
[string]$regex
)
$match = [System.Text.RegularExpressions.Regex]::Match($inputString,$regex)
Write-Host $match.Value -foreground "Yellow" 
}

This allows me to quickly test regular-expressions in powershell without much hassle. And if you want to find help about regular expressions inside powershell then you can type following command and get all help related to regular expressions.

>PS help about_regular*

I refer “Regular Expression Language Reference” MSDN article to understand more about regular expressions.  

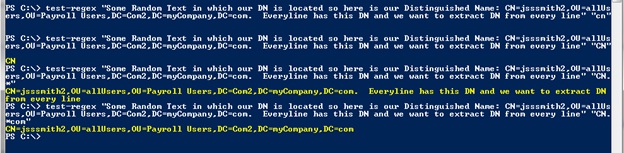
In the below example, I wanted to extract Distinguished Name (DN) from a list of thousands of users from a text file.  Each line in that text file had a Unique DN.  So I resorted to Regular Expression to match DN in each line.   Check out the sample text which has DN in bolded text.

Some Random Text in which our DN is located so here is our Distinguished Name: CN=jsssmith2,OU=allUsers,OU=Payroll Users,DC=Com2,DC=myCompany,DC=com.  Everyline has this DN and we want to extract DN from every line.

I want to show how we can easily test this using powershell function we created. Copy the above text and paste in powershell using just right click.  Check out the syntax to test the function.


Our input string and regex are in double quotes above.  You can see the matching text in Yellow color.  The nice thing about this is if you get it wrong then iterating is easy because you just have to hit the up arrow on your keyboard and just change the regex part and it will give you another match.  

The matching regular expression was “CN.*DC=com”.  The neat thing in this approach I like is not remembering any software to open to test regexes.  Since I have PowerShell as my first item on my task bar I hit Win+1 and start testing.  I hope you like this approach.  If there is any easier approach or quicker way to test regular expressions then please let me know about it in the comments sections.

Monday, June 25, 2012

Passing Parameters to Remote PowerShell Session Inside a Script


Let’s take a look at the following script named md.ps1:

When I run using below syntax it will not work as expected on a remote computer.

PS> .\md.ps1 “computer1” “Release” “ReleaseBuildConfig”

It will replace $BuildDefinition variable but then it will not list all its child folders.  Further more it will not replace $configuration variable with the value, for example, “Release” or “Debug”.   As soon as I hard coded them the rest of the command worked just fine.  Ok so what was the issue.

It turns out that when you are trying to pass parameters to a script and then invoke a remote powershell session and access variables inside that PSsession then you have to declare them twice in your scripts. Yes Twice.  Check the final script.

It was painful to figure it out and my co-worker friend helped me figure it out.

Tuesday, June 19, 2012

Deploying Website and Windows Service using MSDeploy, Powershell and InstallUtil from TFS Build


We have a visual studio solution which has 4 projects into it.  One of them is a web project, another windows service project, class library and console application, all under source control inside Team Foundation Server 2010 in one team project.
TeamProject
   Solution.sln
   >Web Project
   >Windows Service Project
   >Class Library Project
   >Console Application Project

When we queue a new build using Team Foundation Build then all the content gets dumped into one single drops folder (a shared folder on your staging server).   It is a total mess and we need to have our structure as shown above on the destination drops folder.  We would like to have control over the structure of the destination files dropped by TFS Build.  I was able to achieve this by following this guideline posted on MSDN “Control Where the Build System Places Your Binaries”.  


First we will take a look into how to deploy Web Application using Web package in TFS Build using powershell.  Alright now when we look into the drop folder for our website on the destination folder we can see a _publishedpackages folder which has a .zip file.  We are interested in this folder.  We will grab the .zip file which is our package and deploy it using MSdeploy.


MSDeploy is a command line utility used to deploy webpackages to IIS.  All good but there is one problem and that is everytime a new build is queued a new folder is created with date and version number appended to it.  Our files are inside dropsfolder\builddefinition\latestfolder.6192012.1\.  Inside this folder if you have customized Process template then each project will have its own folder and inside that there will be Release\Debug folder.  Then we have to get the path to our .zip file for the website which we need to pass to MSDeploy to publish website to IIS.  This can get cumbersome and slow down our cycle. Why? Everytime a new build is dropped you will have to go through this pain.

1. Login into the server
2. Fire up command line
3. Locate the path to the latest build folder and find the path to the _PublishedPackages folder
4. Pass those parameters into MSDeploy and then run it.

What we want is combine steps 2 to 4 into one powershell script and store it inside TFS that will do the job for us.  You will have to modify process template to run a powershell script during build process. Check this excellent article from Ewald Hofman on how to execute powershell script from tfs. One might think that there are different ways of achieving same functionality and automating it directly from build definition itself but I learnt something in this process which I thought might be useful to somebody.


$latestbuildfolder = Get-ChildItem "C:\dropsfolder\BuildDefinition\" | Sort-Object LastWriteTime -Descending | SELECT-Object -First 1 $webpackagelocation = "\ProjectName\WebProject1\Release\_PublishedWebsites\WebProject1_Package\WebProject1.zip" $finalstring = $latestbuildfolder.FullName + $webpackagelocation & 'C:\Program Files\IIS\Microsoft Web Deploy v2\msdeploy.exe' -verb=sync -dest=auto "-source=package=$finalstring"

In the first three lines we try to grab the path to the web package and then pass the path to MSDeploy commandline utility to deploy to IIS web server.

Line1: First we list all the folders using Get-ChildItem and then sort them in descending order and get the first item.  This first item is our last build that was queued.  Everytime when you run the script it will make sure we get the latest folder.
Line2: This line is very simple because for all the future builds we know where our .Zip file will be sitting.  So it is direct path to the zip file.
Line3: Just concatenating two strings from line1 and 2 but be careful here the $latestbuildfolder variable holds the folder as the item so to get the path you need $latestbuildfolder.FullName.
Line4: If you want to run commandline utilities through powershell then you will have to first put “&” ampersand varialbel then include commandline utility in quotes and then provide other variables or arguments in quotes.  MSDeploy is little bit tricky here.  You provide all other variables in without quotes and include the –source=package-$finalstring in quotes.  To find out the exact syntax that worked, I played with lots of combinations and eventually a friend of mine in the office helped me achieve this.  You can also use Join-Path cmdlet of powershell to join paths.

Now you can do almost anything now with MSDeploy, TFSBuild and Powershell.  MSDeploy is a very powerfull tool and the one that is less exploited for deploying Websites guess.
Let’s try to install windows service using Powershell so that this wil happen automatically everytime.  We also have to take care of one more problem, and that is uninstalling windows service everytime we deploy a new version.  Below is my powershell script to uninstall windows service:


$service1 = Get-WmiObject -Class win32_service -Filter "Name='OurServiceName'" 
 if ($service1.State -eq 'Running') 
 { 
 Write-Host "Stopping $service1.Name service" stop-service OurServiceName & 'C:\Windows\Microsoft.Net\Framework\v4.0.30319\installUtil.exe' /u $service1.PathName
 } 


In the above script, I am using Get-WMIObject win32_service to get our windows service because Get-Service was not giving me the path to the executable that was used to install the service.  The executable path to the service is revealed only through win32_service instance of the class.   This way we don’t have to cycle through our drops folder and find previous versions of windows service.
Let’s take a look at our installation powershell script code:

$latestbuildfolder = Get-ChildItem "C:\dropsfolder\BuildDefinition\" | Sort-Object LastWriteTime -Descending | SELECT-Object -First 1
$windowsServiceFolder = "\ProjectName\WindowsService\Release\WindowsService.exe"
$exepath = $latestbuildfolder.FullName + $windowsServiceFolder
& 'C:\Windows\Microsoft.Net\Framework\v4.0.30319\installUtil.exe' /username=companyname\srviceaccount /password=password1 $exepath
Start-Service -Name OurServiceName
$getlatestservice = Get-Service -Name OurServiceName
$getlatestservice


In the above code pay close attention to the installutil.exe code where we specify /username and /password because we don’t want to have that user prompt annoy us everytime we try to install our windows service.  For this to work you have to make some changes to your windows service installer code.  I have used code to make it work.  There is an appropriate BeforeInstall event where you need to add this code because there are BeforeInstall events for ServiceProcessInstaller and ServiceInstaller objects.

Now putting it all together we want to put our powershell script into TFS as we don’t want to have it on the debug or production machine.  We want it under source control.


$session = New-PSSession -ComputerName Server20 
Invoke-Command -Session $session -ScriptBlock { $service1 = Get-WmiObject -Class win32_service -Filter "Name='OurServiceName'" 
 if ($service1.State -eq 'Running') { 
 Write-Host "Stopping $service1.Name service" stop-service OurServiceName 
& 'C:\Windows\Microsoft.Net\Framework\v4.0.30319\installUtil.exe' /u $service1.PathName 
 } 
$latestbuildfolder = Get-ChildItem "C:\dropsfolder\BuildDefinition\" | Sort-Object LastWriteTime -Descending | SELECT-Object -First 1 
$webpackagelocation = "\ProjectName\WebProject1\Release\_PublishedWebsites\WebProject1_Package\WebProject1.zip" 
$finalstring = $latestbuildfolder.FullName + $webpackagelocation 
& 'C:\Program Files\IIS\Microsoft Web Deploy v2\msdeploy.exe' -verb=sync -dest=auto "-source=package=$finalstring" 
$windowsServiceFolder = "\ProjectName\WindowsService\Release\WindowsService.exe" $exepath = $latestbuildfolder.FullName + $windowsServiceFolder 
& 'C:\Windows\Microsoft.Net\Framework\v4.0.30319\installUtil.exe' /username=companyname\srviceaccount /password=password1 $exepath 
Start-Service -Name OurServiceName $getlatestservice = Get-Service -Name OurServiceName $getlatestservice 
}

The first two lines are of importance we are running these command using powershell remoting (Powershell remoting should be enabled on the remote server).  We are create a new session specify computer name and run our powershell commands.  These commands will run on the remote machine just like they would run on a client machine.  We are all set.  Queue a new build and see this magic happen.

One more step closer to continuous integration!!!


Friday, June 8, 2012

Linked Servers Inside SQL Server


I am trying to connect to a sql database on a different server say server2 and run a sql query on my server1. It will not run even though I specified tables like this [server2].[databasename].[dbo].[tablename] in my sql query. It gave me the following error:

Msg 7202, Level 11, State 2, Line 1
Could not find server 'server2' in sys.servers. Verify that the correct server name was specified. If necessary, execute the stored procedure sp_addlinkedserver to add the server to sys.servers.

As the error specifies we have to add my server2 to a list of linked servers inside sql server.  So what is a linked server in SQL Server?  It allows us to execute remote queries on a remote data store [Sql server, oracle, file system, local Dsn, excel spreadsheet, active directory] by linking it to our server.  When you connect to your sql server inside management studio you will see a node named Linked Servers and there you can see a list of Providers for different types of data stores.  In the image you will see a list of linked servers if any and in my case I have added my server.

After adding a linked server I can query it by specifying entire name of your tables like I mentioned above.  You can also add Active Directory as a linked server and query Active Directory just like SQL Query.  Check this MSDN link to see which all data sources you can add as linked servers. 

The best way to add a linked server is through stored procedure specified in the error itself.  After adding a linked server you will also have to add a linked server login to connect to the remote database.  If you don’t specify security login to your linked server then it will try to connect with the credentials you are currently logged into your sql server through SSMS.  You can map a local user to the linked server to connect if only that user has local login access to that server.  For more check this msdn link on security of linked servers.
Syntax for adding a linked server and linked server login:

EXEC sp_addlinkedserver @server = 'server2', @srvproduct='', @provider='SQLNCLI', @datasrc = 'server2', @catalog='databasename'

EXEC sp_addlinkedsrvlogin @rmtsrvname='server2',@useself='FALSE', @rmtuser='remoteuserlogin',@rmtpassword='somecomplicatedpassword'

If you are using SQL server then you can leave @srvproduct as null.  

You can also connect to Oracle from SQL Server and here is this nice post  which details exact steps to do that.