Showing posts with label JavaScript. Show all posts

Thursday, July 12, 2018

A19–Building App using Angular and ASP.NET Core 2.1–Review Order Details

This post is a part of a series of posts that I am writing as I am building an app using Angular and ASP.NET Core 2.1. Links to previous posts –> A1, A2, A3, A4, A5, A6, A7, A8, A9, A10, A11, A12, A13, A14, A15, A16, A17, A18 Github Repo

On training front, I finished Angular Reactive Forms course by Deborah Kurata on Pluralsight and I am watching Angular Services course by Brice Wilson.

Today, I was able to accomplish following.

1. Create a Review Order Page.

2. Create relevant server side API methods to return data

3. On submit button show confirmation page.

image

image

image

One of the things I had to change was make model names to be camelCase so when retrieving nested object they would display appropriately.

While there are many many issues with the app, I am able to do accomplish one workflow of being able to checkout products in a wizard style format. Notice that I am returning hard coded data for order review page. Once we figure out persistent store we can then return data from data store. There is also an issue with user identity. We want to associate orders with a person and we want to associate orders with unique id. All of that complexity can be handled piece by piece.

Next I want to tackle authentication piece.

That’s all I have for today. Checkout latest changes on github and website.

Sunday, July 8, 2018

A17–Building App using Angular and ASP.NET Core 2.1–Reactive Forms Validation

This post is a part of a series of posts that I am writing as I am building an app using Angular and ASP.NET Core 2.1. Links to previous posts –> A1, A2, A3, A4, A5, A6, A7, A8, A9, A10, A11, A12, A13, A14, A15, A16 Github Repo

I am currently watching Angular Reactive Forms course on Pluralsight by Deborah Kurata. I like Reactive Forms.

Today, I added form validation to shipping info page and payment info page.

image

image

Couple of things to note regarding behavior

1. Validation occurs as soon as you tab our or touch a control.

2. If you click on Next button then validation messages will be shown

3. Simple Regex pattern matching used for phone, card number, security code

4. Added dropdown for selecting card type and expiration month and year

5. Custom group validation implemented for validation Expiration month.

image

Special thanks to Loiane Groner for sharing code @ repo to show validation on button click. This trick and using a method to display validation messages saved a ton of repetitive code for me. I like it a lot.

Thanks to Debora Kurata for sharing code @ repo.

That’s all I have for today. Checkout latest changes on github and website.

Friday, June 22, 2018

A11–Building App using Angular and ASP.NET Core 2.1–Services and Component Refactoring

This post is a part of a series of posts that I am writing as I am building an app using Angular and ASP.NET Core 2.1. Links to previous posts –> A1, A2, A3, A4, A5, A6, A7, A8, A9, A10 Github Repo

Yesterday, I added items to Shopping Cart and API to add products to Shopping Cart. Next step is to be able to checkout products from Shopping Cart and in order to do so I needed a page to display products in Shopping Cart. So Below are things, I was able to accomplish today.

1. Added Shopping Cart Component, Display Products in the cart, Remove products from Shopping Cart.

image

2. I added Shopping Module and Routing Module for that. Since after adding Shopping Module, I was running into issues related to ShoppingCartWidget component. NavMenu component was complaining that you have to declare in the main module. I moved ShoppingCartWidget component into Shared Folder and reference from there. I had to refactor little bit regarding that.

3. Added code to Shopping Service related to removing product from shopping cart.

There are couple of things, I wanted to share that I liked. I switch between VS Code and Visual Studio for this project and I am in love with VS Code. Today I installed few extensions for VS and it makes your job much easier. Below are the ones I use for Angular Development.

1. Angular 6 Snippets – Mikael Morlund

2. Angular Files – Alexander Ivanichev

3. Angular Language Service – Angular

4. Angular V6 Snippets – John Papa

5. Debugger for Chrome – Microsoft

6. TSLint – Egamma

7. SASS – Robin Bentley

Angular Language Service extension and snippets is by far my favorite one. But they all helped me a lot. VS Code is so light weight. I like it a lot.

On learning path I am intending on finishing below courses

1. Learning Angular Routing by Debora Kurata on Pluralsight

2. Implementing and Securing an API with ASP.NET Core by Shawn Wildermuth on Pluralsight

See ya next time. And leave comments if you like anything or have any suggestion.

Code on GitHub.

Wednesday, June 20, 2018

A9–Building App using Angular and ASP.NET Core 2.1–Font-awesome, Pagination and Layout

This post is a part of a series of posts that I am writing as I am building an app using Angular and ASP.NET Core 2.1. Links to previous posts –> A1, A2, A3, A4, A5, A6, A7, A8, Github Repo

Today, I got carried away with home page layout and wasn’t able to fix communication between components. I spent trying to add pagination using some blogpost but then I discovered ngx-pagination. Below are things I was able to do.

1. Added pagination using ngx-pagination npm package it was pretty straight forward

2. Added font-awesome npm package so I could add shopping cart icon.

3. Added pagination to home page and products page

4. Added shopping-cart-widget component for displaying cart information

image

Next, I want to fix communication between components, ie. when you click on add to cart button it should add items to cart and call server side api method.

See ya next time.

Tuesday, June 19, 2018

A8–Building App using Angular and ASP.NET Core 2.1–SASS and Responsive Layout

This post is a part of a series of posts that I am writing as I am building an app using Angular and ASP.NET Core 2.1. Links to previous posts –> A1, A2, A3, A4, A5, A6, A7, Github Repo

Today, I could accomplish very little.

1. Fixed cards layout for home page

I like to put borders and see how where the boxes are.

image

As we change screen size, we can see responsive design at work.

image

Another one

image

image

Alright I messed this one up, I want to make this look different. However, I am running out of time for today.

image

2. From the screenshots above, menu has been fixed and is also responsive.

3. Using SASS syntax was something new—you don’t have to put {} and ; and indentation like python. So I will have to get used to this syntax.

Next, I will have to continue fixing home page styling and then I will follow up on adding more product information. I am excited to work on server side logic.

See ya next time.

Monday, June 18, 2018

A7–Building App using Angular and ASP.NET Core 2.1–Bootstrap 4, SASS, Cleanup

This post is a part of a series of posts that I am writing as I am building an app using Angular and ASP.NET Core 2.1. Links to previous posts –> A1, A2, A3, A4, A5, A6, A7, Github Repo

On training side, I finished watching Beginner Path for Angular on Pluralsight. I learnt some nice things about Angular CLI. I didn’t knew that Angular app can be created using SASS, CSS or LESS as default way of creating style files. Dry run option is awesome. I always liked how PowerShell had –WhatIf flag and every CLI should have these types of commands.

Let’s cover all the things I was able to accomplish today.

1. Refactored app.module.ts file to make it leaner. I moved all product related components, routes and services into product module. In the image below, on the left everything in red was moved into product module.

image

2. Set the default style extension to be SASS and renamed all .css files to .sass. Right now I didn’t not create any styles into any sass file. Ahem, have to learn first right. Actually, I heard it is not very different than .less so will see how sass is. I had to delete navmenu component styles that were created by default template.

image

3. While I have worked with Bootstrap 3 a lot, I wanted to learn Bootstrap 4 in this project so I updated to Bootstrap 4. When you install Bootstrap 4 in an angular project, npm doesn’t install jquery, popper.js libraries so, I had to install those. I had to fix styling for home page and navigation to use Bootstrap 4.

image

4. Other visual and layout changes includes moving nav menu to top, moving home page content to about page, adding products to home page for people to view products on sale.

image

You can see home page with product cards. The UI is all messed up right now. There are many changes need to be made to how cards are displayed. The bottom card is completely hideous—taking up whole page.

image

5. Bug fix. In product.service.ts there was bug found in the handleError function which was returning default type. It should have thrown error. This prevented server side validation error from being displayed to our user.

image

So that’s all for today. The app is completely garbage right now but I am making progress. My next goals are as follows:

1. Make home page UI responsive, add style for product cards, make navigation menu responsive and add more data to display cards appropriately.

2. Add product description and other product related meta data, display that data accordingly on home page, add more complex data validation—using dates and dropdown.

See ya next time.

Thursday, June 14, 2018

A5–Building App using Angular and ASP.NET Core 2.1 – Services Dependency Injection

This post is a part of a series of posts that I am writing as I am building an app using Angular and ASP.NET Core 2.1. Links to previous posts –> A1, A2, A3, A4, Github Repo

Today my goal is to extract httpclient into a product service. And finish delete page.

Below is the code for extracted ProductService.

import { Injectable, Inject } from '@angular/core';
import { Observable } from 'rxjs/Observable';
import { Product } from './product';
import { HttpClient, HttpHeaders } from '@angular/common/http';
import { catchError, map, tap } from 'rxjs/operators';
import { of } from 'rxjs/observable/of';
const httpOptions = {
  headers: new HttpHeaders({
    'Content-Type': 'application/json'
  })
};

@Injectable()

export class ProductService {

  
  private _baseUrl: string;
  private _productListUrl: string = "api/Product/List";
  private _productInsertUrl: string = "api/Product/Insert";
  private _productEditUrl: string = "api/Product/Edit";
  private _productFindUrl: string = "api/Product/Find/";
  private _productDeleteUrl: string = "api/Product/Delete/";
  constructor(private _http: HttpClient, @Inject('BASE_URL') baseUrl: string) {
    this._baseUrl = baseUrl;
  }

  getProduct(id: number): Observable<Product> {
    return this._http.get<Product>(this._baseUrl + this._productFindUrl + id)
      .pipe(
        tap(product => this.log(`fetched product`)),
        catchError(this.handleError<Product>('getProduct'))
      );
  }

  getProducts(): Observable<Product[]> {
    return this._http.get<Product[]>(this._baseUrl + this._productListUrl)
      .pipe(
        tap(products => this.log(`fetched products`)),
        catchError(this.handleError('getProducts', []))
      );
  }

  insertProduct(product: Product): Observable<Product> {
    return this._http.post<Product>(this._baseUrl + this._productInsertUrl, product, httpOptions)
      .pipe(
        tap(products => this.log(`fetched products`)),
        catchError(this.handleError<Product>('insertProduct'))
      );
  }

  editProduct(product: Product): Observable<Product> {
    return this._http.post<Product>(this._baseUrl + this._productEditUrl, product, httpOptions)
      .pipe(
        tap(products => this.log(`fetched products`)),
        catchError(this.handleError<Product>('editProduct'))
      );
  }

  deleteProduct(product: Product): Observable<any> {
    return this._http.post<Product>(this._baseUrl + this._productDeleteUrl + product.id, product, httpOptions)
      .pipe(
        tap(products => this.log(`fetched products`)),
        catchError(this.handleError<Product>('deleteProduct'))
      );
  }

  private handleError<T>(operation = 'operation', result?: T) {
    return (error: any): Observable<T> => {

      console.log(error); // log to console instead      
      this.log(`${operation} failed: ${error.message}`);      
      return of(result as T);
    };
  }
   
  private log(message: string) {
    console.log("Product Service" + message);
  }
}

One of the things, I realized is that dotnet watch run sometimes will get stuck processing requests and it will feel like things have hanged. So I press Ctrl+C and dotnet watch will start processing things again. I have also hooked up Delete button with web api endpoint. Updated and working code is on Github Repo.

Next goal is to clean up default pages created by ASP.NET Core SPA template and host it on Azure website.

Tuesday, June 12, 2018

A3–Building App using Angular and ASP.NET Core 2.1 – Form Validation

This post is a part of a series of posts that I am writing as I am building an app using Angular and ASP.NET Core 2.1. Links to previous posts –> A1, A2, Github Repo

Today, my goal was adding form validation to form controls. I added validation to Insert and Edit pages for Product. Validation on both the pages is very similar.

Add Product Validation

image

Same page but validation changes if you delete price and keep it null.

image

I learnt couple of things today regarding validation and forms.

1. There are many things to remember in hooking up things with form. For example, creating multiple validation is not that straight forward.

2. Out of the box there are couple of validators but real world scenarios almost always require you to have custom validation.

3. I wish there was an alternative to template variable. I do not like creating these variable on input fields. From an api standpoint it would have been nicer if everything was part of ngModel.

These are my naïve observations and stupid opinions based upon my limited knowledge regarding Angular internals.

Regarding my app, I am realizing that there is more code common between add and edit component. Perhaps I could utilize some shared component here. I am not too concerned with this right now. To get good grasp at validation, I am going to add more fields later.

Next goal is to be able to submit edit, insert, delete product using ASP.NET Web API as backend. Until then have a good night. And code is on GitHub.

Sunday, June 10, 2018

A1–Building App using Angular and ASP.NET Core 2.1

This post is a part of a series of posts that I will write as I build an app using Angular and ASP.NET Core 2.1. My goal with this series is not to show you how to do something but to build something little everyday and write about it. If I don’t build anything then I don’t write about it. I believe in concept of learn via building and learn via sharing. So let’s combine these two concepts. Please expect lots of mistakes being made by me and I hope you will correct them.

I have lot of experience building apps using AngularJS and ASP.NET MVC 5 but I wanted to learn Angular latest and ASP.NET Core 2.1. What I have done so far in this journey is listed below, so you have some background and you don’t assume that I am smart.

1. Watched Angular: Getting Started course on Pluralsight by Deborah Kurata

2. Finished Angular Tutorial: Tour of Heroes

3. Watching Angular: Forms course on Pluralsight by Mark Zamoyta

4. Built an app to showcase products and stuff.

My environment looks like this

1. Visual Studio 2017 15.7.3

2. Powershell

3. VS Code Latest

4. ASP.NET Core 2.1

5. Angular cli version listed below
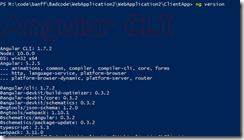
image

6. Angular versions 5.2.0

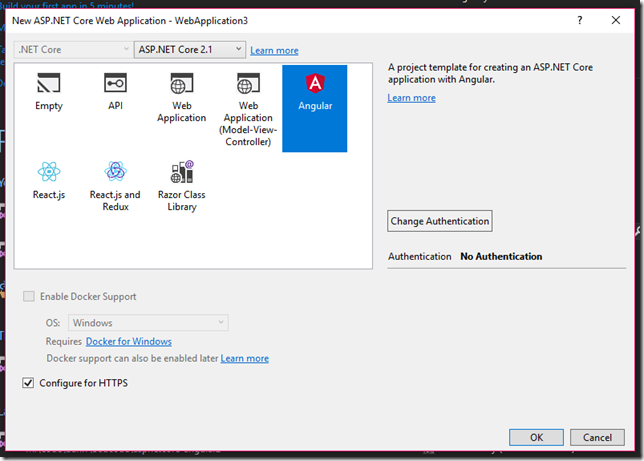
I wanted to have server side back-end technology as ASP.NET Core and wanted to combine Angular with it. In latest ASP.NET Core 2.1, there is a template for getting started with this type of thing.
image

After application project was created, I was excited and I wanted to create a new Angular component. I executed this command on the command line ng generate component product-list and got the friend message to run npm install first. So I ran npm install and then did ng generate component product/product-list and used to get some errors. I don’t recall. However, after deleting contents of node_modules folder it started working.

Tip: Don’t run npm install. Just click Run or hit F5 and let visual studio install all dependencies.

In earlier version of ASP.NET Core 2.0 runtime, creating components using Angular CLI wasn’t that straight forward. In 2.1 working with Angular Cli has been fixed. I like this.

By default when you run the application, you get counter page and fetch data page. The fetch data page shows you how to retrieve data from ASP.NET WEB API endpoint.

I want to create product related pages such as insert, edit, delete, list, details and use ASP.NET WEB API. So first I created Product controller and related methods for doing insert, edit, delete, list and details. I used attribute routing. For simplicity, I am not connecting it to any database. I just want working methods. Then I tested these methods using PostMan client. Below is my Product Controller.

 [Route("api/[controller]")]
    public class ProductController : Controller
    {
        private static List<Product> Products = new List<Product>() {
            new Product { Id = 1, Title = "XYZ1", Price = 1,ImageUrl = "ImageUrl_XYZ1" },
            new Product { Id = 2, Title = "XYZ2", Price = 2,ImageUrl = "ImageUrl_XYZ2" },
            new Product { Id = 3, Title = "XYZ3", Price = 3,ImageUrl = "ImageUrl_XYZ3" },
            new Product { Id = 4, Title = "XYZ4", Price = 4,ImageUrl = "ImageUrl_XYZ4" },
            new Product { Id = 5, Title = "XYZ5", Price = 5,ImageUrl = "ImageUrl_XYZ5" },
            new Product { Id = 6, Title = "XYZ6", Price = 6,ImageUrl = "ImageUrl_XYZ6" },
            new Product { Id = 7, Title = "XYZ7", Price = 7,ImageUrl = "ImageUrl_XYZ7" },
            new Product { Id = 8, Title = "XYZ8", Price = 8,ImageUrl = "ImageUrl_XYZ8" },
            new Product { Id = 9, Title = "XYZ9", Price = 9,ImageUrl = "ImageUrl_XYZ9" }
            
        };
        [HttpGet("[action]")]
        public IEnumerable<Product> List()
        {
            return Products;
        }

        [HttpGet("[action]/{id:int}")]        
        public ActionResult<Product> Find(int id)
        {
            var product = Products.Where(x => x.Id == id).FirstOrDefault();
            if (product != null)
            {
                return product;
            }
            return NotFound($"Product with id {id} was not found");
        }

        [HttpPost("[action]")]
        public ActionResult<Product> Edit([FromBody] Product product)
        {
            return product;
        }

        [HttpPost("[action]/{id:int}")]
        public ActionResult<Product> Delete(int id)
        {
            return Ok("Delete Successfull");
        }

        [HttpPost("[action]")]
        public ActionResult<Product> Insert([FromBody] Product product)
        {
            return product;
        }
    }

Next up, I tried to create product-list angular component using angular cli using command ng g c product/product-list. I wanted to create product related component inside product folder. Hence, I used product/product-list as my component’s name. I am just going to borrow code from fetch-data component to retrieve product list.

import { Component, OnInit, Inject } from '@angular/core';
import { HttpClient } from '@angular/common/http';

@Component({
  selector: 'app-product-list',
  templateUrl: './product-list.component.html',
  styleUrls: ['./product-list.component.css']
})
export class ProductListComponent implements OnInit {
  public products: Product[];
  constructor(http: HttpClient, @Inject('BASE_URL') baseUrl: string) {
    http.get<Product[]>(baseUrl + 'api/Product/List').subscribe(result => {
      this.products = result;
    }, error => console.log(error));
  }
  ngOnInit() {
  }
}
interface Product {
  id: number;
  title: string;
  price: number;
  imageUrl: string;
}

Next up, I hooked up navigation and you can see all the products being displayed. For brevity, I am not listing all the steps or code. I am going to put all this on GitHub so you can see the code and progress I make. Because, it turns out blogging every step is going to be time consuming. [edit- Github Repo here]
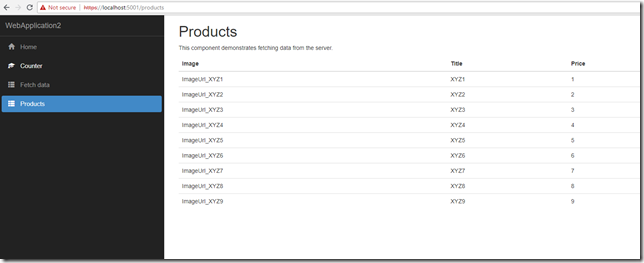
image

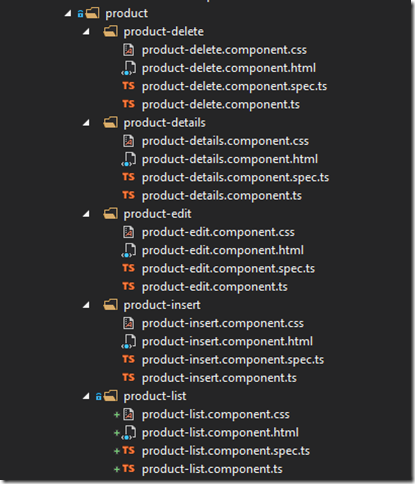
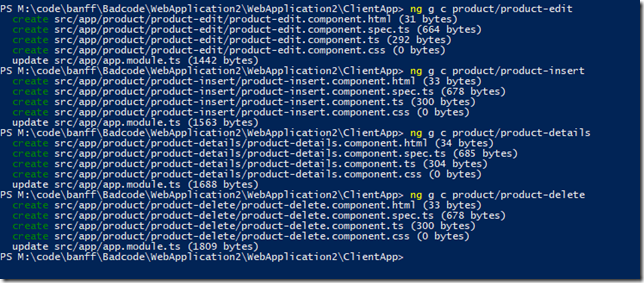
Creating angular components for delete, details, edit and insert as shown below.
image

image

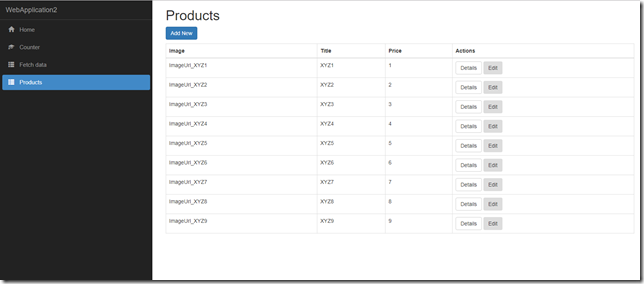
Creating edit, delete, details, insert action buttons on product-list html page and adding routerLink so we can take appropriate actions. Below is how the page looks now.

Tip: Route should not have any ending /. Have product/insert instead of product/insert/
image

I hooked up these buttons with their respective components created in earlier step. Right now I have not created an markup for these individual action pages. That’s all I could get done today.

Next goal is to put this on GitHub and finish creating insert, edit, delete, details features of products page. See you next time. [edit- Github Repo here]

Thursday, January 16, 2014

Making TypeScript compile on TFS2010 Server

Issue:

So the thing is TypeScript is not included with VS2013 out of the box.  I thought it was included but it not I had to download “TypeScript for VS2012 and VS2013” and install locally. When you try to build your web project locally with VS2012/13 then it will produce .js file.  So that’s well and good.  But when you try to build on build server it will not work. As expected because it doesn’t have the Targets to compile .ts file. 

Resolution:

1.  Like most build environments if you have VS2012/13 already installed on your build server then download the “TypeScript for Visual Studio 2012 and 2013” and install on the build server.  This will build the .ts file into .js file on the build server.  However, keep in mind that when you build your solution locally this file (.js) is also created locally and this file should not be included in your source control folder just like normal practice we don’t include .dll files from the bin folder or .exe files from obj folder.  Exclude that file or convert that file into .ts file and delete the duplicate file.

2. Another way to compile TypeScript files on the Build Server is detailed by Tom DuPont – And that is to create separate folder on Source Control and reference the targets from there.

I am sure there are other ways but I found method 1 to be easiest as I already have VS2012 and VS2013 installed on the build server.