Showing posts with label C#. Show all posts

Sunday, June 16, 2019

Unit Testing ASP.NET Core Web API using XUnit and FakeItEasy

Let’s take a one ASP.NET Core Web API method and add unit tests using XUnit and FakeItEasy.

My environment: Visual Studio 2019 Enterprise, ASP.NET Core 2.2, FakeItEasy, AutoFixture and XUnit.

Source code

I have a Before and After version of the source code hosted on github. In the After folder, you can view the completed solution.

System Under Test

There is a ProductsController with one HTTP GET method returning a list of products and a unit test project. There is a ProductService injected into ProductsController that returns the Products. In the following section, we would like to add tests around the code and make it more production ready. One of the goals of this post is to show how often we just start like the code snippet as shown below and then when the code goes into production, there are all sorts of conditions that we have to account for. We will add all those conditions but let’s do it by adding tests for each condition.

[Route("api/[controller]")]
[ApiController]
public class ProductController : ControllerBase
{
    private readonly IProductService _productService;
    [HttpGet]
    public ActionResult<IEnumerable<Product>> Get()
    {
        return _productService.GetProducts();
    }
}

Let’s write our first test that would validate that the Get() method shown above.

I like to start with a simple empty method with just the name of the test method split into three parts. This helps me understand under given condition how should the code behave. The three parts are explained as follows:

1.Actual Name of the method being tested – Get

2.Condition – WhenThereAreProducts

3.Expected Outcome - ShouldReturnActionResultOfProductsWith200StatusCode

[Fact]
public void Get_WhenThereAreProducts_ShouldReturnActionResultOfProductsWith200StatusCode()
{

}

We will add all the dependencies that are required for ProductsController, below is the code that does that.

using AutoFixture;
using System;
using UnitTestingDemo.Controllers;
using UnitTestingDemo.Services;
using Xunit;
using FakeItEasy;
namespace UnitTestingDemo.Tests
{
    public class ProductControllerTest
    {
        //Fakes
        private readonly IProductService _productService;

        //Dummy Data Generator
        private readonly Fixture _fixture;
        
        //System under test
        private readonly ProductsController _sut;
        public ProductControllerTest()
        {
            _productService = A.Fake<IProductService>();
            _sut = new ProductsController(_productService);

        _fixture = new Fixture();
        }

        [Fact]
        public void Get_WhenThereAreProducts_ShouldReturnActionResultOfProductsWith200StatusCode()
        {
            //Arrange


            //Act


            //Assert
        }
    }
}

In the above code, I have added comments that explain what each line of code does. The public constructor is responsible for setting up our private objects. The system under test is called as _sut, so in all the methods it is easier to locate the system under test. In the unit test, we have three sections, Arrange, Act and Assert. I like to put these comments, so it is easier to scan different pieces of logic.

Next, we will add code to Arrange and Act as shown below,

[Fact]
public void Get_WhenThereAreProducts_ShouldReturnActionResultOfProductsWith200StatusCode()
{
    //Arrange
    var products = _fixture.CreateMany<Product>(3).ToList();
    A.CallTo(() => _productService.GetProducts()).Returns(products);

    //Act
    var result = _sut.Get();

    //Assert

}

In the above code, we create 3 fake products using _fixture and then using FakeItEasy we define that when GetProducts() is called it should return those three fake products. And then we call the _sut.Get().

In the Assert part, we want to make sure that our method _productService.GetProducts() was called and it returned a result that is of type ActionResult and it returns a 200 status code. If it doesn’t return that status code, then it should fail and then we will refactor our ProductsController code.

[Fact]
public void Get_WhenThereAreProducts_ShouldReturnActionResultOfProductsWith200StatusCode()
{
    //Arrange
    var products = _fixture.CreateMany<Product>(3).ToList();
    A.CallTo(() => _productService.GetProducts()).Returns(products);

    //Act
    var result = _sut.Get() as ActionResult<IEnumerable<Product>>;

    //Assert
    A.CallTo(() => _productService.GetProducts()).MustHaveHappenedOnceExactly();
    Assert.IsType<ActionResult<IEnumerable<Product>>>(result);
    Assert.NotNull(result);
    Assert.Equal(products.Count, result.Value.Count());
}

In the above code, in the Assert section, we are making sure that _productService.GetProducts() must have been called only once, the type of the result is of type ActionResult, the result is not null and the count of products returned are the same as we created in the Arrange section. Using this approach, we am not able to validate the status code of the result. In order to test the status code, we will have to modify the Controller code.

Lesson learned, just use ActionResult in the method signature and instead of returning directly a List, return an Ok(products). The OkObjectResult contains status code. Using ActionResult only makes it easier to test for different status codes.

Controller Method is now modified as below and the test is now modified to test for a valid 200 status code.

[HttpGet]
public ActionResult Get()
{
    return Ok(_productService.GetProducts());
}

[Fact]
public void Get_WhenThereAreProducts_ShouldReturnActionResultOfProductsWith200StatusCode()
{
    //Arrange
    var products = _fixture.CreateMany<Product>(3).ToList();
    A.CallTo(() => _productService.GetProducts()).Returns(products);

    //Act
    var result = _sut.Get() as OkObjectResult;

    //Assert
    A.CallTo(() => _productService.GetProducts()).MustHaveHappenedOnceExactly();
    Assert.NotNull(result);
    var returnValue = Assert.IsType<List<Product>>(result.Value);
    Assert.Equal(products.Count, returnValue.Count());
    Assert.Equal(StatusCodes.Status200OK, result.StatusCode);
}

Now that we have all the Asserts statements passing, we ask ourselves another question, Is this the only test case to test against? Can there be more test cases that we haven’t accounted for? What if there is an unhandled exception or when there is no product found?

Let’s add another test that covers the test case of an unhandled exception. Before you look at the following code, ask yourself, what should be the expected outcome when there is an exception being thrown by the ProductService? It should probably return a 500 error code and possibly log the error.

First, let’s begin by writing an empty test with a descriptive name as shown below.

[Fact]
public void Get_WhenThereIsUnhandledException_ShouldReturn500StatusCode()
{
    //Arrange

    //Act
    

    //Assert
    
}

Next, we define the behavior of ProductService to throw an exception whenever GetProducts is called. If an exception is thrown, then we want to ensure that 500 HTTP Status Code is returned from the web service. The following test will fail, since we are not handling that case properly.

[Fact]
public void Get_WhenThereIsUnhandledException_ShouldReturn500StatusCode()
{
    //Arrange
    A.CallTo(() => _productService.GetProducts()).Throws<Exception>();

    //Act
    var result = _sut.Get() as StatusCodeResult;

    //Assert
    A.CallTo(() => _productService.GetProducts()).MustHaveHappenedOnceExactly();
    Assert.NotNull(result);
    Assert.Equal(StatusCodes.Status500InternalServerError, result.StatusCode);
}

Let’s modify the Get method to handle unhandled exception by putting the processing logic into a try and catch block. After modify the code as shown below, you can run the test again and this time it would pass.

[HttpGet]
public ActionResult Get()
{
    try
    {
        return Ok(_productService.GetProducts());
    }
    catch (Exception ex)
    {

    }
    return StatusCode(StatusCodes.Status500InternalServerError);
}

We would like to add some kind of logging in the catch exception part. Logging using ILogger is the way to go, however, unit testing using ILogger is a bit problematic, because you have to use Adapter pattern to create your own logger that uses ILogger. For this part, I created a simple Logger called MyLogger with just a Log method to demonstrate unit testing.

The MyLogger.cs code is shown below.

using Microsoft.Extensions.Logging;
using System;
using System.Collections.Generic;
using System.Linq;
using System.Text;
using System.Threading.Tasks;

namespace UnitTestingDemo.Services
{
    public interface IMyLogger
    {       
        void Log(string message, Exception ex);
    }
    public class MyLogger : IMyLogger
    {
        public void Log(string message, Exception ex)
        {
            //Log to database or use application insights.
        }
    }
}

The ProductsController.cs is modified to log exception as shown below.

using System;
using System.Collections.Generic;
using System.Linq;
using System.Threading.Tasks;
using Microsoft.AspNetCore.Http;
using Microsoft.AspNetCore.Mvc;
using Microsoft.Extensions.Logging;
using UnitTestingDemo.Models;
using UnitTestingDemo.Services;

namespace UnitTestingDemo.Controllers
{
    [Route("api/[controller]")]
    [ApiController]
    public class ProductsController : ControllerBase
    {
        private readonly IProductService _productService;
        private readonly IMyLogger _logger;

        public ProductsController(IProductService productService, IMyLogger logger)
        {
            _productService = productService;
            _logger = logger;
        }

        [HttpGet]
        public ActionResult Get()
        {
            try
            {
                return Ok(_productService.GetProducts());
            }
            catch (Exception ex)
            {
                _logger.Log($"The method {nameof(ProductService.GetProducts)} caused an exception", ex);
            }
            return StatusCode(StatusCodes.Status500InternalServerError);
        }
    }
}

The Startup.cs modified as shown below

public void ConfigureServices(IServiceCollection services)
{
    services.AddMvc().SetCompatibilityVersion(CompatibilityVersion.Version_2_2);

    services.AddTransient<IProductService, ProductService>();
    services.AddSingleton<IMyLogger, MyLogger>();
}

We now modify our unit test to in the following ways to make it pass,

1. We renamed the method to include logging piece.

2. Mocked behavior of MyLogger.cs class

3. Asserting that MyLogger’s Log method must have been called when there was an exception.

[Fact]
public void Get_WhenThereIsUnhandledException_ShouldReturn500StatusCodeAndLogAnException()
{
    //Arrange
    A.CallTo(() => _productService.GetProducts()).Throws<Exception>();
    A.CallTo(() => _logger.Log(A<string>._, A<Exception>._)).DoesNothing();

    //Act
    var result = _sut.Get() as StatusCodeResult;

    //Assert
    A.CallTo(() => _productService.GetProducts()).MustHaveHappenedOnceExactly();
    A.CallTo(() => _logger.Log(A<string>._, A<Exception>._)).MustHaveHappenedOnceExactly();
    Assert.NotNull(result);
    Assert.Equal(StatusCodes.Status500InternalServerError, result.StatusCode);
}

Let’s add another test case to account for when there are no products found, then we would like to return a 404 Not Found result.

[Fact]
public void Get_WhenThereAreNoProductsFound_ShouldReturn404NotFoundResult()
{
    //Arrange
    

    //Act
    

    //Assert
    
}

     Let’s write a failing unit test and then add the condition in our Controller Get method.

[Fact]
public void Get_WhenThereAreNoProductsFound_ShouldReturn404NotFoundResult()
{
    //Arrange
    var products = new List<Product>();
    A.CallTo(() => _productService.GetProducts()).Returns(products);

    //Act
    var result = _sut.Get() as NotFoundResult;

    //Assert
    A.CallTo(() => _productService.GetProducts()).MustHaveHappenedOnceExactly();
    Assert.NotNull(result);                        
    Assert.Equal(StatusCodes.Status404NotFound, result.StatusCode);

}

Modify the Get method as follows

[HttpGet]
public ActionResult Get()
{
    try
    {
        var products = _productService.GetProducts();
        if (products?.Count > 0)
        {
            return Ok(products);
        }
        return NotFound();
    }
    catch (Exception ex)
    {
        _logger.Log($"The method {nameof(ProductService.GetProducts)} caused an exception", ex);
    }
    return StatusCode(StatusCodes.Status500InternalServerError);
}

Finally, if you are using Swagger then adding the Produces attribute will result into better documentation. I know this isn’t related to unit testing but it is a nice to have.

[HttpGet]        
[ProducesResponseType(typeof(List<Product>), StatusCodes.Status200OK)]
[ProducesResponseType(StatusCodes.Status404NotFound)]
[ProducesResponseType(StatusCodes.Status500InternalServerError)]        
public ActionResult Get()
{
    try
    {
        var products = _productService.GetProducts();
        if (products?.Count > 0)
        {
            return Ok(products);
        }
        return NotFound();
    }
    catch (Exception ex)
    {
        _logger.Log($"The method {nameof(ProductService.GetProducts)} caused an exception", ex);
    }
    return StatusCode(StatusCodes.Status500InternalServerError);
}

We have accounted for all the test cases to make this code ready for Production.

If you can think of any test case that I haven’t accounted for, then please let me know in the comments section below. The final version of the test can be found here.

Tuesday, December 4, 2018

A20-Upgrading to Angular 7 and ASP.NET Core

This post is a part of a series of posts that I am writing as I am building an app using Angular and ASP.NET Core 2.1. Links to previous posts –> A1, A2, A3, A4, A5, A6, A7, A8, A9, A10, A11, A12, A13, A14, A15, A16, A17, A18, A19Github Repo

Due to personal issues (new job, new country, India trip), I wasn’t able to blog.

Since I posted last time, Angular came out with Angular 7 and a new SDK for .NET Core also came out. Instead of continuing on the older version of Angular I decided to update everything.

I updated

Node to latest version v11.3.0.

NPM is at 6.4.1

I updated Visual Studio to latest and VS Code to latest version.

For updating angular to 7, I followed steps outlined at https://update.angular.io/

Updated Angular-cli globally and locally

Updated Angular Core and RxJs stuff.

Github warns you of vulnerabilities and everytime you run npm commands it shows you issues with packages. There were lot of package vulnerabilities so one by one I removed all of them and npm audit is not complaining anymore. 

After updating all the packages and running ng update for angular packages, I was getting errors when running dotnet run.

image

I had to update nuget package Microsoft.AspNetCore.SpaServices.Extensions. After updating it, I had to fix package.json scripts section’s start and build command to remove –extract-css flags.

Last issue I had to fix was related to certain rxjs operator usages in the application, eg. of, map, catch.

image

After fixing those I was able to compile and run the command dotnet run to view the application in the browser as I used to do before.

Thursday, July 12, 2018

A19–Building App using Angular and ASP.NET Core 2.1–Review Order Details

This post is a part of a series of posts that I am writing as I am building an app using Angular and ASP.NET Core 2.1. Links to previous posts –> A1, A2, A3, A4, A5, A6, A7, A8, A9, A10, A11, A12, A13, A14, A15, A16, A17, A18 Github Repo

On training front, I finished Angular Reactive Forms course by Deborah Kurata on Pluralsight and I am watching Angular Services course by Brice Wilson.

Today, I was able to accomplish following.

1. Create a Review Order Page.

2. Create relevant server side API methods to return data

3. On submit button show confirmation page.

image

image

image

One of the things I had to change was make model names to be camelCase so when retrieving nested object they would display appropriately.

While there are many many issues with the app, I am able to do accomplish one workflow of being able to checkout products in a wizard style format. Notice that I am returning hard coded data for order review page. Once we figure out persistent store we can then return data from data store. There is also an issue with user identity. We want to associate orders with a person and we want to associate orders with unique id. All of that complexity can be handled piece by piece.

Next I want to tackle authentication piece.

That’s all I have for today. Checkout latest changes on github and website.

Tuesday, July 10, 2018

A18–Building App using Angular and ASP.NET Core 2.1–Reactive Forms, Submitting data

This post is a part of a series of posts that I am writing as I am building an app using Angular and ASP.NET Core 2.1. Links to previous posts –> A1, A2, A3, A4, A5, A6, A7, A8, A9, A10, A11, A12, A13, A14, A15, A16, A17 Github Repo

So I was able to accomplish following

1. Created classes to collect data from Form into Model for Shipping and Payment Pages.

2. Create CheckoutService to call Checkout controller methods

3. Created Controller methods for insert of shipping info and payment info

That’s all I have for today. Checkout latest changes on github and website.

Sunday, July 8, 2018

A17–Building App using Angular and ASP.NET Core 2.1–Reactive Forms Validation

This post is a part of a series of posts that I am writing as I am building an app using Angular and ASP.NET Core 2.1. Links to previous posts –> A1, A2, A3, A4, A5, A6, A7, A8, A9, A10, A11, A12, A13, A14, A15, A16 Github Repo

I am currently watching Angular Reactive Forms course on Pluralsight by Deborah Kurata. I like Reactive Forms.

Today, I added form validation to shipping info page and payment info page.

image

image

Couple of things to note regarding behavior

1. Validation occurs as soon as you tab our or touch a control.

2. If you click on Next button then validation messages will be shown

3. Simple Regex pattern matching used for phone, card number, security code

4. Added dropdown for selecting card type and expiration month and year

5. Custom group validation implemented for validation Expiration month.

image

Special thanks to Loiane Groner for sharing code @ repo to show validation on button click. This trick and using a method to display validation messages saved a ton of repetitive code for me. I like it a lot.

Thanks to Debora Kurata for sharing code @ repo.

That’s all I have for today. Checkout latest changes on github and website.

Wednesday, July 4, 2018

A16–Building App using Angular and ASP.NET Core 2.1–Reactive Forms

This post is a part of a series of posts that I am writing as I am building an app using Angular and ASP.NET Core 2.1. Links to previous posts –> A1, A2, A3, A4, A5, A6, A7, A8, A9, A10, A11, A12, A13, A14, A15 Github Repo

I finished watching Angular Routing course and I think that it is very powerful. I like multiple router-outlet, child routes and route guard concept. Route resolver is a good concept too but I am running into issues when implementing in another child route.

Today using reactive forms I have added forms to collect shipping and payment information. There is no validation logic in there right now.

Shipping Info Form

image

Payment Info Form

image

One of my pet peeve with Angular is dependency injection. I ran into an issue with a child route resolver using a service and I couldn’t figure out why it won’t resolve the service. I wish there was a better way to let us know about why it couldn’t resolve the service. Can we have Angular Dependency Injection best practice guide?

Alright everyone, that’s all I have for today. Checkout latest changes on github and website.

Sunday, July 1, 2018

A15–Building App using Angular and ASP.NET Core 2.1–Route Resolvers, Child Routes

This post is a part of a series of posts that I am writing as I am building an app using Angular and ASP.NET Core 2.1. Links to previous posts –> A1, A2, A3, A4, A5, A6, A7, A8, A9, A10, A11, A12, A13, A14 Github Repo

Past three days have been hectic so there were no posts.

I am currently watching Angular Routing pluralsight course by Debora Kurata. I learned about Route Resolvers and Child routes. I refactored product/edit, product/details, product/delete page to use route resolver. Next I wanted to finish checkout page but I wanted to have a wizard type flow. After learning about child routes, I added shipping info, payment details, order review and confirmation components. I also refactored shopping cart as part of wizard. Shopping cart is the first page in this wizard.

Now when you click on shopping cart icon to the top right of the app you will see.

image

At the top, you can see different stages as nav items. As you start clicking different nav items you will see respective components.

image

Below is our shopping-routing module.

import { NgModule } from '@angular/core';
import { Routes, RouterModule } from '@angular/router';
import { ShoppingCartComponent } from './shopping-cart/shopping-cart.component';
import { CheckoutComponent } from './checkout/checkout.component';
import { CheckoutPaymentComponent } from './checkout-payment/checkout-payment.component';
import { CheckoutReviewComponent } from './checkout-review/checkout-review.component';
import { CheckoutConfirmationComponent } from './checkout-confirmation/checkout-confirmation.component';
import { CheckoutShippinginfoComponent } from './checkout-shippinginfo/checkout-shippinginfo.component';

const routes: Routes = [
{
  path: 'checkout', component: CheckoutComponent, children: [
    { path: '', redirectTo: 'shoppingcart',  pathMatch: 'full'},
    { path: 'shoppingcart', component: ShoppingCartComponent} ,
    { path: 'shippinginfo', component: CheckoutShippinginfoComponent },
    { path: 'payment', component: CheckoutPaymentComponent },
    { path: 'review', component: CheckoutReviewComponent },
    { path: 'confirmation', component: CheckoutConfirmationComponent }
  ]
}];

@NgModule({
  imports: [RouterModule.forChild(routes)],
  exports: [RouterModule]
})
export class ShoppingRoutingModule { }

There is one thing I learned about property pathMatch: ‘full’—you cannot add it wherever you like. Initially I added to checkout path, and then I added to different child paths and it wasn’t working. So I removed that property.

Other minor css improvements include navbar nav-item active styling.

image

One thing bugging me is responsiveness of top wizard navigation for checkout component. I want to figure best way to handle that. I am thinking to show full text with icon and on smaller screens just show icons. As shown below, you can see how bad the styling is on smaller screens—completely unacceptable.

image

Alright everyone, that’s all I have for today. Checkout latest changes on github and website.

Wednesday, June 27, 2018

A14–Building App using Angular and ASP.NET Core 2.1–Responsive Product Card and Shopping Cart

This post is a part of a series of posts that I am writing as I am building an app using Angular and ASP.NET Core 2.1. Links to previous posts –> A1, A2, A3, A4, A5, A6, A7, A8, A9, A10, A11, A12, A13 Github Repo

Today’s post is again going to be brief. You might think that these posts are becoming boring and I don’t put more code. My goal is to work on this app just a little bit everyday and learn something everyday. I don’t get to spend a lot of time on this app since most of the time I am working late at night. Sometimes I might do a lot and sometimes not a whole lot. So my goal is just learn and share—even if it is one sentence that I watched a video.

I tried to make product card and shopping cart responsive. I added checkout-contact component and hooked up to checkout button. However, I didn’t implemented logic for collecting contact information. I am thinking of first completing entire navigation scenario of checkout process and then implement details of each page.

Alright that’s it. Checkout the code on github.

Tuesday, June 26, 2018

A13–Building App using Angular and ASP.NET Core 2.1–Updating Shopping Cart Quantity

This post is a part of a series of posts that I am writing as I am building an app using Angular and ASP.NET Core 2.1. Links to previous posts –> A1, A2, A3, A4, A5, A6, A7, A8, A9, A10, A11, A12 Github Repo

Today’s post is going to be brief. I added following functionality to Shopping Cart page.

When you increase quantity of any given product then,

1. Order sub total should get updated.

2. Order Quantity should be updated.

3. Cart total should be updated.

Since there is no database backend, I have to add extra logic to account for persistence. For example, to simulate accurate quantity and amount post deletion, I had to write custom server side logic. This is unnecessary once data store is in place.

image

After increasing quantity order sub total is updated.

image

There is one issue I am running into and that is when using ngModelChange on input element, the change event is firing twice which seems like bug to me or I am doing something wrong (I think later to be true).

That’s all for today, see ya next time.

Monday, June 25, 2018

A12–Building App using Angular and ASP.NET Core 2.1–Shopping Cart

This post is a part of a series of posts that I am writing as I am building an app using Angular and ASP.NET Core 2.1. Links to previous posts –> A1, A2, A3, A4, A5, A6, A7, A8, A9, A10, A11 Github Repo

In the previous post, I started created Shopping Cart page where you could view products and remove products from Shopping Cart. Today, I want to fix a couple of things about Shopping Cart. If you added multiple products then we want to do following things.

1. Show Product along with quantity

2. Change Product quantity

3. Show Order Total

4. Update Order Total when product is deleted.

5. Do not show same product multiple times if product is ordered multiple times.

Below is the UI for new checkout experience.

image

If I remove product then order total is updated.

image

I created a complete different class for displaying products on Shopping Cart Page. I am calling it ShoppingCartProduct. In the ShoppingCartController, I am getting all products and then doing a group by into ShoppingCartProduct.

using A100.Models;
using Microsoft.AspNetCore.Mvc;
using System;
using System.Collections.Generic;
using System.Linq;

namespace A100.Controllers
{
    [Route("api/[controller]")]
    public class ShoppingCartController : Controller
    {
        private static List<Product> shoppingCartProducts = new List<Product>() {
            new Product { Id = 1, Title = "XYZ1",Description = "Description XYZ 1 ", Price = 101,ImageUrl = "ImageUrl_XYZ1" },
            new Product { Id = 1, Title = "XYZ1",Description = "Description XYZ 1 ", Price = 101,ImageUrl = "ImageUrl_XYZ1" },
            new Product { Id = 1, Title = "XYZ1",Description = "Description XYZ 1 ", Price = 101,ImageUrl = "ImageUrl_XYZ1" },
            new Product { Id = 2, Title = "XYZ2",Description = "Description XYZ 2 ", Price = 200,ImageUrl = "ImageUrl_XYZ2" }
        };
        [HttpGet("[action]")]
        public IEnumerable<ShoppingCartProduct> Products()
        {
            var s = from y in shoppingCartProducts
                    group y by y.Id into grouping
                    let p = grouping.First()
                    select new ShoppingCartProduct { Id = grouping.Key,
                        Title = p.Title,
                        Quantity = grouping.Count(),
                        Price = p.Price,
                        Description = p.Description,
                        ImageUrl = p.ImageUrl,
                        TotalPrice = p.Price * grouping.Count() };
            return s.ToList();
        }

        [HttpPost("[action]/{id:int}")]
        public ActionResult Add(int id)
        {
            return new JsonResult("product added to cart");
        }
        [HttpPost("[action]/{id:int}")]
        public ActionResult Delete(int id)
        {
            return new JsonResult("product removed from cart");
        }
    }
}

I had to update relevant parts shopping-cart.component.ts as well.

That’s all I have for today. Please check source code on Github and ask questions if you have any.

Friday, June 22, 2018

A11–Building App using Angular and ASP.NET Core 2.1–Services and Component Refactoring

This post is a part of a series of posts that I am writing as I am building an app using Angular and ASP.NET Core 2.1. Links to previous posts –> A1, A2, A3, A4, A5, A6, A7, A8, A9, A10 Github Repo

Yesterday, I added items to Shopping Cart and API to add products to Shopping Cart. Next step is to be able to checkout products from Shopping Cart and in order to do so I needed a page to display products in Shopping Cart. So Below are things, I was able to accomplish today.

1. Added Shopping Cart Component, Display Products in the cart, Remove products from Shopping Cart.

image

2. I added Shopping Module and Routing Module for that. Since after adding Shopping Module, I was running into issues related to ShoppingCartWidget component. NavMenu component was complaining that you have to declare in the main module. I moved ShoppingCartWidget component into Shared Folder and reference from there. I had to refactor little bit regarding that.

3. Added code to Shopping Service related to removing product from shopping cart.

There are couple of things, I wanted to share that I liked. I switch between VS Code and Visual Studio for this project and I am in love with VS Code. Today I installed few extensions for VS and it makes your job much easier. Below are the ones I use for Angular Development.

1. Angular 6 Snippets – Mikael Morlund

2. Angular Files – Alexander Ivanichev

3. Angular Language Service – Angular

4. Angular V6 Snippets – John Papa

5. Debugger for Chrome – Microsoft

6. TSLint – Egamma

7. SASS – Robin Bentley

Angular Language Service extension and snippets is by far my favorite one. But they all helped me a lot. VS Code is so light weight. I like it a lot.

On learning path I am intending on finishing below courses

1. Learning Angular Routing by Debora Kurata on Pluralsight

2. Implementing and Securing an API with ASP.NET Core by Shawn Wildermuth on Pluralsight

See ya next time. And leave comments if you like anything or have any suggestion.

Code on GitHub.

Thursday, June 21, 2018

A10–Building App using Angular and ASP.NET Core 2.1–Services, Events and Cross Component Communication

This post is a part of a series of posts that I am writing as I am building an app using Angular and ASP.NET Core 2.1. Links to previous posts –> A1, A2, A3, A4, A5, A6, A7, A8, A9 Github Repo
Today, I was able to accomplish few things,
1. Added Shopping service that adds product and updates shopping cart
2. Established cross component communication via Shopping Service (Home Component –> Add To Cart –> Updates Shopping Cart
3. Created API for adding and getting products from ShoppingCart Controller. I am returning hard coded products and hence you will always see two shown at the top right.
Right now I didn’t wanted to create any database backend. I want to just make sure client server interaction is in sync. Once I like how everything is structured then I will invest time into adding database layer. Below is code for Shopping Service.
import { Injectable, Inject } from '@angular/core';
import { BehaviorSubject } from 'rxjs';
import { HttpClient, HttpHeaders } from '@angular/common/http';
import { Product } from '../product/product';
import { catchError, map, tap,last } from 'rxjs/operators';
import 'rxjs/add/observable/throw';
import { of } from 'rxjs/observable/of';
import { Observable } from 'rxjs/Observable';
const httpOptions = {
  headers: new HttpHeaders({
    'Content-Type': 'application/json'
  })
};
@Injectable()
export class ShoppingService {

  private _baseUrl: string;
  private cartQuantitySource = new BehaviorSubject(0);
  currentCartQuantity = this.cartQuantitySource.asObservable();

  private _addProductToShoppingCart: string = "api/ShoppingCart/Add/";
  private _getProductsFromShoppingCart: string = "api/ShoppingCart/Products";
  constructor(private _http: HttpClient, @Inject('BASE_URL') baseUrl: string) {
    this._baseUrl = baseUrl;
    this.updateCartQuantity(); 
  }

  updateCartQuantity() {
    this._http.get<Product[]>(this._baseUrl + this._getProductsFromShoppingCart).subscribe(products => {
      this.log(`getting products from shopping cart`);
      this.cartQuantitySource.next(products.length);
    });
  }

  addProductToCart(product: Product) {
    this._http.post(this._baseUrl + this._addProductToShoppingCart + product.id, product, httpOptions).subscribe(x => {
      this.log(`added Product To Shopping Cart`);
      this.updateCartQuantity();
    });    
  }

  private handleError<T>(operation = 'operation', result?: T) {
    return (error: any): Observable<T> => {
      console.log(error); //log to console instead       
      this.log(`${operation} failed: ${error.message}`);
      return Observable.throw(error || 'Server error');
    };
  }
  private log(message: string) {
    console.log("Shopping Service " + message);
  }
}

One of the things, I am not liking is how api urls are hard coded as strings. This is something I want to improve upon. I will put them inside an injectable service which has all the urls.
Next thing I want to learn is authentication and authorization with ASP.NET Core.

Wednesday, June 20, 2018

A9–Building App using Angular and ASP.NET Core 2.1–Font-awesome, Pagination and Layout

This post is a part of a series of posts that I am writing as I am building an app using Angular and ASP.NET Core 2.1. Links to previous posts –> A1, A2, A3, A4, A5, A6, A7, A8, Github Repo

Today, I got carried away with home page layout and wasn’t able to fix communication between components. I spent trying to add pagination using some blogpost but then I discovered ngx-pagination. Below are things I was able to do.

1. Added pagination using ngx-pagination npm package it was pretty straight forward

2. Added font-awesome npm package so I could add shopping cart icon.

3. Added pagination to home page and products page

4. Added shopping-cart-widget component for displaying cart information

image

Next, I want to fix communication between components, ie. when you click on add to cart button it should add items to cart and call server side api method.

See ya next time.

Monday, June 18, 2018

A7–Building App using Angular and ASP.NET Core 2.1–Bootstrap 4, SASS, Cleanup

This post is a part of a series of posts that I am writing as I am building an app using Angular and ASP.NET Core 2.1. Links to previous posts –> A1, A2, A3, A4, A5, A6, A7, Github Repo

On training side, I finished watching Beginner Path for Angular on Pluralsight. I learnt some nice things about Angular CLI. I didn’t knew that Angular app can be created using SASS, CSS or LESS as default way of creating style files. Dry run option is awesome. I always liked how PowerShell had –WhatIf flag and every CLI should have these types of commands.

Let’s cover all the things I was able to accomplish today.

1. Refactored app.module.ts file to make it leaner. I moved all product related components, routes and services into product module. In the image below, on the left everything in red was moved into product module.

image

2. Set the default style extension to be SASS and renamed all .css files to .sass. Right now I didn’t not create any styles into any sass file. Ahem, have to learn first right. Actually, I heard it is not very different than .less so will see how sass is. I had to delete navmenu component styles that were created by default template.

image

3. While I have worked with Bootstrap 3 a lot, I wanted to learn Bootstrap 4 in this project so I updated to Bootstrap 4. When you install Bootstrap 4 in an angular project, npm doesn’t install jquery, popper.js libraries so, I had to install those. I had to fix styling for home page and navigation to use Bootstrap 4.

image

4. Other visual and layout changes includes moving nav menu to top, moving home page content to about page, adding products to home page for people to view products on sale.

image

You can see home page with product cards. The UI is all messed up right now. There are many changes need to be made to how cards are displayed. The bottom card is completely hideous—taking up whole page.

image

5. Bug fix. In product.service.ts there was bug found in the handleError function which was returning default type. It should have thrown error. This prevented server side validation error from being displayed to our user.

image

So that’s all for today. The app is completely garbage right now but I am making progress. My next goals are as follows:

1. Make home page UI responsive, add style for product cards, make navigation menu responsive and add more data to display cards appropriately.

2. Add product description and other product related meta data, display that data accordingly on home page, add more complex data validation—using dates and dropdown.

See ya next time.

Sunday, January 21, 2018

Control multiple servos using Raspberry Pi 2 Model B, PCA9685, Windows 10 IOT and C#

In this post, I will be showing you how to control servos using Raspberry Pi 2 model B, Windows 10 IOT, C#, PCA9685 and Visual Studio 2017.  This post assumes you have some experience running C# application on a remote device. I will not cover how you connect to Rpi2 via Visual Studio or anything related to deployment. There is also an accompanying youtube video I have created and you can find it here - https://youtu.be/gkWYirX8uHo.  For code and power point check links below.

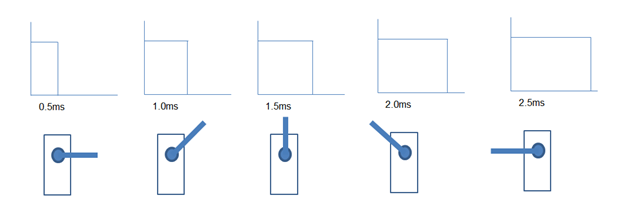
Servos motors typically turn 0 to 180 degrees. Some servos can go beyond 180 degree as well. The way you control servos is by providing a Pulse Width Modulation (PWM) signal. 

image


Raspberry Pi 2 has one hardware PWM pin and you can do software PWM via any of its GPIO pins.  If you want to control multiple servos then just one PWM hardware pin is not going to cut it and if you use GPIO pins and do PWM via software then you will not have enough GPIO pins for doing other work.  And PWM via software is also not that accurate. However, I am not too concerned about it for my project. 

So what are our options if we want to control multiple servos? Enter I2C protocol.  I2C is a protocol that enables master slave communication over SDA and SCL.  Via I2C you can have multiple devices (slaves) connect to our RPi2 (master) without taking up those GPIO pins. What does that mean? For example, if you see any sensor breakout boards that have I2C pins like SDA and SCL then you can connect multiple of those sensors directly to RPi2 via I2C. So we will use I2C pins of RPi2 to connect to PCA9685 chip which has 16 header pins that allow us to control up to 16 servos or 16 LEDs. With I2C and PCA9685 you can connect up to 62 PCA9685 boards and control up to 992 servos.

image

Let’s talk about PCA9685 and what it is.  The PCA9685 comes on a board typically if you buy from Adafruit or Amazon or any other retailer. I got mine from SunFounder via Amazon. The PCA9685 has 12-bit resolution. What does that mean? It means that it has a resolution of 2^12 = 4096. What does that mean? It means that for each period of your frequency you will have 4096 steps.  So let’s say your PWM frequency is 60Hz and 1/f is period T = 1/60s. T = 17ms. Now each 17ms is divided into 4096 steps. The time is taken per step is 17ms/4096=4.15us. If you want to give a pulse of 0.5ms then figure out how many steps are required.  Total Steps required for 0.5ms pulse = 0.5ms/4.15us = 120steps. Similarly you can find out steps required for 1ms,1.5ms,2ms,2.5ms. Below are the steps for these times.

0.0005 –> 120

0.0010 –> 240

0.0015 –> 361

0.0020 –> 481

0.0025 –> 602

How did I come up with these times and why do we need them? Typically servos turn 0 degrees if you provide a 0.5ms pulse, 1.0 for 60 degree pulse, 1.5ms for 90 degrees and 2.5ms for 180 degrees.  These are not accurate numbers and you find out these times for different servo motors. In our experiment we will fine tune our calculation so these turn servo exactly at a particular angle. Please see the section below where it says fine tuning our calculations so servo turn at our desired angle.

Now your next question is going to be how to turn servo at a specific angle other than 0,60,90 or 180.  In other words, if I want to turn servo at any random angle say 35 degrees, what is the number of steps we need to provide.

602-120 = 482 Total number of steps from 0 to 180 roughly.

480/180 = 2.7 Step per angle.

120 + 2.7x = Steps required to turn our servo at an angle x.

For 35 degrees,

120 + 2.7(35) = 214.5 Steps for 35 degrees.

Let’s summarize, to turn our servo at angle 35 degrees, we need to tell PCA9685 chip to turn the pulse HIGH for 214.5 steps and (4096-214.5) LOW.

image

Note: These calculations can change based upon your frequency and servo.  I am showing you this based upon Tower Pro SG90 micro servo motor at 60Hz frequency. Why 60Hz? Because this is a analog servo and analog servo you should have frequency ranging from 30Hz to 60Hz.

Since all the math is out of our way we can now focus other things.

1. Block diagram

In the block diagram, the things I haven’t shown are that Host PC and RPi2 are connected to their own keyboard, mouse and monitor.

image

2. Wiring diagram

The below image is from adafruit.com. Connecting multiple servos is pretty much straightforward.

raspberry_pi_ServoSketch

3. Coding

You are now really impatient to see the working code. Right. Every body seems to use Adafruit library provided in python.  The c# library from Adafruit i.e AdafruitClassLibrary available on nuget doesn’t work out of the box if you create a new UWP application in Visual Studio. Why? Because the it is just not updated and it has issues. So I copied Adafruit I2CBase.cs and PCA9685.cs classes and modified them so they will throw exceptions if anything goes wrong. The main page of the application has few textboxes and buttons to control servos.

You can find the source code at this github link.

Follow the steps to run the application.

1. Ensure that Platform is set to ARM and Build configuration to Debug

2. Start the Visual Studio debugger on RPi2. This you can start by the Device Portal under Debug menu.

3. Run the application and it will deploy to the device and the application will start. (For me debugging doesn’t work and a prompt appears and I close that prompt)

4. Once you have the application running you will see a UI as shown in the figure below.

5. Press InitPCA9685

6. Press 60 the Step 2 textbox and SetPWMFrequency

7. Then enter the desired angle for your servo say 30 degrees.

You can see some logging into the textblock as you are executing actions.

image

The line of code that actually sets the steps is actually very simple.

_pca9685.SetPin(0, ticks, false);
For 35 degree angle ticks are 214.5 ticks, the code sets the pin 0 (which is where the first servo is connected) to HIGH starting from 0th tick to 214.5 tick and turns it LOW from there on till 4095th tick.
4. Fine Tuning
If you have followed so far and found that servo horns do not go exactly from 0 to 180 then we will tackle it in this section. It either goes past 0 or beyond 180. So let’s try to fix it. 
a. Adjusting the lower and upper limit. 
Let’s Recap – Do you remember the values 120 and 602? I will wait. Go above and come back. Alright those are the only things that we need to alter. That will determine our angle equation. My values after adjustment are as follows: 
125 and 530
The resulting equation to calculate Ticks for a given angle is 
125+2.25*angle
Those two values are the biggest things.
b. Placing your servo horns
Placing your servo horns is important. The lower and upper bounds will be affected based upon how you place your servo horn. Normally I place servo horn after providing a zero pulse and mark the position. Sometimes the grove will not fit at the exact zero position. At this time you will have to modify the upper and lower tick values to fine tune that servo.  
c. Changing PWM frequency
All of our calculations were based upon 60Hz frequency. If you change this frequency then you will have to change recalculate everything again and do your tuning accordingly. 
Notes:
1. The angle of your servo will also depend on how you are mounting your servo horn. I would pulse the servo to zero’s position and then place the servo horn and fine tune the steps.
2. At some steps you will hear the servo is getting stuck. This is due to servo is not in the desired position. Adjust the tick plus or minus one and you will see that it doesn’t occur. This is where we need to tune our calculations. This is a trial and error process. 
3. Somehow I cannot debug the application while running using Visual Studio 2017. Hence I had to create UWP UI application with textboxes and buttons. You will need a monitor, keyboard, mouse connected to Rpi2 to enter the angle and visualize what is happening. 
4. If you would like to know all the components used in this then please refer the environment section.
Resources:
Below are the resources I have found to be useful while learning this process. 
1.  Adafruit Raspberry pi servo driver
2.  Sunfounder wiki
3.  PCA9685 datasheet
4.  AdafruitClassLibrary
5.  Full source code available here
6.  PowerPoint Slides
7.  YouTube Video Link

Environment

1. Windows IOT – 10.0.16299.125
2. Raspberry PI 2 Model B
3. Visual Studio 2017 Update 15.5
4. Power Supply for Raspberry PI 5V 2.1A
5. PCA9685 supplier (SunFounder)
6. Breadboard
7. Jumper wires
8. 5V Power Supply for PCA9685 (Eventtek Power Supply 0-30V 0-5A)
9. Host Computer OS (Windows 10)
10. Micro Servos (Tower Pro Micro Servo SG90)

Sunday, November 29, 2015

Making the Setup phase of Unit testing easier with StructureMap and FakeItEasy

In this post I am going to show you how I am using StructureMap Registry along with FakeItEasy to make the setup phase of my unit tests easier.  By no means I am claim that this is how it should be done but I feel it can be done this way. If you find any issues or it could be done better please let me know in the comments below. I will be happy to correct it and respond. In this post I am assuming you know about StructureMap, Dependency Injection, FakeItEasy and Unit Testing in general.

First about the problem I was facing and I am sure you must have faced it too and already solved it some other way. My system under test in this example is about an OrderingService which is responsible for placing orders, checking if inventory is there in warehouse or not and notify via email and log messages to database. Below is the code for OrderingService.  We are not interested in the details for the PlaceOrder function here.

 public interface IOrderingService
{
bool PlaceOrder(Order order);
}
public class OrderingService : IOrderingService
{
private IPaymentService _paymentService;
private IWarehouseService _warehouseService;
private ILoggingService _loggingService;
private IEmailService _emailService;
public OrderingService(
IPaymentService paymentService,
IWarehouseService warehouseService,
ILoggingService loggingService,
IEmailService emailService)
{
_paymentService = paymentService;
_warehouseService = warehouseService;
_loggingService = loggingService;
_emailService = emailService;
}
public bool PlaceOrder(Order order)
{
throw new NotImplementedException();
}
}

Like any system one system depends on the other and we now have a graph of dependency. For example, LoggingService depends upon IDataManager and EmailService depends upon ISmtpService.

  public interface ILoggingService
{
void Log(string logText);
}
public class LoggingService : ILoggingService
{
private IDataManager _dataManager;
public LoggingService(IDataManager dataManager)
{
_dataManager = dataManager;
}
public void Log(string logText)
{
throw new NotImplementedException();
}
}

I am not showing code for EmailService for brevity. With such graph my setup phase of the unit tests started to look like following.

  [TestClass]
public class BadOrderingServiceTests
{
//All Fakes to be injected.
private IPaymentService _paymentService;
private IEmailService _emailService;
private ILoggingService _loggingService;
private IWarehouseService _warehouseService;

//SUT
private IOrderingService _orderingService;

[TestInitialize]
public void Setup()
{
var smtpService = A.Fake<SmtpService>(
x => x.WithArgumentsForConstructor(
() => new SmtpService("Fake Smtp Server")));

_emailService = A.Fake<EmailService>(
x => x.WithArgumentsForConstructor(
() => new EmailService(smtpService)));


var dataManager = A.Fake<DataManager>(
x => x.WithArgumentsForConstructor(
() => new DataManager("Connection String")));

_loggingService = A.Fake<LoggingService>(
x => x.WithArgumentsForConstructor(
() => new LoggingService(dataManager)));

_paymentService = A.Fake<IPaymentService>();
_warehouseService = A.Fake<IWarehouseService>();

//SUT
_orderingService = new OrderingService(_paymentService,_warehouseService,_loggingService,_emailService);
}

[TestMethod]
public void PlaceOrder_OnPassingNonNullOrder_ShouldPlaceOrderSuccessfully()
{
//Arrange
var fixture = new Fixture();
var order = fixture.Create<Order>();

//Act
var result = _orderingService.PlaceOrder(order);

//Assert
Assert.IsTrue(result);
}
}

So you see in the setup method how much ceremony it requires to test this ordering service and if you have to do this again for another service then again all the dependencies have to be hooked in like this. Now for simplicity the paymentService and warehouseservice doesn’t take in any dependency so it is just a straight A.Fake<IPaymentService>().  This is all handy dandy for testing one service. But this isn’t ideal if you want to test another service which may require similar setup.  And another thing I kept reading everywhere is writing unit tests should be fast and easy and the setup should feel just like how you wrote your system under test. Clearly the setup phase is way different from how we wrote the OrderingService above.  You may ask how it is different? In the constructor of OrderingService, do you have to worry where LoggingService is getting its IDataManager from or EmailService getting its ISmtpServer? No right. Because it is being taken care by StructureMap registry like below.

    public class StructureMapRegistry : Registry
{
public StructureMapRegistry()
{
Scan(scan =>
{
scan.TheCallingAssembly();
scan.WithDefaultConventions();
scan.SingleImplementationsOfInterface();
});

For<IDataManager>().Singleton().Use<DataManager>()
.Ctor<string>("connectionString")
.Is("Production Connection String");

For<ISmtpService>().Singleton().Use<SmtpService>()
.Ctor<string>("smtpServer")
.Is("Production Smtp Server");
}
}

So you may ask why are you writing your setup that way. One reason is that I didn’t knew any other way and I learnt stuff harder way using google.  For now lets focus on a light bulb moment that inspired me to make my code better.  And here is a better way according to me. Just like how StructureMap took care for me the registration of all  dependencies [I love you StructureMap] of OrderingService why not StructureMap take of registering all the Fake dependencies [light blub].  Let’s create a different Registry which we will call FakeStructureMapRegistry.cs

 public class FakeStructureMapRegistry : Registry
{
public FakeStructureMapRegistry()
{
Scan(scan =>
{
scan.TheCallingAssembly();
scan.WithDefaultConventions();
});

For<IDataManager>()
.Singleton()
.Use(A.Fake<DataManager>(
y => y.WithArgumentsForConstructor(() =>
new DataManager("Fake Connection String"))));


For<ISmtpService>()
.Singleton()
.Use(A.Fake<SmtpService>(
y => y.WithArgumentsForConstructor(() =>
new SmtpService("Fake Smtp Server"))));

For<ILoggingService>().Use(A.Fake<ILoggingService>());
For<IPaymentService>().Use(A.Fake<IPaymentService>());
For<IWarehouseService>().Use(A.Fake<IWarehouseService>());
For<IEmailService>().Use(A.Fake<IEmailService>());
For<IOrderingService>().Use(A.Fake<IOrderingService>());
}
}

Question: Why I am also registering SUT OrderingService inside FakeStructureMapRegistry? Because in this Fake registry I don’t want to keep changing which class is under test and which one isn’t. I will register all the Fakes at once and not worry about it. More on that in the next paragraph. Now we will use this Fake registry in our setup method. So here is how my modified unit test looks like.

  [TestClass]
public class OrderingServiceTest
{
private IPaymentService _paymentService;
private IEmailService _emailService;
private ILoggingService _loggingService;
private IWarehouseService _warehouseService;
private IContainer _container;

//SUT
private IOrderingService _orderingService;

[TestInitialize]
public void Setup()
{
_container = new Container(x => x.AddRegistry(new FakeStructureMapRegistry())); //registering all FAKES.
_container.EjectAllInstancesOf<IOrderingService>(); //ejecting FAKE SUT
_container.Configure(x => x.AddType(typeof(IOrderingService), typeof(OrderingService))); //registering SUT

_paymentService = _container.GetInstance<IPaymentService>();
_emailService = _container.GetInstance<IEmailService>();
_loggingService = _container.GetInstance<ILoggingService>();
_warehouseService = _container.GetInstance<IWarehouseService>();
_orderingService = _container.GetInstance<IOrderingService>();
}
[TestMethod]
public void PlaceOrder_OnPassingNonNullOrder_ShouldPlaceOrderSuccessfully()
{
//Arrange
var fixture = new Fixture();
var order = fixture.Create<Order>();

//Act
var result = _orderingService.PlaceOrder(order);

//Assert
Assert.IsTrue(result);
}
}

Let’s go into detail about the first three lines in the Setup method and rest is self explanatory.  Line 1 – we create a new structuremap container and add our FakeStructureMapRegistry class. That takes care of configuring all the Fake dependencies including our SUT which should never be a mocked or faked object. Hence line 2 – which tell the container to eject all the instances of IOrderingService because I will configure it as not Fake and real OrderingService on Line 3. So that’s all. The rest of the lines gets instances from the container which will look  a bit familiar to the constructor of OrderingService.  I love this setup method. This exactly feels how I would write my system under test.  If you were to configure another service say LoggingService then it would be like this.

[TestClass]
public class LoggingServiceTest
{
private IContainer _container;
private IDataManager _dataManager;

private ILoggingService _loggingService;
[TestInitialize]
public void Setup()
{
_container = new Container(x => x.AddRegistry(new FakeStructureMapRegistry())); //registering all FAKES.
_container.EjectAllInstancesOf<ILoggingService>(); //ejecting FAKE SUT
_container.Configure(x => x.AddType(typeof(ILoggingService), typeof(LoggingService))); //registering SUT

_dataManager = _container.GetInstance<IDataManager>();
_loggingService = _container.GetInstance<ILoggingService>();
}
}

So that’s it. What do you guys think of this way of setting up? Please let me know in the comments sections below and thank you for reading the post.

Friday, September 25, 2015

Creating a very simple Ajax Form in ASP.NET MVC 4

In this post, I am going to demonstrate how to create a simple Ajax Form in ASP.NET MVC 4 application using Visual Studio.  I am using Visual Studio 2015 but this should work with VS 2013 too. We are going to submit information about a person using some ajax and with minimum use of javascript.  There is javascript used but we are taking advantage of the wonderful tooling and template benefits of ASP.NET MVC4.  I assume you know some basics of ASP.NET MVC 4 but to get started you create a default asp.net mvc 4 application inside visual studio.

Before diving right into code you may want to check the pre-requisites section below.

PREREQUISITES

Packages.

 You will need if not already installed jQuery, jQuery.UI.Combined, jQuery.Validation, Microsoft.jQuery.Unobtrusive.Ajax, Microsoft.jQuery.Unobtrusive.Validation. Below is how my packages look like.

<?xml version="1.0" encoding="utf-8"?>
<packages>
  <package id="Antlr" version="3.4.1.9004" targetFramework="net451" />
  <package id="bootstrap" version="3.0.0" targetFramework="net451" />
  <package id="EntityFramework" version="6.1.1" targetFramework="net451" />
  <package id="jQuery" version="1.10.2" targetFramework="net451" />
  <package id="jQuery.UI.Combined" version="1.11.2" targetFramework="net451" />
  <package id="jQuery.Validation" version="1.13.0" targetFramework="net451" />
  <package id="Microsoft.AspNet.Identity.Core" version="2.1.0" targetFramework="net451" />
  <package id="Microsoft.AspNet.Identity.EntityFramework" version="2.1.0" targetFramework="net451" />
  <package id="Microsoft.AspNet.Identity.Owin" version="2.1.0" targetFramework="net451" />
  <package id="Microsoft.AspNet.Mvc" version="5.2.2" targetFramework="net451" />
  <package id="Microsoft.AspNet.Razor" version="3.2.2" targetFramework="net451" />
  <package id="Microsoft.AspNet.Web.Optimization" version="1.1.3" targetFramework="net451" />
  <package id="Microsoft.AspNet.WebPages" version="3.2.2" targetFramework="net451" />
  <package id="Microsoft.jQuery.Unobtrusive.Ajax" version="3.2.2" targetFramework="net451" />
  <package id="Microsoft.jQuery.Unobtrusive.Validation" version="3.2.2" targetFramework="net451" />
  <package id="Microsoft.Owin" version="2.1.0" targetFramework="net451" />
  <package id="Microsoft.Owin.Host.SystemWeb" version="2.1.0" targetFramework="net451" />
  <package id="Microsoft.Owin.Security" version="2.1.0" targetFramework="net451" />
  <package id="Microsoft.Owin.Security.Cookies" version="2.1.0" targetFramework="net451" />
  <package id="Microsoft.Owin.Security.Facebook" version="2.1.0" targetFramework="net451" />
  <package id="Microsoft.Owin.Security.Google" version="2.1.0" targetFramework="net451" />
  <package id="Microsoft.Owin.Security.MicrosoftAccount" version="2.1.0" targetFramework="net451" />
  <package id="Microsoft.Owin.Security.OAuth" version="2.1.0" targetFramework="net451" />
  <package id="Microsoft.Owin.Security.Twitter" version="2.1.0" targetFramework="net451" />
  <package id="Microsoft.Web.Infrastructure" version="1.0.0.0" targetFramework="net451" />
  <package id="Modernizr" version="2.6.2" targetFramework="net451" />
  <package id="Newtonsoft.Json" version="6.0.3" targetFramework="net451" />
  <package id="Owin" version="1.0" targetFramework="net451" />
  <package id="Respond" version="1.2.0" targetFramework="net451" />
  <package id="WebGrease" version="1.5.2" targetFramework="net451" />
</packages>

Bundles

 public class BundleConfig
{
// For more information on bundling, visit http://go.microsoft.com/fwlink/?LinkId=301862
public static void RegisterBundles(BundleCollection bundles)
{
bundles.Add(new ScriptBundle("~/bundles/jquery").Include(
"~/Scripts/jquery-{version}.js"));

bundles.Add(new ScriptBundle("~/bundles/jqueryval").Include(
"~/Scripts/jquery.validate*",
"~/Scripts/jquery.unobtrusive-ajax*"));

bundles.Add(new ScriptBundle("~/bundles/jqueryui")
.Include("~/Scripts/jquery-ui-*"));

bundles.Add(new StyleBundle("~/Content/jquerycss")
.Include("~/Content/themes/base/datepicker.css"));

bundles.Add(new ScriptBundle("~/bundles/modernizr").Include(
"~/Scripts/modernizr-*"));

bundles.Add(new ScriptBundle("~/bundles/bootstrap").Include(
"~/Scripts/bootstrap.js",
"~/Scripts/respond.js"));

bundles.Add(new StyleBundle("~/Content/css").Include(
"~/Content/bootstrap.css",
"~/Content/site.css"));

// Set EnableOptimizations to false for debugging. For more information,
// visit http://go.microsoft.com/fwlink/?LinkId=301862
BundleTable.EnableOptimizations = true;
}
}

Let’s dive in.


First we create a person class i.e model in the models folder inside your application. Notice the data annotations used to trigger form validation. These will be triggered on the client side when the user enters invalid information. Most of them are self explanatory however special mention to the confirm password field. It is so easy to do password confirmation here.

using System;
using System.Collections.Generic;
using System.ComponentModel.DataAnnotations;
using System.Linq;
using System.Web;

namespace AspNetAjaxForm.Models
{
public class Person
{
[Required()]
[DataType(DataType.Text)]
[StringLength(50, MinimumLength = 3)]
public string FirstName { get; set; }

[Required()]
[DataType(DataType.Text)]
[StringLength(50, MinimumLength = 3)]
public string LastName { get; set; }

[Required]
[DataType(DataType.EmailAddress)]
public string Email { get; set; }

[Required]
public DateTime BirthDate { get; set; }

[DataType(DataType.Text)]
[StringLength(50,MinimumLength=6)]
[Required]
public string Username { get; set; }

[DataType(DataType.Password)]
[StringLength(255, MinimumLength = 8)]
[Required]
public string Password { get; set; }

[Compare("Password")]
[DataType(DataType.Password)]
[StringLength(255, MinimumLength=8)]
public string ConfirmPassword { get; set; }
}
}

Next we will create Register.cshtml page as shown below inside Views/Home folder.  For explanation see paragraph below code

@model AspNetAjaxForm.Models.Person
@{
ViewBag.Title = "Register";
}
<h2>Register</h2>
<div id="register-main">
<div id="register-main-loading-img">
<img id="loading-img" alt="loading" src="~/Content/loadingAnimation.gif">
</div>
@Html.Partial("_RegisterForm",Model)
</div>
@section scripts
{
<script type="text/javascript">
$(document).on('focus', '[data-date="birthdate"]', function () {
$(this).datepicker({
changeMonth: true,
changeYear: true
});
});
</script>
}

In the code above we specify that this form will take in strongly typed model Person. In the register-main div we have two things, one is loading image which is a spinning .gif image that you can easily get from internet and the other is a Partial view called _RegisterForm.cshtml that accepts our Model object. We will create _RegisterForm in the next step.  In the Scripts section we use Jquery to configure our date picker to show month and year field to select Birthdate. Lets’ create _RegisterForm view using the create template with Person as strongly typed object.  Now I have modified the form to use Ajax.BeginForm.  See description of the code below.

@model AspNetAjaxForm.Models.Person

<div id="ajaxForm">
@using (Ajax.BeginForm("Register", "Home", null,
new AjaxOptions
{
HttpMethod = "POST",
InsertionMode = InsertionMode.ReplaceWith,
UpdateTargetId = "ajaxForm",
LoadingElementId = "register-main-loading-img"
}))
{
@Html.AntiForgeryToken()

<div class="form-horizontal">
<h4>Person</h4>
<hr />
@Html.ValidationSummary(true, "", new { @class = "text-danger" })
<div class="form-group">
@Html.LabelFor(model => model.FirstName, htmlAttributes: new { @class = "control-label col-md-2" })
<div class="col-md-10">
@Html.EditorFor(model => model.FirstName, new { htmlAttributes = new { @class = "form-control" } })
@Html.ValidationMessageFor(model => model.FirstName, "", new { @class = "text-danger" })
</div>
</div>

<div class="form-group">
@Html.LabelFor(model => model.LastName, htmlAttributes: new { @class = "control-label col-md-2" })
<div class="col-md-10">
@Html.EditorFor(model => model.LastName, new { htmlAttributes = new { @class = "form-control" } })
@Html.ValidationMessageFor(model => model.LastName, "", new { @class = "text-danger" })
</div>
</div>

<div class="form-group">
@Html.LabelFor(model => model.Email, htmlAttributes: new { @class = "control-label col-md-2" })
<div class="col-md-10">
@Html.EditorFor(model => model.Email, new { htmlAttributes = new { @class = "form-control" } })
@Html.ValidationMessageFor(model => model.Email, "", new { @class = "text-danger" })
</div>
</div>

<div class="form-group">
@Html.LabelFor(model => model.BirthDate, htmlAttributes: new { @class = "control-label col-md-2"})
<div class="col-md-10">
@Html.EditorFor(model => model.BirthDate, new { htmlAttributes = new { @class = "form-control", data_date = "birthdate" } })
@Html.ValidationMessageFor(model => model.BirthDate, "", new { @class = "text-danger" })
</div>
</div>

<div class="form-group">
@Html.LabelFor(model => model.Username, htmlAttributes: new { @class = "control-label col-md-2" })
<div class="col-md-10">
@Html.EditorFor(model => model.Username, new { htmlAttributes = new { @class = "form-control" } })
@Html.ValidationMessageFor(model => model.Username, "", new { @class = "text-danger" })
</div>
</div>

<div class="form-group">
@Html.LabelFor(model => model.Password, htmlAttributes: new { @class = "control-label col-md-2" })
<div class="col-md-10">
@Html.EditorFor(model => model.Password, new { htmlAttributes = new { @class = "form-control" } })
@Html.ValidationMessageFor(model => model.Password, "", new { @class = "text-danger" })
</div>
</div>

<div class="form-group">
@Html.LabelFor(model => model.ConfirmPassword, htmlAttributes: new { @class = "control-label col-md-2" })
<div class="col-md-10">
@Html.EditorFor(model => model.ConfirmPassword, new { htmlAttributes = new { @class = "form-control" } })
@Html.ValidationMessageFor(model => model.ConfirmPassword, "", new { @class = "text-danger" })
</div>
</div>

<div class="form-group">
<div class="col-md-offset-2 col-md-10">
<input type="submit" value="Create" class="btn btn-default" />
</div>
</div>
</div>
}

<div>
@Html.ActionLink("Back to List", "Index")
</div>
</div>

In the above code, first line is obvious it takes in Person object. We wrap everything into ajaxForm div. The key parts here are as follows:


1. Using Ajax.BeginForm allows us submit form using Ajax.  The parameters say that when I click on the submit button please post this form using “Register” action on the “Home” controller which accepts “POST” request. After the form is submitted replace the contents of “ajaxForm” div with result of request and while you process the request display the loading image we specified earlier. 


2. Everything inside div form-horizontal is created using create a new asp.net mvc 4 view with a strongly typed model of type person. I modified the Birthdate field to take in the jquery ui date picker pay attention to the data_date attribute eg. data_date = "birthdate" we had inside the Register page.


Now we are going to see how everything clubs together. Until now you may be a bit lost. So lets check out our controller.  In the home controller create following methods.

           [HttpGet]
public ActionResult Register()
{
return View(new Person());
}

[HttpPost]
public async Task<PartialViewResult> Register(Person person)
{
await Task.Delay(1000);
if ((new string[] {"mitul1","mitul11","mitul12","mitul13"}).Contains(person.Username))
{
ModelState.AddModelError("Username", String.Format("username {0} is already taken", person.Username));
}
if (ModelState.IsValid)
{
return PartialView("_RegistrationResult");
}
return PartialView("_RegisterForm", person);
}

When you run the application and navigate to /Home/Register page it will hit the first Register method and display the Register.cshtml view. And inside Register.cshtml we have _RegisterFrom.cshtml partial view which will ultimately render the form.  After filling the form out when you click on the submit button the second Register method is called that takes in a Person object. This register method returns a PartialView in both the cases 1. if the form is successful 2. if the form has errors. Lets’ understand the second Register method in a little bit more detail.


1. This method uses async and await since you may be submitting the form to a database or checking validation against a web service asynchronously.  Special notice – See the async keyword on the method signature and because of that we cannot just return PartialViewResult we have decorate the method signature with Task<PartialViewResult>.  For demo purposes, I am using await Task.Delay(1000) instead of an async web call.


2. The first if statement checks if the username is already taken or not. This is just for demo purpose but you may have some complex validation on the server side and if any field is invalid then you want to throw that error back and the user should see it below that field. See the image below. You do that by using the ModelState.AddModelError method which takes in field name and error message. In our case we wanted to display that this username is already taken so we have specified ModelState.AddModelError(“username”,String.Format(”username {0} is already taken”,person.username);  Because of this statement our person model that was submitted by the user is invalidated and we return the same _RegisterForm.cshtml Partial view with person model.


image


3. If the model was valid then we enter into the second if statement and submit our person to a database or call a web service. Based upon you business logic you can do other things like if the form was unsuccessful show different message etc. In our case we are showing a partial view called _RegistrationResult.cshtml. You can modify this view to display either confirmation or error message.


Last but not the least to show stuff properly I am using following CSS.

#register-main{
position:relative;
border:3px solid green;
z-index:10;
}
#register-main-loading-img{
display:none;
position:absolute;
z-index:1;
top:0px;
left:0px;
width:100%;
height:100%;
border:3px solid orange;
background-color:rgba(216, 213, 213, 0.89);
}
#loading-img{
border:3px solid blue;
display:block;
position:relative;
width:100px;
height:100px;
margin-left:auto;
margin-right:auto;
top:50%;
}


So that’s about it. If you like this post of have any comments leave in the comments section.