Showing posts with label Visual Studio 2012. Show all posts

Friday, September 18, 2015

Visual Studio Extension of the Week: Inline Color Picker

If you are a web developer then most modern IDE’s have this feature and thanks to Web Essentials and ReSharper I am used to seeing color next to their hex code counterpart inside Visual Studio. But if you are working in XAML then by default Visual Studio does not have this feature. In this post I want to mention a visual studio extension Inline Color Picker that displays actual color next to the hex code inside your XAML file. It allows you to pick a color of your choice using a color picker. I wonder why XAML team at Microsoft doesn’t add this feature.

image

image

Note this Extension has been there for Visual Studio 2015, 2013, 2012, 2010 all along.  Go download it if you are working with XAML.

Thursday, February 27, 2014

Introducing TfsManager Some PowerShell cmdlets to work with Tfs

TfsManager is a project hosted on github by me.  The idea came about this project when I was fiddling around with Team Foundation Server Object Model.  Using the .dlls that are provided as part of Visual Studio installation or Team Explorer, you can pretty much do anything with TFS using code.  I wanted to explore what I can do with that Object Model.  At first sight these PowerShell cmdlets don’t seem to solve a significant problem that can’t be solved with traditional GUI or TF.exe.  But let’s hold on to that thought for a while.  Let’s get started.

github url: https://github.com/mitulsuthar/TfsManager

You can fork it, submit issues and pull requests.  I will be happy to work with you. 

Install the PowerShell module by using this single command. 

(new-object Net.WebClient).DownloadString("https://raw.github.com/mitulsuthar/TfsManager/master/tools/InstallTfsManager.ps1") | iex

This will copy .dll file into your Modules folder under a directory called TfsManager.Cmdlets.


image


Note: There is no help file included right now so traditional help cmdlets won’t return any examples.


1. Get all the cmdlets available for this module.


PS C:\> get-command -module TfsManager.cmdlets


 image


2. Get all the Tfs Server Url configured on your machine.


PS C:\>Get-TfsServer


image


Note: I apologize for some whitening on the output as I had to hide some sensitive information.


If you have just one Tfs Server then it will return a String object and if you have more than one then it will return array of string.


3. Get all the Team Project Collection for a particular Tfs Server. 

PS C:\> Get-TfsProjectCollection -ServerUri (get-TfsServer)[0]

From (2) you can see I am referencing the first Tfs Server which is the VisualStudio hosted version of Tfs.  If your credentials aren’t cached then it will ask you to first connect to it using a Microsoft Account.  After you provide your credentials you will see your Tfs Project Collections.


image


Alright. Here comes why these cmdlets are of interest. Because they provide you the full .Net object work inside PowerShell.  Let’s get the returned Project Collection into a variable $col and do a get-member.


image


Ah ! See all the methods and properties you can get to.  But I know you are not happy with this.  Let’s do something more.  So if you have worked with Tf.exe then you might know that Tf.exe commands work if you provide TeamProjectcollectionUri or if you are currently on a path that is mapped to your project folder.  I am going to navigate to a project folder locally inside PowerShell and then try to run some cmdlets.


3. Get mapped workspace for a particular path

PS C:\Your Mapped Folder Path>Get-TfsWorkspace

image


Aha! It returns a .Net object of Type Workspace.  Let’s do Get-Member on the workspace and see if you are impressed or not.  There are more methods and properties that I can’t show in the screenshot below.  You can do all the interesting stuff with just Get-TfsWorkspace command. You can get reference to objects returned by these cmdlets and write your own script to do some work. 


image


Actually this project TfsManager is a by product of something I am working with managing Tfs Builds. I will share that project some time later.  But talking of Builds let find out if there is something for us in these cmdlets.


4. Get all the BuildDefinitions associated with the currently mapped folder or a project.

PS C:\Your Mapped Folder Path>Get-TfsBuildDefinition

Warning: This will enumerate all the properties of a BuildDefinition  and it will clutter your output. 


Again Get-Member to the rescue.  After getting a reference to our build definition we perform the following methods on that BuildDefinition.  For shorthand do Get-TfsBuildDefinition | Select Name


image


Alright one last command before I conclude this post.


5. Get all the builds for a particular mapped path

PS C:\Your Mapped Folder Path>Get-TfsBuild

This command will first get the Team Project and find all the builds. Again be careful it will enumerate all the properties for the object IBuildDetail.  So a Get-Member again to see all the methods.


image


To see just the important information you can do the following command.


image


Sometimes if you have lots of builds older than certain date or meet certain criteria and want to just delete them then you can do that easily in a script.


6.  Ok I couldn’t resist this one.  Not very useful but you can still play with it. For a particular path you can get PendingChanges too.


Get-TfsPendingChanges | select localitem


So that’s about it for now.  I have lots of hypothetical scenarios coming in my mind that I can do with these cmdlets but I want to hear from you on what do you think about this project and what are the bugs and issues. 

Friday, November 22, 2013

Show selected item details from Autocomplete dropdownlist of jQuery using PartialView

This is a continuation of a series around Autocomplete using jQuery in Asp.net MVC4.

1. Implement Autocomplete using jQuery UI inside Asp.Net MVC4 Application

2. Show selected item details from Autocomplete dropdownlist of jQuery UI – (using Knockout)

3. Show selected item details from Autocomplete dropdownlist of jQuery UI – (using PartialView)

In the last post we looked at how to display details about a selected person from the dropdownlist of jQuery UI Autocomplete using Knockout.js. Knockout.js allowed us to databind our ViewModel with our view.  In this post we are going to look at how to do show details of a person but using a PartialView. 

1. Right click on the Home folder>Add>View.

image

2. Type the name of the view as _Person

image

3. Create another method named GetPerson just like the following but this one returns a PartialViewResult instead of JsonResult.  And in our select statement of LINQ query we are return a custom class with all the properties.  We had to do otherwise we won’t be able to strongly type our view.  For demo purposes I have created the class in the same class as the controller but in real world application I create separate ViewModel folder and create classes there.

[HttpGet]
public PartialViewResult GetPerson(int id)
{
var user = (from p in db.People
join e in db.Employees
on p.BusinessEntityID equals e.BusinessEntityID
join be in db.BusinessEntityAddresses on p.BusinessEntityID equals be.BusinessEntityID
join ad in db.Addresses on be.AddressID equals ad.AddressID
join st in db.StateProvinces on ad.StateProvinceID equals st.StateProvinceID
where p.BusinessEntityID == id
select new PersonDetail
{
Id = p.BusinessEntityID,
FullName = p.LastName + ", " + p.FirstName,
LastName = p.LastName,
FirstName = p.FirstName,
JobTitle = e.JobTitle,
HireDate = e.HireDate,
AddressLine1 = ad.AddressLine1,
City = ad.City,
PostalCode = ad.PostalCode,
State = st.Name
}).ToList().First();
if (user == null)
{
HttpNotFound();
}
return PartialView("_Person", user);
}

Add the following class for PersonDetail below the controller class in your HomeController.

public class PersonDetail
{
public int Id { get; set; }
public string FullName { get; set; }
public string LastName { get; set; }
public string FirstName { get; set; }
public string JobTitle { get; set; }
public DateTime HireDate { get; set; }
public string AddressLine1 { get; set; }
public string City { get; set; }
public string PostalCode { get; set; }
public string State { get; set; }
}

Let's make sure our PartialView _Person.cshtml accepts our model of type PersonDetail.

@model AspNetDemo06.Controllers.PersonDetail
<p>@Model.Id </p>
<p>@Model.FullName </p>
<p>@Model.LastName </p>
<p>@Model.FirstName </p>
<p>@Model.JobTitle </p>
<p>@Model.HireDate </p>
<p>@Model.AddressLine1 </p>
<p>@Model.City = ad.City </p>
<p>@Model.PostalCode </p>
<p>@Model.State </p>

Finally fix few things to fix in our Index.cshtml page. First create a div with id selectedPerson.

<div id="selectedPerson">

</div>

Then in our javascript code, first instead of FindPerson change it to GetPerson. Then in the success method of ajax call just replace the div with the returned partial view.

 $(document).ready(function () {
$("#SearchString").autocomplete({
source: function (request, response) {
$.ajax({
url: "/Home/Find",
data: "{ 'prefixText': '" + request.term + "' }",
dataType: "json",
type: "POST",
contentType: "application/json; charset=utf-8",
dataFilter: function (data) { return data; },
success: function (data) {
response($.map(data, function (item) {
return {
label: item.value,
value: item.value,
id: item.id,
firstname: item.firstname,
lastname: item.lastname
}
}))
},
error: function (XMLHttpRequest, textStatus, errorThrown) {
alert(textStatus);
}
});
},
minLength: 2,
select: function (even, ui) {
var businessEntityId = ui.item.id;
$.ajax({
url: "/Home/GetPerson",
type: "GET",
data: { "id": businessEntityId}
}).done(function () {
}).success(function (person) {
$("#selectedPerson").html(person);
});
}
});
});

In the above code line 36 the person object is our partial view that we inserting in the div of id selectedPerson.


image

Monday, November 18, 2013

Show selected item details after selecting an item from autocomplete dropdownlist using Knockout.js

This is a continuation of previous post where we looked at how to implement autocomplete functionality into Asp.net MVC 4 application using jQuery UI and Ajax.  In the previous post when you selected a particular user it redirected you to a different page.  What if we want to show information about that user on the same page without any page refresh.  In this post we are going to do exactly the same thing.  Well there are many ways to do this but I want to show you the one using Knockout.js. To use Knockout.js first include it in our BundleConfig.cs  

bundles.Add(new ScriptBundle("~/bundles/knockout").Include("~/Scripts/knockout-*"));

Second lets tell our _layout.cshtml page to load knockout.

<body>
@RenderBody()
@Scripts.Render("~/bundles/jquery")
@Scripts.Render("~/bundles/jqueryui")
@Scripts.Render("~/bundles/knockout")
@RenderSection("scripts", required: false)
</body>

Add the following javascript below the autocomplete method in Index.cshtml page. This is a PersonViewModel which has properties like LastName, FirstName and BusinessEntityID.

 
//ViewModels Knockout
function PersonViewModel(data) {
this.LastName = ko.observable(data.lastname);
this.FirstName = ko.observable(data.firstname);
this.BusinessEntityId = ko.observable(data.id);
}

We created a ViewModel for the Person Object called PersonViewModel. And ko.observable(data.lastname) means that lastname is an observable property. Next add the following div section where we are going to display selected person’s information.  Inside the span tag see the data-bind=”text: LastName” it will be replaced by the LastName returned from our select function inside autocomplete.

<div style="display: none;" data-bind="visible: true">
<span data-bind="text: LastName"></span>
<span data-bind="text: FirstName"></span>
</div>

In this post I want to just focus on people who are employees. So lets make sure we allow users to search just for Employees. Make appropriate changes suggested below

[HttpPost]
public JsonResult Find(string prefixText)
{
var suggestedUsers = from x in db.People
where x.LastName.StartsWith(prefixText) && x.PersonType == "EM"
select new {
id = x.BusinessEntityID,
value = x.LastName + ", " + x.FirstName,
firstname = x.FirstName,
lastname = x.LastName};
var result = Json(suggestedUsers.Take(5).ToList());
return result;
}

One last thing before we run our application. Replace the window.location.href line with  ko.applyBindings(new PersonViewModel(ui.item));  This will databind our selected person to the datatemplate shown above.

@section scripts{
<script type="text/javascript">
//Javascript function to provide AutoComplete and Intellisense feature for finding Users.
$(document).ready(function () {
$("#SearchString").autocomplete({
source: function (request, response) {
$.ajax({
url: "/Home/Find",
data: "{ 'prefixText': '" + request.term + "' }",
dataType: "json",
type: "POST",
contentType: "application/json; charset=utf-8",
dataFilter: function (data) { return data; },
success: function (data) {
response($.map(data, function (item) {
return {
label: item.value,
value: item.value,
id: item.id,
firstname: item.firstname,
lastname: item.lastname
}
}))
},
error: function (XMLHttpRequest, textStatus, errorThrown) {
alert(textStatus);
}
});
},
minLength: 2,
select: function (even, ui) {
ko.applyBindings(new PersonViewModel(ui.item));
}
});
});
//ViewModels Knockout
function PersonViewModel(data) {
this.LastName = ko.observable(data.lastname);
this.FirstName = ko.observable(data.firstname);
this.BusinessEntityId = ko.observable(data.id);
}
</script>
}
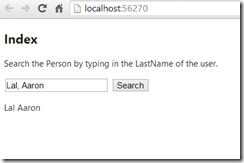
image


I just wanted to show that it could be done with Knockout. At this point our search button is non-functional. We will make it functional later. One thing to notice here is that the information about the selected user is grabbed from the initial query we did to find suggested users.  To bring in more information we would have to adjust our LINQ query.  And I know what you are thinking right now, “But Mitul, that would bring in all the unnecessary information about other users in which we are not interested.” So we are going to write another method in our HomeController to bring in information just about that selected person. Before doing that let’s update our model to bring in additional information about our selected person.


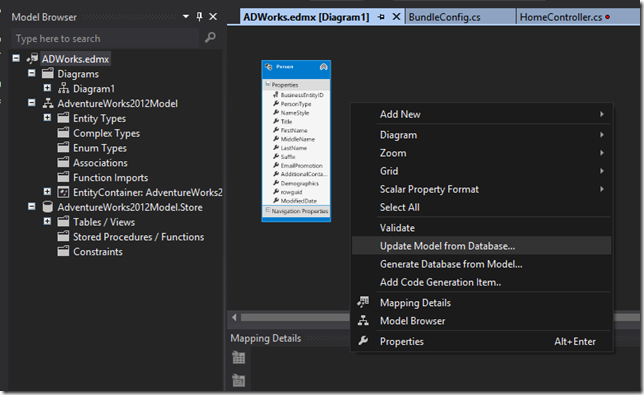
Open the ADworks.edmx file inside our Models folder and then click anywhere next to the entity and select “Update Model from Database


image


And then check on these entities Employee, Address, BusinessEntityAddress, StateProvince. 
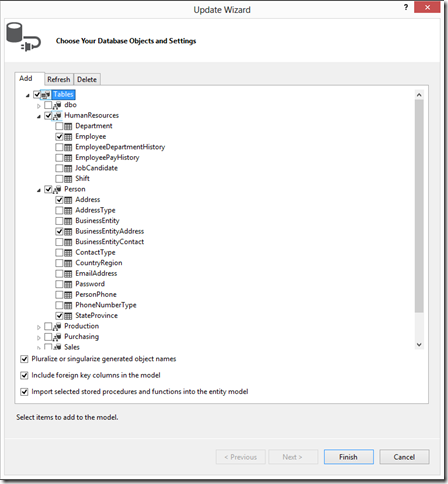

image

Now FindPerson method will return detailed information about the selected person.
        [HttpGet]
public JsonResult FindPerson(int id)
{
var user = (from p in db.People
join e in db.Employees
on p.BusinessEntityID equals e.BusinessEntityID
join be in db.BusinessEntityAddresses on p.BusinessEntityID equals be.BusinessEntityID
join ad in db.Addresses on be.AddressID equals ad.AddressID
join st in db.StateProvinces on ad.StateProvinceID equals st.StateProvinceID
where p.BusinessEntityID == id
select new
{
Id = p.BusinessEntityID,
FullName = p.LastName + ", " + p.FirstName,
LastName = p.LastName,
FirstName = p.FirstName,
JobTitle = e.JobTitle,
HireDate = e.HireDate,
AddressLine1 = ad.AddressLine1,
City = ad.City,
PostalCode = ad.PostalCode,
State = st.Name
}).ToList().First();
if (user == null)
{
HttpNotFound();
}
return Json(user, JsonRequestBehavior.AllowGet);
}

Inside our select function of AutoComplete we are going to make an ajax call [line 31] to this method passing in the BusinessEntityID [line 35] for the Person to FindPerson method [line 33]. Also I have made changes to the PersonViewModel to reflect all the properites returned from the FindPerson method.

@section scripts{
<script type="text/javascript">
$(document).ready(function () {
$("#SearchString").autocomplete({
source: function (request, response) {
$.ajax({
url: "/Home/Find",
data: "{ 'prefixText': '" + request.term + "' }",
dataType: "json",
type: "POST",
contentType: "application/json; charset=utf-8",
dataFilter: function (data) { return data; },
success: function (data) {
response($.map(data, function (item) {
return {
label: item.value,
value: item.value,
id: item.id,
firstname: item.firstname,
lastname: item.lastname
}
}))
},
error: function (XMLHttpRequest, textStatus, errorThrown) {
alert(textStatus);
}
});
},
minLength: 2,
select: function (even, ui) {
var businessEntityId = ui.item.id;
$.ajax({
url: "/Home/FindPerson",
type: "GET",
data: { "id": businessEntityId}
}).done(function () {
}).success(function (person) {
ko.applyBindings(new PersonViewModel(person));
});
}
});
});
//Person Detailed View Model
function PersonViewModel(p) {
this.Id = ko.observable(p.Id);
this.FullName = ko.observable(p.FullName);
this.LastName = ko.observable(p.LastName);
this.FirstName = ko.observable(p.FirstName);
this.JobTitle = ko.observable(p.JobTitle);
this.HireDate = ko.observable(p.HireDate);
this.AddressLine1 = ko.observable(p.AddressLine1);
this.City = ko.observable(p.City);
this.PostalCode = ko.observable(p.PostalCode);
this.State = ko.observable(p.State);
}
</script>
}

Finally lets update our div to reflect all the udpated user properties.

<div style="display: none;" data-bind="visible: true">
FullName:<span data-bind="text: FullName"></span>
<br/> LastName:<span data-bind="text: LastName"></span>
<br/> FirstName:<span data-bind="text: FirstName"></span>
<br/> HireDate:<span data-bind="text: HireDate"></span>
<br/> Job Title:<span data-bind="text: JobTitle"></span>
<br/> AddressLine1: <span data-bind="text: AddressLine1"></span>
<br/> City: <span data-bind="text: City"></span>
<br/> PostalCode: <span data-bind="text: PostalCode"></span>
<br/> State: <span data-bind="text: State"></span>
</div>

Run the application and search a particular user.
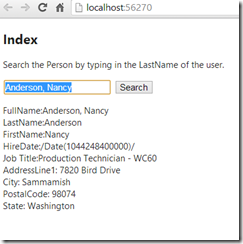

image


In this post, we looked at how to show selected user’s information after search for a user using jQuery UI’s autocomplete method.  Initially to display the selected user we simply data binded the object returned by the select object, we didn’t went to server to find more information.  In the final attempt we did another ajax call to the server to find more information about the user.  In the next post we will look into how to show detailed information about a person using a PartialView. 

Friday, November 15, 2013

Implement Autocomplete using Jquery UI inside Asp.NET MVC4 application

I think the title explains what I am going to accomplish in this blogpost.  I assume you have AdventureWorks2012 database, visual studio 2012 installed. So let’s get started.
1. Open Visual Studio 2012/2013. I am using VS2012 for this demo.
2. Create an Asp.Net MVC 4 Application and Click on basic application for this demo.
3. Add a new controller to your project. I am naming it as HomeController and using Empty MVC Controller as template.
image
4. Right Click on Models Folder and Add new Item. From the Data section add a new ADO.NET Entity Data Model.  I named it as ADWorks.edmx
image
5. Choose the AdventureWorks2012 database when prompted during new connection.   Choose Person.Person table when “Choose Your Database Objects and Settings” dialog appears in the Entity Data Model Wizard as shown in the figure.  After adding the model build the project once [Ctrl+Shift+B].
image
6. Open HomeController.cs file and Add Reference to your Models. Then create a new method to find the person.
private AdventureWorks2012Entities db = new AdventureWorks2012Entities();

        [HttpPost]
        public JsonResult Find(string prefixText)
        {
            var suggestedUsers = from x in db.People
                                 where x.LastName.StartsWith(prefixText)
                                 select new { id = x.BusinessEntityID, 
                                     value = x.LastName + “, ”+ x.FirstName, 
                                     firstname = x.FirstName, 
                                     lastname = x.LastName };
            var result = Json(suggestedUsers.Take(5).ToList());
            return result;
        }

In the above code we find all the users that match the text that is entered by the user and only return 5. One thing to note here is that the Value field is the one that is going to be displayed when the dropdown for all the possible values shows up. I pass in a anonymous object with all the possible properties that I want for additional stuff. Usually id is a unique identifier and value is something you want to display. Another thing is notice the HttpPost attribute somehow I tried with HttpGet and it doesn’t like because you have to set JsonRequestBehavior to allow GET.

7. Next Add Index.cshtml page to your View Folder and then add the Html.TextBox where we will enter Person’s LastName, inside Html.BeginForm() as shown in the code. 
    </p>
        Search the Person by typing in the LastName of the user.
    </p>
    <div>
        @using (Html.BeginForm())
        {  
            <p>
                @Html.TextBox("SearchString")
                <input type="submit" value="Search">
            </p>
        }
  </div>

8. Add @scripts.Render("~/bundles/jqueryui") to the _Layout.cshtml page as shown below.
image
9. Open Index.cshtml page and now we will add the Javascript code that will query our Find method of Step6 using ajax method of jQuery and autocomplete method of jQuery UI.  We will add the following script inside section called scripts that will place all this javascript code in place of @RenderSection(“scripts”,required: false) in our _layout.cshtml page. 
@section scripts{
    <script type="text/javascript">
        //Javascript function to provide AutoComplete and Intellisense feature for finding Users.
        $(document).ready(function () {
            $("#SearchString").autocomplete({
                source: function (request, response) {
                    $.ajax({
                        url: "/Home/Find",
                        data: "{ 'prefixText': '" + request.term + "' }",
                        dataType: "json",
                        type: "POST",
                        contentType: "application/json; charset=utf-8",
                        dataFilter: function (data) { return data; },
                        success: function (data) {
                            response($.map(data, function (item) {
                                 return {
                                    label: item.value,
                                    value: item.value,
                                    id: item.id,
                                    firstname: item.firstname,
                                    lastname: item.lastname
                                }
                            }))
                        },
                        error: function (XMLHttpRequest, textStatus, errorThrown) {
                            alert(textStatus);
                        }
                    });
                },
                minLength: 2,
                select: function (even, ui) {
                    window.location.href = '/Home/details/' + ui.item.id;
                    }
            });
        });
    </script>
}

In this step, we use autocomplete method of jQuery UI.  The nested function inside autocomplete takes two object request and response.  We take the response object and pass the text that was entered to the Find method of our controller using jQuery Ajax method. In the case of a success event we take the response object and grab the data and for each item return value, id, firstname and lastname.  On the user interface side we are only going to see the value property in the form of a dropdown list.  Once you select a particular object the select function or callback is triggered with even, ui parameters.  The ui parameter has all the properties that we returned from the success event of the ajax method.  In our select event, I want to redirect the user to a different page where you can see the details of the person.  I have included this in the sample code available on my github account.  Redirection is done by setting window.location.href to the url you wish.

Its time to spin this project in the browser so lets run and see what happens when we type a person’s lastname. 

image

10. Fix CSS. Notice the dropdown style is messed up.  Your marketing department and users would be frustrated.  Let’s fix that. Oh ! But you might say that there is CSS file already included for the autocomplete I see in the Content folder under themes/base right. Actually we forgot to include that in our _Layout.cshtml file. If you use any of the jQuery UI things then replace the existing Styles.Render line with the following. Because in the Bundles.Config file we already have created jQuery UI CSS Style Bundle. We just need to include it if we use it.
    @Styles.Render("/Content/themes/base/css", "~/Content/css")

Test it out if the CSS has changed or not. F5.

image

The full source code for this sample is available on github. In the next post we will check out some fun stuff with the help of Knockout.

Friday, November 1, 2013

Lessons learned in sending emails to users in a complex Asp.Net MVC application using MvcMailer

There are multiple ways to handle mailing in a .net application.  System.Net.Mail is a well known assembly we often use for sending simple email messages.  I am building a fairly complex website with couple of different workflows [nothing to do with Windows Workflow] into it.  In each workflow, the website could be sending multiple emails with different text.  I wanted something maintainable and flexible.  MvcMailer is a very good open source library by SM Sohan to send mails using Razor views.  Razor Views!! yes, I am already sold on this.  It also supports other view engines btw. There is a good documentation on the gitHub and it details all the scenarios.  It is so cool and has already been on Scott Hansleman’s blog.  If you want to pass in strongly typed view then you can check this stackoverflow answer by Darin Dimitrov. Again very cool.  I like the idea of strongly typing and I have no other choice due to sheer complexity of the web application.

I wanted to share some of the lessons I learned in sending multiple emails with different content to different types of users.  Some of the things here is not related to coding but is very important in keeping yourself organized.  I tend to work backwards focusing on what the user will see.  So I first start documenting an Email Template in word document and keep adding them as new ones pop-up.  And I follow most of the steps shown below.

1. Maintain a word document with Email Templates.

This is applicable only if you are building a fairly complex MVC application with different stake holders.  It is very important to get it reviewed by different people involved in the project.  Sometimes you might get the text wrong and may be the intent is not conveyed properly to the end user.  I am not perfect at English and I like to get it reviewed by someone.  I am going to share some tidbits of such a word document. 

Template Name – Send Email to Vendors for product pickup

TemplateId – ET0001

Description

The following email will be sent to all the recipients listed below after all the products requested ready for shipping. After all the requested products are packaged, an order is considered as ready for shipping.

Recipients

1. To the shipping vendor to notify about product pickup for shipping.

Subject

Order ready for pickup

Email Body

[Shipping Vendor’s Full Name],

Your next products order has been ready for pickup and you can come on and no later than [pickup date]

Products Ordered [List Dynamically Populated]

1. Gel

2. Shaving Cream

3. Toothbrush

If you have, any questions or concerns related to your order pickup please contact [contact email address].

[Signature]


The purpose of this type of word document is to make sure that all the content you put in front of the user is appropriate for its intended audience. Is the wording right? Is there any misleading information? Are we conveying our intent to the user in a clear and concise manner? All these and more questions need to be ironed out before you ship this feature.  Because later down the road it will be difficult when you have say 25 or 50 different Razor Views, ViewModels sending emails. Right now my application has not reached to that level of complexity but I do see it reaching it. All the text that is underlined in the Email Body will be replaced by strongly typed ViewModel.  The Email Body will closely resemble the Razor Views in the Web Application.  Once you know the structure of all the emails you can start coding Razor Views.  So again it reviewed or proof checked by Project manager or immediate supervisor.

2. Use Strongly Typed Views

After I have my text templates ready, I can directly copy them into the web application.  I scaffold my views as necessary using the Scaffold command.  From point 1 we can create our Strongly Typed View named ET001 [TemplateId].

@using WebsiteName.ViewModels

@model OrderPickupEmailViewModel

@Model.VendorFullName,

Your next products order has been ready for pickup and you can come on and no later than @Model.PickupDeadline

Products Ordered

<ul>

@foreach (var item in @Model.Products)
{
<li>@item</li> 
}
</ul>

If you have, any questions or concerns related to your order pickup please contact @Model.ContactInfo

@Model.Signature

3. Use ViewModels to pass information to Razor Views.

After I construct my Razor Views I know what Properties I should be adding to my ViewModel.  I then create my ViewModel named OrderPickupEmailViewModel see point 2.

public class OrderPickupEmailViewModel

{

public string ToAddress {get;set;}

public string Subject {get;set;}

public string VendorFullName{get;set;}

public DateTime PickupDeadline {get;set;}

public List<string> Products {get;set;}

public string ContactInfo {get;set;}

public string Signature {get;set;}

}

4.  Modify the Interface and Class to accept your custom ViewModels

After the ViewModels are ready I go and modify the interface IUserMailer.cs methods to use my CustomViewModels. 

public interface IUserMailer
{
MvcMailMessage OrderPickupConfirmation(OrderPickupViewModel ordp);
}
After that I modify the method inside UserMailer.cs created as a part of scaffolding.

public virtual MvcMailMessage OrderPickupConfirmation(OrderPickupViewModel ordp)
{
       ViewData = new ViewDataDictionary(ordp);
return Populate(x =>
{
x.Subject = ordp.Subject;
x.ViewName = "RequestSubmissionConfirmation";
x.To.Add(ordp.ToAddress);                });
}
Finally send the email in the respective controller.

[HttpPost]
public ActionResult SendEmail(OrderPickupViewModel model)
{
UserMailer.OrderPickupConfirmation(model).Send();
}
5. Keep common settings inside your web.config file just like MvcMailer stores smtp settings inside web.config file.  You can use web.config transforms to send emails to a redirectfolder and to end users when in production.  
If you are following any techniques or best practices to keep your self then please share in the comments below. I would like to know and get better.

Sunday, August 25, 2013

Quickly explore 159 samples of windows 8 SDK using PowerShell and touch on Surface Pro

I was looking sample source code on windows 8 and I found this collection of 159 windows 8 app samples in C#. You can also find windows 8 and 8.1 app samples in c#, vb.net, C++ and Javascript. Many windows 8 developers might be aware of it already but it becomes painful after some time to go and open each solution. However, I think most people only open a particular solution when the need arises. However, I wanted to explore all of them (159 of them), run, and see what all the different features Windows 8.1 and 8 SDK has. That way I am at least aware of the features and use them in my application whenever needed. The only problem is opening each of them through the explorer window and locate .sln file three layers deep. One more thing I am doing this all on a surface pro sitting while on a couch.

Part of my frustration with these samples was, first you have to download them samples (that’s ok), unblock them since they are downloaded from internet (fine by me), then navigate to the solution folder and open the .sln file (not good for 159 of them). There is a lot of context switching when I launch the application from Visual Studio and then the modern interface opens up another context switch. Now try to do this on a Windows 8 pro tables like the Surface Pro while sitting on your couch or lying in the bed. Too much hassle right, but I have figured out an easy way to overcome this problem.  My Answer to the problem is Powershell. I have attempted to solve this problem before(link) but it was not as elegant as this one is.
Check this powershell one-liner


I extracted windows8 samples to the folder C:\windows8samples. This one-liner first finds all the .sln files in the samples folders, then selects just the name and fullname property of the the .sln file, and then sorts them by name, and then shows you list of .sln files in a gridview window. If you are running windows 8 for viewing all the windows 8 samples, you have powershell v3. In PS v3, you can pass the object(s) you select from the gridview down to the on going pipeline. You can select a single object which what I have done here because I do not want to open multiple solutions. This is done by the –Outputmode single property. After selecting the object in the gridview interface you click ok and then I use invoke item command to open the file in the default program configured for the file.

Ok so what's simple in this as you might ask right. Copy this one-liner, create a powershell script named OpenVSSolutions.ps1, and create a shortcut on the desktop. Open the properties of the shortcut file and change the target field in the property window to this

C:\Windows\System32\WindowsPowerShell\v1.0\powershell.exe -WindowStyle Hidden -NonInteractive C:\Scripts\OpenVSSolutions.ps1


This will hide powershell window and present you gridview with all solutions and then you can select one solution and hit ok. It will open visual studio. Done. Then just run the application and explore. To ease surfing source code inside visual studio 2012 or 2013 is switch scroll to use map mode scrolling (now supported in VS2013 and productivity power tool for VS2012).

You can change icon of your script too to reflect something else than powershell icon. Mine looks like the following.

You can place the shortcut on the toolbar or pin it to start page.

Now that is simple and easy solution to browse all samples quickly using touch on a Surface Pro lying in the bed when you don’t want to sit at your desk.

This solution works for other purposes too. I have folder named C:\BadSourceCodes\ which contains ad-hoc solutions I create to quickly test a concept. Over a time the folder contains lots of solutions and finding them is also pain.  Instead I use above technique to open solutions.  I have couple of such folders with lots of Visual Studio solutions some contains samples from various books I have purchased over the years, my production source code library, badsourcecode library and others.  To make our experiment more generic lets change our one line of powershell to replace the hardcoded path with a $path variable.   Save the script file.

Now you can create multiple shortcuts for your folders and edit target property of each shortcut.
C:\Windows\System32\WindowsPowerShell\v1.0\powershell.exe -WindowStyle Hidden -NonInteractive C:\Scripts\OpenVSSolutions.ps1 “C:\BadSourceCode"

C:\Windows\System32\WindowsPowerShell\v1.0\powershell.exe -WindowStyle Hidden -NonInteractive C:\Scripts\OpenVSSolutions.ps1 “C:\Windows8Samples"

Pin different shortcuts to your taskbar and now you easily open any solution without having to navigate different folders, switch context and later forget what you were trying to do.

Bonus. Download samples of C#, Linq101 samples, windows 8 and others to create a shortcut menu like this.

This is my first attempt at creating gifs but if I click or double tap on any of the above shortcuts on my desktop then it displays a list of visual studio solutions and I can open any one of it.


Monday, April 15, 2013

Visual Studio Trick - Convert Find Box into Command Box

In this blog post, I am going to show you how you can easily accomplish certain tasks within Visual Studio using Visual Studio commands from the Find Box that is provided at the top[see image below]. The Find Box is not enabled by default to appear in the toolbar, as a result few developers know about it.  The trick is that Find Box can be converted into a command box when you place a greater than < symbol in it and execute Visual Studio commands.  When I found about this I was totally psyched.  To get started lets see if you have the Find Box in the toolbar above like me.  See the image below.

If not then here is how you can enable it.  By default this will not be enabled in a fresh install of visual studio.  First click on the Add or Remove Buttons option to enable it.  Then below the Find in Files option there is just a Find option as highlighted in red box.  Click in front of it to enable it.
Once you have enabled it you can use Ctrl+D to quickly search something.  Pretty cool right but we are not there just yet. In the Find Box put a > character then start typing like File.Open or Edit.Replace something like that.  Did you just see what happened!!!

Find Box has now become a command box.  It shows all Visual Studio commands which you can use to do certain tasks without leaving your keyboard.  You might be tempted to ask me, "So Mitul is there a shortcut to insert > sign into the Find [or sorry command] Box so I can directly start typing Visual Studio commands?".  Yes there is.  Ctrl + / and it will insert > sign in the Find Box to convert it into a command box.

"So how is this useful?" and "How is this going to save me time?"

In this case you have to constantly think which tasks you do most frequently with mouse in visual studio and you can perhaps find a command for that action.  Then you can take advantage of this feature to save time.  There are predefined aliases for some of these commands.

So one of my favorite uses of command box is to open up Pending Changes window and TFS SourceControl Explorer window.  Go ahead and try to find TFS SourceControl Explorer window from the Menu and see how much time it takes.  Or even from the Team Explorer because I don’t have it always opened in visual studio.

But Ctrl + / and type View.TfsSourceExplorer and hit enter. Its opens up TFS SourceControl Explorer window for you. Again for the PendingChanges window use TFSDynamicSlientCheckin.  Opens up Pending Changes and there you are.  It is very quick and easy.  It depends on person to person how they might find this feature useful.


Pretty cool feature and yet unexplored by many Visual Studio developers out there. Check it out yourself and enjoy the productivity.  And please don't forget to share how you use this command feature in Visual Studio in the comments below.


Sunday, April 7, 2013

How to do Ajax in Asp.Net MVC4 Application?

In this post, I am going to show you how to do Ajax in an Asp.net MVC4 Application using C#.  It is very easy to create a very simple Ajax demo up and running.  Here are few things you need in order to get basic Ajax demo running in your application.  The complete source code for this application is available on my gitHub account.

0. Create basic Asp.net MVC4 application using VS2012
1. You need an Ajax.ActionLink in one of your views
2. Public Method that will return a Partial View
3. PartialView with some content

Open Index.cshtml and remove all the content and paste Ajax.ActionLink as below.  Ajax.ActionLink has 12 overloads (msdn link) to do Ajax and all of them are very self explanatory.  In the code below, I am passing in the text to display as link text, the controller action to hit, and Ajax Options that’s it. 
We need a div whose content we wish to replace or the target location where we wish to replace the contents.
Then we need a public method inside our home controller that will return a partial view with some data in it.  You can pass data to the Partial View using a ViewBag.  As in our case I am using ViewBag.Tiffin variable to hold that data and retrieve inside Partial View. Next in our Partial View we retrieve it.
Hit F5 and click on the link to see what happens.  All of the text will be replaced if you created a default Asp.net MVC4 Internet application.  Because by default Asp.net Template for MVC4 Internet Application doesn’t load the Jquery Validation bundle to do Unobtrusive JavaScript.  Include this line @Scripts.Render("~/bundles/jqueryval") in your _layout.cshtml page and you are all good to go.  Run again and you should see the output.

You might be curious to ask why are you using a POST instead of GET inside Ajax.ActionLink? Because depending on which browser you are running it will cache the response and will not trigger an ajax request every time you wish to do Ajax.  To overcome this problem you can disable cache for just that method use GET in Ajax.ActionLink

I have recorded a screencast video to show upto this point. Check it out and if you have any feedback let me know.
Now moving on to some more stuff like how can we put animated gifs showing that something is running.  That is actually even more easy.  For this purpose we are going to use few more attributes of AjaxOptions object.  This object has some events like OnCompleted, OnBegin, OnSuccess, OnFailure and we will assign javascript functions to them.  So when we trigger a ajax request then OnBegin function we will load the gif and OnCompleted we will hide the image. 
What about passing Parameters? For this we will use another overloaded method of Ajax.ActionLink which will pass routeparameters to our public method.  We are going to change our public method and Ajax.ActionLink as shown in the code below.
Ok I get it but what about some HtmlAttributes?  Actually there is very easy you use another overload of Ajax.ActionLink and you can pass in an anonymous object with values to it.  There are different options you can consider for HtmlAttributes. And also what about jQuery mobile data-role attribtues? For jQuery data attributes you will have to use _ instead of - as shown below.  Alright but now I want to implement Async and Await into this mix how can I do that?  Hmmm. For this we will have to modify our public method inside our controller to return Task of type PartialViewResult.  That is pretty easy too.
Oh! But I am told to just use jQuery to do Ajax then you have be a little bit careful. Please check your jQuery version. If you have jQuery 1.7 then Ajax is done differently and jQuery 1.9 does little bit differently. I am using 1.9 for this demo. There is a difference where you detect start and success events. You attach these events to the document object (see upgrade guide).


What-If Error
Why Ajax is still not working out for me? Here are some very common issues which I ran into while learning Ajax in MVC4 application. 

1. Always debug using Internet Explorer.  If you run your application then Chrome will show you red error count only if you inspect the page but will happily show you the page.  Compare this to Internet Explorer it will give you Microsoft JavaScript Runtime Error.  Doing a quick StackOverflow search will give you most of the common problems’ solutions.

2. Check if you have loaded Jquery Validation bundle

3. Check if you are even loading jQuery or not. Actually this should be number 0.

4. Check if you are loading multiple versions of Jquery or validation, if yes then deletes older ones.

5. Open up fiddler to see what is going on. If I am working with web then I have fiddler open by default most of the times. And it has affected my debugging skills.

6. Put breakpoints as this is very basic debugging skill.

7. Try deleting packages for jQuery and delete related entry in packages.config and again install those packages using Nuget.

8.  The complete source code for this application and demo is at gitHub.  Check this link

Monday, April 1, 2013

Visual Studio Trick - Block Edit Code

I love Visual Studio 2012 and the improvements made in it.  You can check out my post on Visual Studio 2012 goes search first here.  However there are some features which are hidden and aren't much talked about.  And these features were there even before Visual Studio 2012.  My favorite one it how you can block edit your code using this trick.  I have always been a fan of this trick.  It has saved me a lot of typing.  Find and Replace is not always useful and quick.  I have recorded my first video demonstrating this trick which is embedded below.  

This trick can be very helpful when you have to edit a block of text at once.  You can select a block of text by pressing the Alt key and select a piece of code with your mouse. Once you have selected the text you can type or delete that piece of text.  You can also use your keyboard to select a block of code and edit.  Just press Shift + Alt + Down Arrow to select number of lines and keep Shift + Alt pressed and then press Right Arrow to select the number of characters in those lines and then simply edit.  Check out this video below.


Thursday, February 28, 2013

Web Deploy Check list for deploying website to IIS7 from Visual Studio and TFS

Web Deploy is one of the mechanisms to publish websites to IIS from Visual Studio.  You can utilize this mechanism to publish from Visual Studio, TFS or manually if you have existing website packaged as a zip file.  If you haven’t checked this gem of resources (Vishal Joshi's Blog) on web deploying and publishing then please do yourself a favor.  In this post I am going to talk about a checklist to make sure before you wish to publish site to IIS.  Here is the list:

  • Installed the latest Web Deploy on windows server (Check this IIS website).  
  • Web Management Service is started and running
  • Web Deployment Agent Service started and running
  • Created a website inside IIS and created application pool for it  
  • Given the user IIS Manager Permissions at the site level inside IIS
  • Configured website for Web Deploy publishing
  • Saved Web publish settings on a local desktop
  • Import Web publish settings from the local desktop from Visual Studio publish dialog
  • Publish url is over Https 
  • Checked connectivity to the site from the Visual Studio publish dialog 

Now before you jump on to the TFS side of things to publish, please make sure that you have done following things:

  • Team Foundation Server Build service account is added to IIS Manager Permission section for the website inside IIS
  • Able to publish successfully from visual studio using web deploy?
  • Check the MSBuild parameters for web deploy (I have provided what works for me below).
If you have some more checklist you have formed over the years then let me know I will add to this list.

What-If-Error
When you click publish from visual studio you will have to select a publish method and at that point select Web Deploy.  You have the option to import the profile you have created from that publish dialog.  This will pre-populate all the details.  You will have to provide the user name and password for the user who has the permission in IIS Manager Permissions as described in earlier.  At this point if you see any errors then this is a nice website where all the errors are listed.  I think you will see these errors only if you do some mistake while manually typing out the details in the publish dialog.  I haven’t found any issues if you import site details through import mechanism.

Here are TFS MSBuild parameters I use to publish a website from TFS to IIS7.

/p:DeployOnBuild=True
/p:DeployTarget=MsDeployPublish
/p:CreatePackageOnPublish=True
/p:MSDeployPublishMethod=WMSVC
/p:MSDeployServiceUrl=https://ServerName:8172/MSDeploy.axd /p:DeployIisAppPath="NameofWebsiteOnIISServer"
/p:AllowUntrustedCertificate=True
/p:UserName="domain\serviceaccount"
/p:Password="AwesomeSecurePassword"

If you are still unsuccessful in publishing the website from TFS Build then it could be that your TFS Build server is 2010 and you are using Visual Studio 2012 and it might be missing some binaries.  If you install Visual Studio 2012 on the build server then this issue could be resolved.

Friday, October 5, 2012

Visual Studio 2012 goes search first


Visual Studio 2012 is awesome and my favorite tool that I use daily.  The one thing that I like about VS2012 is how search is implemented more than before and its quick launch textbox on the top right corner.  In this post I want to highlight different places where search box is implemented and where you can  use a shortcut to highlight the box without using a mouse.  

Quick Launch with shortcut Ctrl+Q


In New Project dialog, search using shortcut Ctrl+E 

 Inside Solution Explorer, search for a particular file using shortcut Ctrl+;

      You can not only search for files but you can also search functions within files.  Absolutely magic, see the screenshot below where I searched details and it showed me where Details appeared.  Pretty Cool.

    Inside Team Explorer – Search work items using shortcut Ctrl+’

    Inside Reference Manager – Search using Ctrl+E.  Works for Package Manager dialog too.

        Inside Toolbox, search using well just click it.  Although I would love to have a shortcut to highlight that search box.

     Search Error List,

     Search a Class View

     Search in Code Analysis


If you find any place else a search box inside Visual Studio 2012 then let me know, I would be glad to include it in this post.