Friday, June 8, 2018

My Visual Studio 2019 Feature Wishlist

In this MSDN blog post, John Montgomery announced that the next version of Visual Studio is going to be 2019 and they have started planning for it. As I am very excited about this news, I couldn’t help myself from thinking about what features I would like to have in Visual Studio 2019. What could Microsoft add to VS that will make my job easier? So friends below is a list of features that are on my wish list.

1. Support for integrated terminal

Have you seen how snappy VS code is? It is light weight, fast and responsive. We need that kind of support for integrated terminal inside of Visual Studio 2019. The current option of right-clicking a node within Solution Explorer and clicking on open command prompt here is not ideal.

2. Auto Save

Alright, now you will say, “Mitul, you are saying copy all features from VS code and put in VS2019”. No. Not all the features but some things are really good in VS Code. I like auto save feature of VS Code and it just works. Can we have this in VS2019. Please…

3. Being able to easily add new files

When you hover in VS Code, you can see icons to add a new file, folder, refresh, and collapse all. This feature is very useful as it makes adding new files so much easier. I use Ctrl+F2 to invoke Add File Extension written by Mads Kristensen and this is one of my favorite extension but having this icon from VS code would be nice.

image

4. Command Window, Ctrl+Shift+P

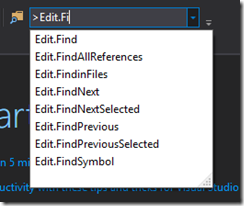
In VS code when you hit Ctrl+Shift+P, you will see a command window appear and you can execute any command from there.

image

In VS, things are scattered around for doing these type of things such as,

1. Ctrl+Q

image

2. Ctrl+D

image

3. Command window

image

Can we have command execution workflow like VS code. You should be able to type command in english language instead of remember edit.somecommand.

5. Auto Download Next VS Update

We all appreciate the fast release cadence of VS but the yellow notification icon when it pops up every few days, it annoys me. When I see it, I want to update it. And this is good but I don’t like waiting for download. So can we have a setting where we can specify, “Always download new updates and prompt for update when done”. Download should happen in the background when new updates are available. I wish one day we can have silent VS updates in the background just like Chrome. I know this will be lot of work but may be some day in future. VS2019 may be..

6. Multi-cursor support

I have seen in some roadmap of VS2017 that multi-cursor support is coming. If it is not then we need multi-cursor support in VS2019.

7. Debugging - Support for Dump()

What is this Dump() method? If you have used LINQPad, then you will be familiar with Dump() method. In LINQPad you can put . after anything and call Dump() method and it will display the entire object in a nice format. It is so much easier to quickly hack up a script and get going. Let me show you something. In the image below, I called Dump() in many places to inspect different values and in the Results panel below you can see after each iteration those values were printed. “But Mitul how would this work in VS?”, you might ask. So let’s say if .Dump() was available then we can have it display these values in the output window. I imagine you could have an extension method in the Diagnostics assembly and display in output window.

image

8. Make animations and actions feel lightweight

Alright, this is highly subjective and you should remember that this is my wish list, so you might not feel the same way. What makes VS code light weight or feel light weight? When moving document to left or right it feels fast. There aren’t many animations in VS code whereas shifting documents within VS to left or right feels heavy. It would also be nice if there was keyboard support for docking documents within VS to left right or to next screen.

That’s all I have for now. We don’t want to list 10 features just to please OCD gods.

So what do you think about these features? Please leave a comment below and if I think of other feature ideas I will blog them again.

Enjoy day dreaming!

My Build 2018 Experience

I hate backpacks. Keep reading to find out why. I know its been a month since Build 2018 and I am late in writing this post but I didn’t wanted to feel guilty for not writing about my wonderful experience at Build 2018. So here you go.

I have attended 3 Build conferences one in 2013, 2016 and 2018. And I felt this was the best Build. After attending each Build, I felt that, that particular conference was the best conference. In this post, I want to reflect upon my experience attending Build 2018 conference. I traveled with family this year and so it wasn’t that lonely in Seattle. For my first conference, I was so excited to attend that I paid conference ticket using personal expense. After receiving Surface Pro tablet, I didn’t felt that bad. Past two conferences were all paid for by my company so it was awesome.

There are 386 Build 2018 videos. The content quality from Build is top notch. Every session is recorded and available online for later viewing and downloading. They have the ability to live stream sessions directly on Channel9 website. The work required to organize such a conference is beyond my imagination and I am always blown away by the scale of the conference. This brings me to one of the issues with Build this year. It was difficult to know where everything was. The build app was helpful in finding things and the app was much better than previous years. I later came to know that there were hands-on labs. Next time, I would recommend to spend few minutes just getting familiarized with conference layout so it becomes easier to find and locate a session.

Keynote

Keynote this year was about inspiring and selling us a vision about AI, Azure innovations, and intelligent Edge (ahem Windows). When you are standing in line with thousands of developers to watch keynote, you realize how big this conference is. The keynote hall was big and there were at least 8 insane size screens in the hall. So no matter where you got a seat you could not miss anything (unless you were on your phone). Over the past few conferences, I have noticed that more and more cool stuff is getting announced not in keynote but during the sessions. I feel there should be two mini keynotes detailing some common things that everyone should know.

Sessions

Sessions were action packed with high production quality content. Some of the sessions I attended and watched online are listed at the end of this post.  All the sessions are recorded and available on Ch9 and YouTube. I prefer YouTube and I want to thank ch9 team for putting it on YouTube. Due to YouTube Red, I downloaded sessions and was watching them while waiting at the airport and in flight. Another benefit of YouTube is that it will suggest you more Build 2018 videos. And because I forget to watch videos, after few days, I see a suggestion and I watch it.

Another pro tip for watching sessions

1. Download Build 2018 videos using PowerShell script

2. Use VLC media player to watch and quickly search videos. You will have to paste this link to the podcasts section and all the videos will appear on the right.

During the conference, when I was tired and didn’t felt like attending session, I was able to watch sessions on my phone that were live streamed while crashing on couch in the expo area.

Expo area

The expo area this year was huge. You are standing and walking most of the time and if you are carrying laptop in your backpack then it will wear you out. And I was tired like crazy. So that’s the reason why I hated carrying backpack. 

I was blown away by the presence of so many product/framework specific booth from Microsoft and of course from vendors and partners. I had the most fun interacting with Program Managers, Product Owners, and Engineers from Microsoft. Everyone greeted me very nicely. Some even approached me while I was just staring at the display TV or some chart saying, “Are you just going to stare at TV or ask me questions?”. Some went to great lengths—whiteboarding solutions, showing actual live demos and clearing my doubts. I learnt a lot by asking questions and talking to people. I could feel the openness, inclusiveness, curiosity in the culture. I did not wanted to leave Build because of this reason.

Since my last two Build, I have been spending more of my time in Expo area. This is the biggest benefit of attending a conference. Otherwise, you can watch keynote and sessions online. If you do not like talking to people then also attending in person has many benefits. For example, you can take picture with some legends—Scott Hanselman, Carl Franklin and Richard Campbell. In addition to that, this year we were able to pat dogs, horse and cats. I am not kidding there was an area with wooden fencing where you could pat dogs, horse and cats.

image

image

Booths visited

Windows admin center, PowerShell and Console Team, Eye Tracking, Adaptive Cards UI, TFS And VSTS, Branching and Release Management, Containers Team, Build Recap, Git branching insights, MSIX, MongoDB, .NET Platform, AI - ML.NET, Azure Functions, ASP.NET, Azure Essentials Training, AI School, Xamarin Essentials, IOT, Windows XAML, WinForms, Azure Resource Manager, Bot framework, ASP.NET Core, Launch Darkly

Food at Build

Alright, I know what you are expecting about food. It must be great, this and that. Food at conferences is mostly a miss and sometimes hit. During Build registration, there was an option for selecting Indian Vegetarian food. I was very excited after seeing this option. For the first two days, I couldn’t find Indian Vegetarian. It was there but it was located at a place that I came to know the last day. So its my fault for not discovering it and also it should have been placed in a more convenient location.

Closing thoughts

One of the things I was interested in was getting feedback from developers, program managers or anyone who has experience in software development about my career and my resume. And Build is the place where you have thousands of developers and leaders with years of experience in the field. I was literally carrying copies of my resume and asking few people about their opinion. Sometimes I felt shy and not confident in approaching people asking questions while they were busy with other folks. Well I developed courage and asked few individuals and got valuable piece of advice. I wish and humbly request Microsoft to dedicate a section where there would be mentors from software industry giving you advice regarding your career. Simple.

Everyone may not be able to attend this conference due to various reasons, I feel very lucky to have attended this three times. It was an honor and privilege to attend Build. I am thankful to University of Michigan for sending me.

List of Sessions attended or watched online.

Friday, April 27, 2018

Azure DevOps Project brings DevOps to everyone

So Azure has this cool feature called DevOps Project right and in this post, I want to show you what it is and why it is cool. At the time of this writing, this feature is still in preview so hang on to your seatbelts. When you click on this, you will be presented with two options—start fresh with a new application or start with your application. You can select any language. Let’s select .NET.

image

After selecting .NET, you have to decide framework—ASP.NET or ASP.NET Core. Let’s select ASP.NET.

image

Next, select where you want to host this app—inside azure app service or inside virtual machine. Let’s select Web App.

image

Final step, provide details regarding app, azure subscription, app name etc. and then click Done.

image

So what does this do for us behind the scenes? After the resources are successfully created, you will see something like this. Let’s understand all the things it has created for us.

image

1. Visual Team Services Account

2. Git repository (source code)

3. Build definition (CI)

4. Release definition (CD)

5. App Service (hosted website on Azure)

6. Application Insights (logging and monitoring)

It did all these things. One more thing, it also checked in code, ran build definition, created a release and deployed website to app service. Let’s say thank you to folks who created this for us. If you do not know how to create this end-to-end pipeline then you can create a DevOps project like this and inspect how different pieces work together. Azure is great for learning and great for experimentation, even if you do not have a single app hosted on Azure for production. DevOps is something every developer should be able to do it.

Let me know in the comments, what do you think about this feature.  

Sunday, January 21, 2018

Control multiple servos using Raspberry Pi 2 Model B, PCA9685, Windows 10 IOT and C#

In this post, I will be showing you how to control servos using Raspberry Pi 2 model B, Windows 10 IOT, C#, PCA9685 and Visual Studio 2017.  This post assumes you have some experience running C# application on a remote device. I will not cover how you connect to Rpi2 via Visual Studio or anything related to deployment. There is also an accompanying youtube video I have created and you can find it here - https://youtu.be/gkWYirX8uHo.  For code and power point check links below.

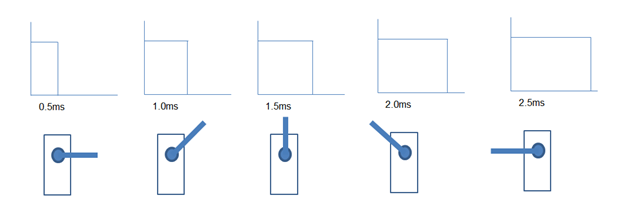
Servos motors typically turn 0 to 180 degrees. Some servos can go beyond 180 degree as well. The way you control servos is by providing a Pulse Width Modulation (PWM) signal. 
image


Raspberry Pi 2 has one hardware PWM pin and you can do software PWM via any of its GPIO pins.  If you want to control multiple servos then just one PWM hardware pin is not going to cut it and if you use GPIO pins and do PWM via software then you will not have enough GPIO pins for doing other work.  And PWM via software is also not that accurate. However, I am not too concerned about it for my project. 

So what are our options if we want to control multiple servos? Enter I2C protocol.  I2C is a protocol that enables master slave communication over SDA and SCL.  Via I2C you can have multiple devices (slaves) connect to our RPi2 (master) without taking up those GPIO pins. What does that mean? For example, if you see any sensor breakout boards that have I2C pins like SDA and SCL then you can connect multiple of those sensors directly to RPi2 via I2C. So we will use I2C pins of RPi2 to connect to PCA9685 chip which has 16 header pins that allow us to control up to 16 servos or 16 LEDs. With I2C and PCA9685 you can connect up to 62 PCA9685 boards and control up to 992 servos.

image

Let’s talk about PCA9685 and what it is.  The PCA9685 comes on a board typically if you buy from Adafruit or Amazon or any other retailer. I got mine from SunFounder via Amazon. The PCA9685 has 12-bit resolution. What does that mean? It means that it has a resolution of 2^12 = 4096. What does that mean? It means that for each period of your frequency you will have 4096 steps.  So let’s say your PWM frequency is 60Hz and 1/f is period T = 1/60s. T = 17ms. Now each 17ms is divided into 4096 steps. The time is taken per step is 17ms/4096=4.15us. If you want to give a pulse of 0.5ms then figure out how many steps are required.  Total Steps required for 0.5ms pulse = 0.5ms/4.15us = 120steps. Similarly you can find out steps required for 1ms,1.5ms,2ms,2.5ms. Below are the steps for these times.

0.0005 –> 120

0.0010 –> 240

0.0015 –> 361

0.0020 –> 481

0.0025 –> 602

How did I come up with these times and why do we need them? Typically servos turn 0 degrees if you provide a 0.5ms pulse, 1.0 for 60 degree pulse, 1.5ms for 90 degrees and 2.5ms for 180 degrees.  These are not accurate numbers and you find out these times for different servo motors. In our experiment we will fine tune our calculation so these turn servo exactly at a particular angle. Please see the section below where it says fine tuning our calculations so servo turn at our desired angle.

Now your next question is going to be how to turn servo at a specific angle other than 0,60,90 or 180.  In other words, if I want to turn servo at any random angle say 35 degrees, what is the number of steps we need to provide.

602-120 = 482 Total number of steps from 0 to 180 roughly.

480/180 = 2.7 Step per angle.

120 + 2.7x = Steps required to turn our servo at an angle x.

For 35 degrees,

120 + 2.7(35) = 214.5 Steps for 35 degrees.

Let’s summarize, to turn our servo at angle 35 degrees, we need to tell PCA9685 chip to turn the pulse HIGH for 214.5 steps and (4096-214.5) LOW.

image

Note: These calculations can change based upon your frequency and servo.  I am showing you this based upon Tower Pro SG90 micro servo motor at 60Hz frequency. Why 60Hz? Because this is a analog servo and analog servo you should have frequency ranging from 30Hz to 60Hz.

Since all the math is out of our way we can now focus other things.

1. Block diagram

In the block diagram, the things I haven’t shown are that Host PC and RPi2 are connected to their own keyboard, mouse and monitor.

image

2. Wiring diagram

The below image is from adafruit.com. Connecting multiple servos is pretty much straightforward.

raspberry_pi_ServoSketch

3. Coding

You are now really impatient to see the working code. Right. Every body seems to use Adafruit library provided in python.  The c# library from Adafruit i.e AdafruitClassLibrary available on nuget doesn’t work out of the box if you create a new UWP application in Visual Studio. Why? Because the it is just not updated and it has issues. So I copied Adafruit I2CBase.cs and PCA9685.cs classes and modified them so they will throw exceptions if anything goes wrong. The main page of the application has few textboxes and buttons to control servos.

You can find the source code at this github link.

Follow the steps to run the application.

1. Ensure that Platform is set to ARM and Build configuration to Debug

2. Start the Visual Studio debugger on RPi2. This you can start by the Device Portal under Debug menu.

3. Run the application and it will deploy to the device and the application will start. (For me debugging doesn’t work and a prompt appears and I close that prompt)

4. Once you have the application running you will see a UI as shown in the figure below.

5. Press InitPCA9685

6. Press 60 the Step 2 textbox and SetPWMFrequency

7. Then enter the desired angle for your servo say 30 degrees.

You can see some logging into the textblock as you are executing actions.

image

The line of code that actually sets the steps is actually very simple.

_pca9685.SetPin(0, ticks, false);
For 35 degree angle ticks are 214.5 ticks, the code sets the pin 0 (which is where the first servo is connected) to HIGH starting from 0th tick to 214.5 tick and turns it LOW from there on till 4095th tick.
4. Fine Tuning
If you have followed so far and found that servo horns do not go exactly from 0 to 180 then we will tackle it in this section. It either goes past 0 or beyond 180. So let’s try to fix it. 
a. Adjusting the lower and upper limit. 
Let’s Recap – Do you remember the values 120 and 602? I will wait. Go above and come back. Alright those are the only things that we need to alter. That will determine our angle equation. My values after adjustment are as follows: 
125 and 530
The resulting equation to calculate Ticks for a given angle is 
125+2.25*angle
Those two values are the biggest things.
b. Placing your servo horns
Placing your servo horns is important. The lower and upper bounds will be affected based upon how you place your servo horn. Normally I place servo horn after providing a zero pulse and mark the position. Sometimes the grove will not fit at the exact zero position. At this time you will have to modify the upper and lower tick values to fine tune that servo.  
c. Changing PWM frequency
All of our calculations were based upon 60Hz frequency. If you change this frequency then you will have to change recalculate everything again and do your tuning accordingly. 
Notes:
1. The angle of your servo will also depend on how you are mounting your servo horn. I would pulse the servo to zero’s position and then place the servo horn and fine tune the steps.
2. At some steps you will hear the servo is getting stuck. This is due to servo is not in the desired position. Adjust the tick plus or minus one and you will see that it doesn’t occur. This is where we need to tune our calculations. This is a trial and error process. 
3. Somehow I cannot debug the application while running using Visual Studio 2017. Hence I had to create UWP UI application with textboxes and buttons. You will need a monitor, keyboard, mouse connected to Rpi2 to enter the angle and visualize what is happening. 
4. If you would like to know all the components used in this then please refer the environment section.
Resources:
Below are the resources I have found to be useful while learning this process. 
1.  Adafruit Raspberry pi servo driver
2.  Sunfounder wiki
3.  PCA9685 datasheet
4.  AdafruitClassLibrary
5.  Full source code available here
6.  PowerPoint Slides
7.  YouTube Video Link

Environment

1. Windows IOT – 10.0.16299.125
2. Raspberry PI 2 Model B
3. Visual Studio 2017 Update 15.5
4. Power Supply for Raspberry PI 5V 2.1A
5. PCA9685 supplier (SunFounder)
6. Breadboard
7. Jumper wires
8. 5V Power Supply for PCA9685 (Eventtek Power Supply 0-30V 0-5A)
9. Host Computer OS (Windows 10)
10. Micro Servos (Tower Pro Micro Servo SG90)

Wednesday, December 6, 2017

Real Time monitoring Windows Event Logs using Reactive Extensions

In this post, I want to demonstrate how I have used Reactive Extensions to monitor Windows Event Log entries as they get added to Event Logs by a specific provider.  The main piece that enables us to do this is Tx.All a single nuget package that exposes event log events as observables using Reactive Extensions. I will create two console projects, one for monitoring event logs and another to generate Event Logs.   

Part 1 – Monitoring Console App

Create a blank .NET console project (do not select .NET core).  Then Install Tx.All Nuget Package and your packages.config file should look as shown below.


<?xml version="1.0" encoding="utf-8"?>
<packages>
  <package id="System.Reactive" version="3.1.1" targetFramework="net47" />
  <package id="System.Reactive.Core" version="3.1.1" targetFramework="net47" />
  <package id="System.Reactive.Interfaces" version="3.1.1" targetFramework="net47" />
  <package id="System.Reactive.Linq" version="3.1.1" targetFramework="net47" />
  <package id="System.Reactive.PlatformServices" version="3.1.1" targetFramework="net47" />
  <package id="System.Reactive.Windows.Threading" version="3.1.1" targetFramework="net47" />
  <package id="Tx.All" version="2.1.1" targetFramework="net47" />
  <package id="Tx.Core" version="2.1.1" targetFramework="net47" />
  <package id="Tx.SqlServer" version="2.1.1" targetFramework="net47" />
  <package id="Tx.Windows" version="2.1.1" targetFramework="net47" />
  <package id="Tx.Windows.TypeGeneration" version="2.1.1" targetFramework="net47" />
</packages>

Then use the following code to query specific provider inside Event Log. We are interested into Application event logs and our provider is ConsoleEventLogGenerator.

using System;
using System.Collections.Generic;
using System.Diagnostics.Eventing.Reader;
using System.Linq;
using System.Reactive.Linq;
using System.Text;
using System.Threading.Tasks;
using Tx.Windows;

namespace ConsoleMonitor
{
    class Program
    {
        static void Main(string[] args)
        {
            IObservable<EventRecord> evtx = EvtxObservable.FromLog("Application");
            IDisposable d = evtx.Where(y => y.ProviderName == "ConsoleEventLogGenerator").Subscribe(e => {
                Console.WriteLine(e.FormatDescription());
            });

            Console.WriteLine("Waiting for Event Log entry for provider - \"ConsoleEventLogGenerator\"");
            Console.Read();
        }
    }
}

Now we will create another console project to create event in the Event Log. 

Part 2 – Create another Console Project.

In the following code we are creating lots of events log entries and our source is ConsoleEventLogGenerator. This string has to match the string shown in the earlier section.

using System;
using System.Collections.Generic;
using System.Diagnostics;
using System.Linq;
using System.Text;
using System.Threading;
using System.Threading.Tasks;

namespace ConsoleEventLogGenerator
{
    class Program
    {
        static void Main(string[] args)
        {
            EventLog log = new EventLog("Application");
            log.Source = "ConsoleEventLogGenerator";

            for (int i = 0; i < 100; i++)
            {
                Thread.Sleep(1000);
                log.WriteEntry("test " + i);
            }
        }
    }
}

In the next section you will fire up both the application side by side and you will see events showing up in real time.

image

I have created a simple console app like this to monitor event log when I am debugging a certain application that writes everything to event log.  Seeing output in real time helps a lot in debugging.

Sunday, December 3, 2017

Why I don’t see any data disk attached inside my Azure Virtual Machine?

In Azure, you can attach multiple data disks to your virtual machine based upon the type of virtual machine size you select. These can be standard disks or premium disks.  If you attach a data disk then they won’t magically show up in the file explorer. You will have to initialize a new data disk and create a volume from the server manager if you are on windows server operating systems. From Azure I have added 500GB data disk. In the below screenshot the highlighted disk is the one we want to initialize.

image

If you open disk management, then it will ask you to initialize the disk.

image

Click Ok.

You can now just right click disk that you created and create a New Simple Volume.

image

Now you know the game right, just keep clicking next until you want to change a setting and you are done.

image

image

image

image

image

After you follow the prompts you can open file explorer and see that a new drive is available.

image

You can do the same thing without opening Disk Management. This can be done from Server Manager window itself the wizard is bit nicer looking.  Have fun with your data disks. 

Wednesday, November 29, 2017

Iometer is how you measure IOPS

Every time I saw IOPS in Azure I always thought that what the heck is this. I understood the concept but never gave a hard look at it. The developer in me just glanced over it and just selected a VM size that felt good enough.

image 

The issue becomes when you have to evaluate virtual machine size that is ideal for your workload so you don’t blow up your budget by selecting larger VMs or have performance issues with applications by selecting smaller VMs.

So one of the parameters you will have to consider is IOPS, i.e. I/O per sec for disk and network.  While you can monitor for performance counters it is not the most intuitive way. Iometer is a free tool which you can use to measure these metrics and do some benchmarking.  If you have existing VMs you can use this tool and figure out which VM size in Azure you might need.

In the below screen shot I am trying to measure performance of my regular drive.

clip_image001 

And in the next test I am measure performance of my SSD drive.  You can see the difference between two drives. SSDs are faster.

clip_image001[4]

Please share you tips and tricks or article regarding measuring and benchmarking for IOPs performance.