Friday, November 15, 2013

Implement Autocomplete using Jquery UI inside Asp.NET MVC4 application

I think the title explains what I am going to accomplish in this blogpost.  I assume you have AdventureWorks2012 database, visual studio 2012 installed. So let’s get started.
1. Open Visual Studio 2012/2013. I am using VS2012 for this demo.
2. Create an Asp.Net MVC 4 Application and Click on basic application for this demo.
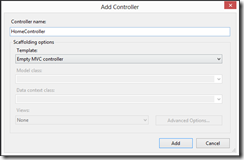
3. Add a new controller to your project. I am naming it as HomeController and using Empty MVC Controller as template.
image
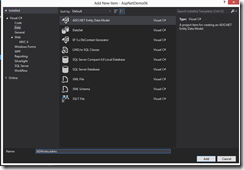
4. Right Click on Models Folder and Add new Item. From the Data section add a new ADO.NET Entity Data Model.  I named it as ADWorks.edmx
image
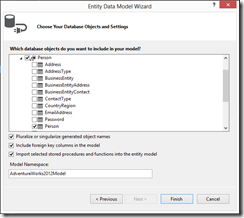
5. Choose the AdventureWorks2012 database when prompted during new connection.   Choose Person.Person table when “Choose Your Database Objects and Settings” dialog appears in the Entity Data Model Wizard as shown in the figure.  After adding the model build the project once [Ctrl+Shift+B].
image
6. Open HomeController.cs file and Add Reference to your Models. Then create a new method to find the person.
private AdventureWorks2012Entities db = new AdventureWorks2012Entities();

        [HttpPost]
        public JsonResult Find(string prefixText)
        {
            var suggestedUsers = from x in db.People
                                 where x.LastName.StartsWith(prefixText)
                                 select new { id = x.BusinessEntityID, 
                                     value = x.LastName + “, ”+ x.FirstName, 
                                     firstname = x.FirstName, 
                                     lastname = x.LastName };
            var result = Json(suggestedUsers.Take(5).ToList());
            return result;
        }

In the above code we find all the users that match the text that is entered by the user and only return 5. One thing to note here is that the Value field is the one that is going to be displayed when the dropdown for all the possible values shows up. I pass in a anonymous object with all the possible properties that I want for additional stuff. Usually id is a unique identifier and value is something you want to display. Another thing is notice the HttpPost attribute somehow I tried with HttpGet and it doesn’t like because you have to set JsonRequestBehavior to allow GET.

7. Next Add Index.cshtml page to your View Folder and then add the Html.TextBox where we will enter Person’s LastName, inside Html.BeginForm() as shown in the code. 
    </p>
        Search the Person by typing in the LastName of the user.
    </p>
    <div>
        @using (Html.BeginForm())
        {  
            <p>
                @Html.TextBox("SearchString")
                <input type="submit" value="Search">
            </p>
        }
  </div>

8. Add @scripts.Render("~/bundles/jqueryui") to the _Layout.cshtml page as shown below.
image
9. Open Index.cshtml page and now we will add the Javascript code that will query our Find method of Step6 using ajax method of jQuery and autocomplete method of jQuery UI.  We will add the following script inside section called scripts that will place all this javascript code in place of @RenderSection(“scripts”,required: false) in our _layout.cshtml page. 
@section scripts{
    <script type="text/javascript">
        //Javascript function to provide AutoComplete and Intellisense feature for finding Users.
        $(document).ready(function () {
            $("#SearchString").autocomplete({
                source: function (request, response) {
                    $.ajax({
                        url: "/Home/Find",
                        data: "{ 'prefixText': '" + request.term + "' }",
                        dataType: "json",
                        type: "POST",
                        contentType: "application/json; charset=utf-8",
                        dataFilter: function (data) { return data; },
                        success: function (data) {
                            response($.map(data, function (item) {
                                 return {
                                    label: item.value,
                                    value: item.value,
                                    id: item.id,
                                    firstname: item.firstname,
                                    lastname: item.lastname
                                }
                            }))
                        },
                        error: function (XMLHttpRequest, textStatus, errorThrown) {
                            alert(textStatus);
                        }
                    });
                },
                minLength: 2,
                select: function (even, ui) {
                    window.location.href = '/Home/details/' + ui.item.id;
                    }
            });
        });
    </script>
}

In this step, we use autocomplete method of jQuery UI.  The nested function inside autocomplete takes two object request and response.  We take the response object and pass the text that was entered to the Find method of our controller using jQuery Ajax method. In the case of a success event we take the response object and grab the data and for each item return value, id, firstname and lastname.  On the user interface side we are only going to see the value property in the form of a dropdown list.  Once you select a particular object the select function or callback is triggered with even, ui parameters.  The ui parameter has all the properties that we returned from the success event of the ajax method.  In our select event, I want to redirect the user to a different page where you can see the details of the person.  I have included this in the sample code available on my github account.  Redirection is done by setting window.location.href to the url you wish.

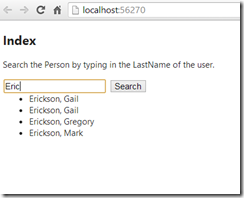
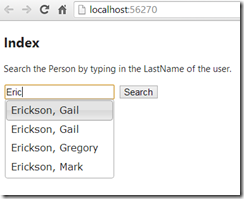
Its time to spin this project in the browser so lets run and see what happens when we type a person’s lastname. 
image

10. Fix CSS. Notice the dropdown style is messed up.  Your marketing department and users would be frustrated.  Let’s fix that. Oh ! But you might say that there is CSS file already included for the autocomplete I see in the Content folder under themes/base right. Actually we forgot to include that in our _Layout.cshtml file. If you use any of the jQuery UI things then replace the existing Styles.Render line with the following. Because in the Bundles.Config file we already have created jQuery UI CSS Style Bundle. We just need to include it if we use it.
    @Styles.Render("/Content/themes/base/css", "~/Content/css")

Test it out if the CSS has changed or not. F5.
image

The full source code for this sample is available on github. In the next post we will check out some fun stuff with the help of Knockout.

Friday, November 1, 2013

Lessons learned in sending emails to users in a complex Asp.Net MVC application using MvcMailer

There are multiple ways to handle mailing in a .net application.  System.Net.Mail is a well known assembly we often use for sending simple email messages.  I am building a fairly complex website with couple of different workflows [nothing to do with Windows Workflow] into it.  In each workflow, the website could be sending multiple emails with different text.  I wanted something maintainable and flexible.  MvcMailer is a very good open source library by SM Sohan to send mails using Razor views.  Razor Views!! yes, I am already sold on this.  It also supports other view engines btw. There is a good documentation on the gitHub and it details all the scenarios.  It is so cool and has already been on Scott Hansleman’s blog.  If you want to pass in strongly typed view then you can check this stackoverflow answer by Darin Dimitrov. Again very cool.  I like the idea of strongly typing and I have no other choice due to sheer complexity of the web application.

I wanted to share some of the lessons I learned in sending multiple emails with different content to different types of users.  Some of the things here is not related to coding but is very important in keeping yourself organized.  I tend to work backwards focusing on what the user will see.  So I first start documenting an Email Template in word document and keep adding them as new ones pop-up.  And I follow most of the steps shown below.

1. Maintain a word document with Email Templates.

This is applicable only if you are building a fairly complex MVC application with different stake holders.  It is very important to get it reviewed by different people involved in the project.  Sometimes you might get the text wrong and may be the intent is not conveyed properly to the end user.  I am not perfect at English and I like to get it reviewed by someone.  I am going to share some tidbits of such a word document. 

Template Name – Send Email to Vendors for product pickup

TemplateId – ET0001

Description

The following email will be sent to all the recipients listed below after all the products requested ready for shipping. After all the requested products are packaged, an order is considered as ready for shipping.

Recipients

1. To the shipping vendor to notify about product pickup for shipping.

Subject

Order ready for pickup

Email Body

[Shipping Vendor’s Full Name],

Your next products order has been ready for pickup and you can come on and no later than [pickup date]

Products Ordered [List Dynamically Populated]

1. Gel

2. Shaving Cream

3. Toothbrush

If you have, any questions or concerns related to your order pickup please contact [contact email address].

[Signature]


The purpose of this type of word document is to make sure that all the content you put in front of the user is appropriate for its intended audience. Is the wording right? Is there any misleading information? Are we conveying our intent to the user in a clear and concise manner? All these and more questions need to be ironed out before you ship this feature.  Because later down the road it will be difficult when you have say 25 or 50 different Razor Views, ViewModels sending emails. Right now my application has not reached to that level of complexity but I do see it reaching it. All the text that is underlined in the Email Body will be replaced by strongly typed ViewModel.  The Email Body will closely resemble the Razor Views in the Web Application.  Once you know the structure of all the emails you can start coding Razor Views.  So again it reviewed or proof checked by Project manager or immediate supervisor.

2. Use Strongly Typed Views

After I have my text templates ready, I can directly copy them into the web application.  I scaffold my views as necessary using the Scaffold command.  From point 1 we can create our Strongly Typed View named ET001 [TemplateId].

@using WebsiteName.ViewModels

@model OrderPickupEmailViewModel

@Model.VendorFullName,

Your next products order has been ready for pickup and you can come on and no later than @Model.PickupDeadline

Products Ordered

<ul>

@foreach (var item in @Model.Products)
{
<li>@item</li> 
}
</ul>

If you have, any questions or concerns related to your order pickup please contact @Model.ContactInfo

@Model.Signature

3. Use ViewModels to pass information to Razor Views.

After I construct my Razor Views I know what Properties I should be adding to my ViewModel.  I then create my ViewModel named OrderPickupEmailViewModel see point 2.

public class OrderPickupEmailViewModel

{

public string ToAddress {get;set;}

public string Subject {get;set;}

public string VendorFullName{get;set;}

public DateTime PickupDeadline {get;set;}

public List<string> Products {get;set;}

public string ContactInfo {get;set;}

public string Signature {get;set;}

}

4.  Modify the Interface and Class to accept your custom ViewModels

After the ViewModels are ready I go and modify the interface IUserMailer.cs methods to use my CustomViewModels. 

public interface IUserMailer
{
MvcMailMessage OrderPickupConfirmation(OrderPickupViewModel ordp);
}
After that I modify the method inside UserMailer.cs created as a part of scaffolding.

public virtual MvcMailMessage OrderPickupConfirmation(OrderPickupViewModel ordp)
{
       ViewData = new ViewDataDictionary(ordp);
return Populate(x =>
{
x.Subject = ordp.Subject;
x.ViewName = "RequestSubmissionConfirmation";
x.To.Add(ordp.ToAddress);                });
}
Finally send the email in the respective controller.

[HttpPost]
public ActionResult SendEmail(OrderPickupViewModel model)
{
UserMailer.OrderPickupConfirmation(model).Send();
}
5. Keep common settings inside your web.config file just like MvcMailer stores smtp settings inside web.config file.  You can use web.config transforms to send emails to a redirectfolder and to end users when in production.  
If you are following any techniques or best practices to keep your self then please share in the comments below. I would like to know and get better.

Tuesday, October 15, 2013

How to render grouped entities using strongly typed View in Asp.NET MVC?

In this post, we are going to learn how to show grouped entities using strongly typed Asp.net MVC View, for example, show all the products by subcategories as shown in the figure below. The first column shows the SubCategories and other columns show products. Another thing to notice is SubCategory’s Name property isn't populated more than once.  The style for just that row is colored and all other rows have background color as white.
image
I am using AdventureWorks2012 sample database for this example. I assume you know certain basics of Asp.Net MVC applications, little bit of LINQ and EntityFramework.  I am using database first approach with EntityFramework. 
  1. Create a basic Asp.net MVC4 Application. I am naming it as AspNetAjaxSamples101.  
  2. Add new empty Controller named HomeController
  3. Add a new ADO.NET Entity Data Model to your application.
  4. Open your HomeController and add following lines to your Index method.
We are passing the View an Object of type IEnumerable<IGrouping<string,AspNetAjaxSamples101.Models.Product>>. Add a new empty view to by right clicking on the View(ProductsBySubCategories.ToList()).
Copy the following code into your Index.cshtml page. Something about the code. Our view is a strongly typed view of type IEnumerable<IGrouping<string,AspNetAjaxSamples101.Models.Product>> that you can see on the top. Next piece of the puzzle is inside the tbody tag of table. First we do a foreach loop and get the group item then we iterate through each group item i.e. Product and show product details using for loop not foreach. The reason we use for loop is we want to know which row we are rendering. If it is the first row which we determine using the if statement then render SubCategory name using item.Key.ToString(). And if it is not the first row then skip the first td cell of the row and don’t show anything. Final piece in this project is styling. In the Site.css file add following style. In Index.cshtml page, inside second for loop if the i==0 then we assign class trsubheader to the row element of the table. So there you have it.

Thursday, September 19, 2013

Use Processmonitor to debug command line syntax passed through PowerShell

If you are trying to find out why a certain formatted command within PowerShell is not working then I strongly recommend using ProcessMonitor tool from SysInternals suite of tools.  When you initially fire up the ProcessMonitor then it will show you lots of information and it can be overwhelming. 
image_thumb[1]
So there is a powerful filtering functionality built into the utility.  Click on the filter tab and click on filter.
image_thumb[3]
Then on the filter section add two filters as shown in the figure below.
image_thumb[7]
The first filter is Path is “C:\Program Files\7-zip\7z.exe” and second one is Operation is “Load Image”.  After applying the filter and running my PowerShell script I can narrow down my desired line.
image_thumb[9]
So if next time any command line utility is behaving weird then debug using ProcessMonitor.

Tuesday, September 17, 2013

Use PowerShell variables after escaping parsing in PowerShell v3.0

Recently I answered a question on StackOverflow related to passing parameters inside a PowerShell script to command line utility 7z.exe for unzipping zip files.  In the process of debugging the issue, I tried different options and learned few tricks in working with PowerShell and debugging issues. In this post, I am going to talk about how to pass powershell variables after you use the stop parsing --% trick.

Did you knew that you can tell PowerShell to stop parsing command?
In PowerShell V3, there is a neat trick you can use to tell it to stop parsing anything after typing --%. All you have to do is use --% after your command say & 7z.exe and PowerShell will directly pass the string after the --% to the command line utility. Check out below help snippet about parsing easily found by typing PS>C:\help about_parsing
STOP PARSING:  --%
    The stop-parsing symbol (--%), introduced in Windows PowerShell 3.0,
    directs Windows PowerShell to refrain from interpreting input as
    Windows PowerShell commands or expressions.
 
    When calling an executable program in Windows PowerShell, place the
    stop-parsing symbol before the program arguments. This technique is
    much easier than using escape characters to prevent misinterpretation.
So in the following example you don't have to include those parameters after --% in double or single quotes and do voodoo magic to figure out which one works.


But there is one problem with this approach, if you want to use PowerShell variables after the --% it won’t work. To solve this issue, you have to create a variable and initialize its value to --% and pass everything after it in variable(s). In the example below, I am using $stopparser variable with value --%. Finally I am passing everything using variables so PowerShell first evaluates the variables and then ignores parsing while executing the actual command. Isn't it magic.  I love PowerShell. If you know some neat trick about PowerShell then share in the comments section.

Sunday, August 25, 2013

Quickly explore 159 samples of windows 8 SDK using PowerShell and touch on Surface Pro

I was looking sample source code on windows 8 and I found this collection of 159 windows 8 app samples in C#. You can also find windows 8 and 8.1 app samples in c#, vb.net, C++ and Javascript. Many windows 8 developers might be aware of it already but it becomes painful after some time to go and open each solution. However, I think most people only open a particular solution when the need arises. However, I wanted to explore all of them (159 of them), run, and see what all the different features Windows 8.1 and 8 SDK has. That way I am at least aware of the features and use them in my application whenever needed. The only problem is opening each of them through the explorer window and locate .sln file three layers deep. One more thing I am doing this all on a surface pro sitting while on a couch.

Part of my frustration with these samples was, first you have to download them samples (that’s ok), unblock them since they are downloaded from internet (fine by me), then navigate to the solution folder and open the .sln file (not good for 159 of them). There is a lot of context switching when I launch the application from Visual Studio and then the modern interface opens up another context switch. Now try to do this on a Windows 8 pro tables like the Surface Pro while sitting on your couch or lying in the bed. Too much hassle right, but I have figured out an easy way to overcome this problem.  My Answer to the problem is Powershell. I have attempted to solve this problem before(link) but it was not as elegant as this one is.
Check this powershell one-liner


I extracted windows8 samples to the folder C:\windows8samples. This one-liner first finds all the .sln files in the samples folders, then selects just the name and fullname property of the the .sln file, and then sorts them by name, and then shows you list of .sln files in a gridview window. If you are running windows 8 for viewing all the windows 8 samples, you have powershell v3. In PS v3, you can pass the object(s) you select from the gridview down to the on going pipeline. You can select a single object which what I have done here because I do not want to open multiple solutions. This is done by the –Outputmode single property. After selecting the object in the gridview interface you click ok and then I use invoke item command to open the file in the default program configured for the file.

Ok so what's simple in this as you might ask right. Copy this one-liner, create a powershell script named OpenVSSolutions.ps1, and create a shortcut on the desktop. Open the properties of the shortcut file and change the target field in the property window to this

C:\Windows\System32\WindowsPowerShell\v1.0\powershell.exe -WindowStyle Hidden -NonInteractive C:\Scripts\OpenVSSolutions.ps1


This will hide powershell window and present you gridview with all solutions and then you can select one solution and hit ok. It will open visual studio. Done. Then just run the application and explore. To ease surfing source code inside visual studio 2012 or 2013 is switch scroll to use map mode scrolling (now supported in VS2013 and productivity power tool for VS2012).

You can change icon of your script too to reflect something else than powershell icon. Mine looks like the following.

You can place the shortcut on the toolbar or pin it to start page.

Now that is simple and easy solution to browse all samples quickly using touch on a Surface Pro lying in the bed when you don’t want to sit at your desk.

This solution works for other purposes too. I have folder named C:\BadSourceCodes\ which contains ad-hoc solutions I create to quickly test a concept. Over a time the folder contains lots of solutions and finding them is also pain.  Instead I use above technique to open solutions.  I have couple of such folders with lots of Visual Studio solutions some contains samples from various books I have purchased over the years, my production source code library, badsourcecode library and others.  To make our experiment more generic lets change our one line of powershell to replace the hardcoded path with a $path variable.   Save the script file.

Now you can create multiple shortcuts for your folders and edit target property of each shortcut.
C:\Windows\System32\WindowsPowerShell\v1.0\powershell.exe -WindowStyle Hidden -NonInteractive C:\Scripts\OpenVSSolutions.ps1 “C:\BadSourceCode"

C:\Windows\System32\WindowsPowerShell\v1.0\powershell.exe -WindowStyle Hidden -NonInteractive C:\Scripts\OpenVSSolutions.ps1 “C:\Windows8Samples"

Pin different shortcuts to your taskbar and now you easily open any solution without having to navigate different folders, switch context and later forget what you were trying to do.

Bonus. Download samples of C#, Linq101 samples, windows 8 and others to create a shortcut menu like this.

This is my first attempt at creating gifs but if I click or double tap on any of the above shortcuts on my desktop then it displays a list of visual studio solutions and I can open any one of it.


Wednesday, June 5, 2013

Low cost method for organizing electronics components

So there is one problem you will have to deal with when you are beginning to work with electronics projects and that is organizing these tiny components like resistors, capacitors, diodes, transistors, etc.  There are different suggestions as this stackexchange question highlights. I ended by putting all these small components into tiny zip lock bags. The ones available in the grocery section of a super store will not work because they are little bit big.  I bought those pill bags found in the pharmacy section.  They look like this.
 You can put a strip of resistances say 1M ohms in one bag and use permanent marker to label it.
 Then I arranged ones with values like 10ohms, 100ohms, 150 ohms, 1k and so on in one big zip lock bag.

Yeah it is little bit hassle taking them out and putting back in.  In that case you might want to try those compartment boxes that you take along with you for fishing. They have adjustable dividers and you can put them in those.  In fact in the future that is way I am going to organize them.  I have one carry-on box with three decks in which I just dump all these zip lock bags and if I needed to carry entire box then I can do it.